52nd Osho Match Game 4
[Black "Habu Yoshiharu, Challenger"]
[White "Sato Yasumitsu, Osho"]
[Event "52nd Osho-sen, Game 4"]
[Date "February 12th and 13th 2003"]
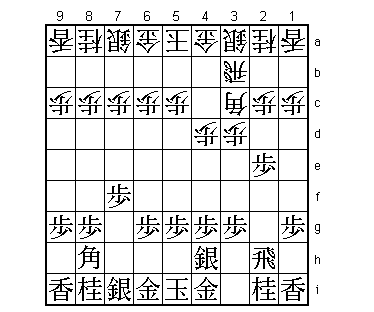
1.P2g-2f 00:00:00 00:00:00
2.P3c-3d 00:00:00 00:05:00
3.P7g-7f 00:03:00 00:05:00
4.P4c-4d 00:03:00 00:06:00
5.P2f-2e 00:05:00 00:06:00
6.B2b-3c 00:05:00 00:06:00
7.S3i-4h 00:10:00 00:06:00
8.R8b-3b 00:10:00 00:09:00
Despite being 3-0 down in the match, Sato has taken command of the
opening in each of the games. In game one the new move N*5e in the
R8e-Yokofudori, in game 2 the new idea of pushing the edge pawn early
in the Gokigen-Nakabisha and in game 3 B*6d in the reclining silver
variation of the Kakugawari. This time he plays the 3rd file rook, the
same opening that he started last year's Osho match with. Winning with
this opening could give him the same mental boost that resulted in
taking the Osho title from Habu. Sato really needs something special
with a match score as it is.
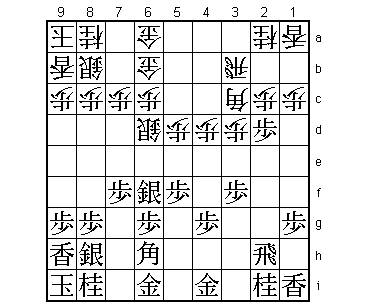
9.K5i-6h 00:14:00 00:09:00
10.S3a-4b 00:14:00 00:10:00
11.K6h-7h 00:15:00 00:10:00
12.K5a-6b 00:15:00 00:11:00
13.P5g-5f 00:39:00 00:11:00
14.K6b-7b 00:39:00 00:20:00
15.B8h-7g 00:54:00 00:20:00
16.P5c-5d 00:54:00 00:27:00
17.K7h-8h 00:58:00 00:27:00
18.K7b-8b 00:58:00 00:30:00
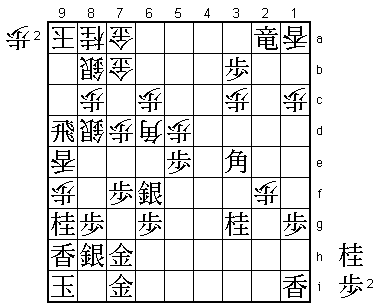
19.L9i-9h 01:14:00 00:30:00
20.S4b-5c 01:14:00 00:34:00
21.S4h-5g 01:15:00 00:34:00
22.L9a-9b 01:15:00 00:39:00
The Furibisha-anaguma. Not an opening that is often played by top
professionals, but Habu will not have been too surprised. It is the
same opening that Sato played 10 days earlier in the first group of
the Ryu-O ranking tournament against Minami (Sato won that game).
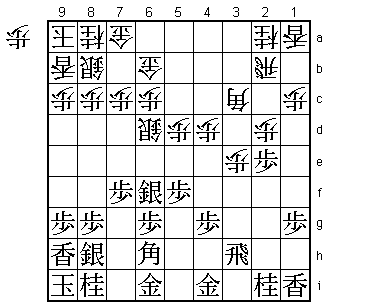
23.K8h-9i 01:17:00 00:39:00
24.K8b-9a 01:17:00 00:39:00
25.S7i-8h 01:17:00 00:39:00
26.S7a-8b 01:17:00 00:39:00
27.S5g-6f 01:38:00 00:39:00
28.S5c-6d 01:38:00 00:43:00
29.B7g-6h 01:38:00 00:43:00
30.G4a-5b 01:38:00 01:54:00
31.P3g-3f 02:46:00 01:54:00
32.G5b-6b 02:46:00 03:06:00
33.P2e-2d! 03:45:00 03:06:00
The double anaguma used to be an opening where both players first
finished their castle before thinking about anything else. This is
no longer true. One has to be very careful at each castling move not
to give the opponent an opportunity to attack. Because both sides have
a strong castle, it is very hard to come back from a strategic loss.
Therefore, it is not surprising that Habu and Sato spent so much time
on the last four moves (G4a-5b: 71 minutes, P3f: 68 minutes,
G5b-6b: 72 minutes, P2d: 59 minutes). 33.P2d was a complete surprise
to all, including Sato. It is a very difficult move to play, as it
starts the fighting with the two black generals still on their original
squares. On the other hand, these two generals defend well against
rook drops or rook promotions. After careful calculation Habu reached
the conclusion that this advantage was more important. He was the
only one and he was right.
34.P2cx2d 03:45:00 03:54:00
35.B6hx2d 03:46:00 03:54:00
36.R3b-2b 03:46:00 03:54:00
37.P*2e 03:46:00 03:54:00
38.G6a-7a 03:46:00 04:00:00
39.B2d-6h 05:40:00 04:00:00
40.P*2c 05:40:00 04:13:00
41.P3f-3e 05:43:00 04:13:00
42.P3dx3e 05:43:00 04:39:00
43.R2h-3h 05:45:00 04:39:00
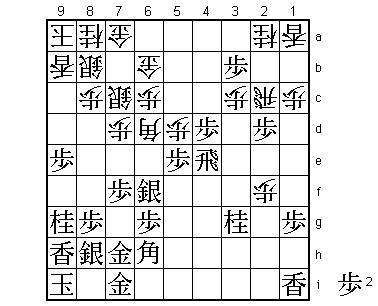
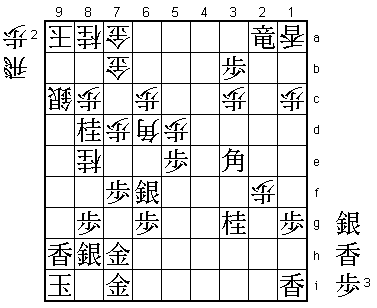
44.P2c-2d? 05:45:00 05:04:00
A mistake based on a miscalculation. Sato should have played 44.R5b
here, aiming at developing the rook through the centre or play a
waiting game with P7d followed by G6b-7b and P9d.

45.R3hx3e    06:00:00  05:04:00
46.B3c-4b    06:00:00  05:39:00

The reason Sato played 44.P2d was that he thought that he could play
46.Px2e here. However, here he realised that after 47.P*2d 48.Bx2d
(Rx2d? Rx3c+ Nx3c Bx2d) 49.R3a+ white is in trouble after both
50.Bx6h+ Gx6h R2c +R3b R3c +Rx2a (now the gold on 4i is defending
against the rook promotion on 3i), or 50.B3c P5e P2f Px5d P2g+ +Rx2b
Bx2b R*2c R*2f Rx2f+ +Px2f R*2c. The game move B4b is a change of
plan, but gives Sato a very passive position.

47.G4i-5i    06:12:00  05:39:00
48.G6b-5b    06:12:00  06:39:00

This gold should move in the other direction, but Sato is desperately
trying to keep his position together.

49.P*3b      06:51:00  06:39:00
50.P*3c      06:51:00  06:52:00

Another move white doesn't want to play, as it blocks the bishop, but
Sato has no other option.

51.N2i-3g    06:54:00  06:52:00

While Sato is struggling, Habu plays one natural move after another.

52.G5b-6b    06:54:00  07:12:00
53.G6i-7i    07:07:00  07:12:00
54.P7c-7d    07:07:00  07:32:00
55.G5i-6i    07:12:00  07:32:00
56.P9c-9d    07:12:00  07:32:00
57.G6i-7h    07:13:00  07:32:00
58.S6d-7c    07:13:00  07:40:00
59.P4g-4f    07:33:00  07:40:00
60.P9d-9e    07:33:00  07:53:00
61.P4f-4e    07:33:00  07:53:00
62.P2dx2e    07:33:00  07:58:00
63.P4ex4d    07:33:00  07:58:00
64.P9e-9f    07:33:00  07:58:00
65.P9gx9f    07:34:00  07:58:00
66.P*9g      07:34:00  07:58:00
67.N8ix9g    07:43:00  07:58:00
68.B4b-5c    07:43:00  07:58:00
69.R3e-4e    07:44:00  07:58:00
70.B5c-6d    07:44:00  07:58:00
71.P5f-5e    07:45:00  07:58:00
72.P2e-2f    07:45:00  07:58:00
73.P*2c      07:45:00  07:58:00
74.R2bx2c    07:45:00  07:58:00
75.P*2d      07:45:00  07:58:00
76.P*9e      07:45:00  07:59:00
77.P9fx9e    07:46:00  07:59:00
78.R2cx2d?!  07:46:00  07:59:00

Sato can no longer bear being slowly pushed back by Habu and decides
to go out in a blaze of glory. Objectively, 78.R2b P4c+ P2g+ N2e might
be better, but also in that case black has a very comfortable position.
Habu admitted that he was completely surprised by 78.Rx2d. The idea
is simple: take a pawn to fuel the edge attack. Not a bad idea, but
giving up a complete rook for it is too much for white's fragile position.

79.B6hx2d    07:47:00  07:59:00
80.P*9f      07:47:00  07:59:00
81.P4d-4c+   07:51:00  07:59:00
82.S7c-8d    07:51:00  07:59:00
83.+P4c-5b   07:51:00  07:59:00
84.G6bx5b    07:51:00  07:59:00
85.R4e-4a+   07:51:00  07:59:00
86.G5b-6b    07:51:00  07:59:00
87.+R4ax2a   07:51:00  07:59:00
88.G6b-7b    07:51:00  07:59:00
89.B2d-3e    07:53:00  07:59:00
90.L9bx9e    07:53:00  07:59:00
91.R*9d!     07:55:00  07:59:00
Good defence. This defends against white's edge attack with check.
Without the edge attack and without material to attack or defend, the
white position is hopeless.

92.S8b-9c    07:55:00  07:59:00
93.R9dx9e    07:55:00  07:59:00
94.P9fx9g+   07:55:00  07:59:00
95.R9ex9g    07:55:00  07:59:00
96.N*8e      07:55:00  07:59:00
97.R9gx9c+   07:55:00  07:59:00
98.S8dx9c    07:55:00  07:59:00
99.N*8d!     07:59:00  07:59:00
Perfect until the end. Lesser players would have played the wrong
order 99.Bx7a+ 100.Gx7a 101.+Rx7a which is threatening P*9b Kx9b N*8d
and mate, but 102.P*9g! is a mating threat that defends against this
threat because black can no longer play P*9b Kx9b N*8d as white can
now take this knight with the silver as this silver is no longer pinned
by the lance on 9h.

100.P8cx8d   07:59:00  07:59:00
101.B3ex7a+  07:59:00  07:59:00
102.G7bx7a   07:59:00  07:59:00
103.+R2ax7a  07:59:00  07:59:00
Resigns      07:59:00  07:59:00

This time 104.P*9g fails to 105.P*9b Kx9b +R7b R*8b G*8c K9a P*9b Rx9b
Gx9b. Also, a defence like 104.B*9b doesn't work after 105.G*7b. A rather
one-sided game to finish a one-sided match. After five months with
only three titles, Habu again holds the majority of the seven major
titles by taking his 7th Osho title.