52nd Osho Match Game 2
[Black "Habu Yoshiharu, Challenger"]
[White "Sato Yasumitsu, Osho"]
[Event "52nd Osho-sen, Game 2"]
[Date "January 23rd and 24th 2003"]
1.P7g-7f     00:00:00  00:00:00
2.P3c-3d     00:00:00  00:05:00
3.P2g-2f     00:02:00  00:05:00
4.P5c-5d     00:02:00  00:07:00
5.P2f-2e     00:30:00  00:07:00
6.R8b-5b     00:30:00  00:09:00

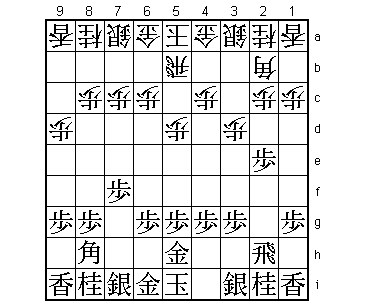
The "Gokigen Nakabisha". When Sato played this in the third game of
last year's Osho match this was a big surprise. Even Habu admitted
then that it had never occurred to him that Ibisha player Sato would
play this. This time Habu will have been more prepared.

7.G4i-5h     00:30:00  00:09:00
8.P9c-9d!?   00:30:00  00:17:00

Only eight moves in the game and already a new move. This move is
Sato's opening preparation. In recent years, the timing of a pawn
push on the edge has become an important issue in professional games
and is one of the basic ideas behind the Fujii system. Here the timing
is also crucial. The point of 8.P9d is that it is difficult for black
to reply with 9.P9f because after 10.P5e P2d Px2d Rx2d P5f Px5f Bx8h+
Sx8h B*3c the innocent looking pawn move has turned a position that
is almost certainly a white loss in a position that is probably a white
win. The point is that the white king can escape up the board (first
to 9c and then to 8d), limiting black's attacking options.

9.S3i-4h     01:49:00  00:17:00

Habu takes 79 minutes to admit that Sato has a point with P9d.

10.P9d-9e    01:49:00  00:25:00

The edge is now completely white territory. Important for both attack
and defence. White might already be a bit better here.

11.K5i-6h    01:49:00  00:25:00
12.K5a-6b    01:49:00  00:33:00
13.K6h-7h    01:51:00  00:33:00
14.K6b-7b    01:51:00  00:37:00
15.P3g-3f    02:01:00  00:37:00
16.K7b-8b    02:01:00  01:35:00
17.P2e-2d    02:22:00  01:35:00
18.P2cx2d    02:22:00  01:41:00
19.R2hx2d    02:22:00  01:41:00
20.S7a-7b    02:22:00  01:45:00
21.N2i-3g    03:04:00  01:45:00
22.G4a-3b    03:04:00  02:57:00
23.R2dx3d!   04:09:00  02:57:00

Taking the side pawn is often dangerous, but Habu shows that he wants
to play positively whenever he can. He plays a lot of title matches,
but it is quite rare for him to be challenger (he last challenged in
2001 for the Ryu-O title). Being forced into the "lower seat" seems
to give him a bit of extra fighting spirit (not that he can be accused
of lacking any).

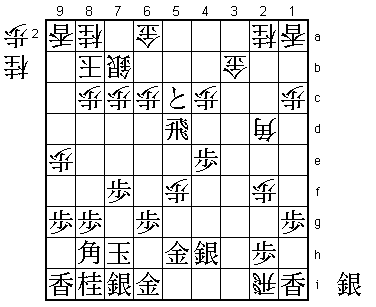
24.B2b-3c    04:09:00  04:15:00

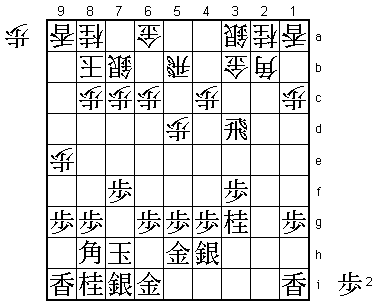
The best move, but not what Sato intended. He wanted to play 24.Bx8h+
Sx8h G3c R3e R2b, but realized in time that after B*8f B*6d Bx6d Px6d
N4e the white position is not as good as he thought. After 78 minutes
he sealed 24.B3c to bring an unusually interesting first day to an end.

25.R3d-3e    04:30:00  04:15:00
26.P5d-5e    04:30:00  04:18:00
27.R3e-2e    05:21:00  04:18:00
28.S3a-2b    05:21:00  04:18:00
29.R2e-2f    05:24:00  04:18:00
30.R5b-5d    05:24:00  05:15:00
31.P3f-3e    05:31:00  05:15:00
32.B3c-4d?   05:31:00  05:21:00

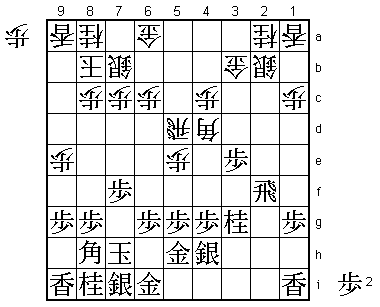
A mistake. 32.S2c was the correct move. Sato now has a lot of trouble
activating his pieces on his left side of the board.

33.P5g-5f!   05:44:00  05:21:00

Habu takes full advantage of Sato's mistake. This is a nasty move as
white can't take the pawn: 34.Px5f 36.Bx4d and now 37.Rx4d is answered
by B*7g and 37.Px4e by B*6e R5b P*5c R4b Bx3b+ Rx3b G*4c. However, if
white doesn't take the pawn, black will take the pawn on 5e himself,
and this pawn is a vital stronghold in white's position.

34.B4dx3e    05:44:00  05:49:00
35.R2f-3f    05:50:00  05:49:00
36.R5d-3d    05:50:00  05:49:00
37.P4g-4f    05:50:00  05:49:00
38.P*2f      05:50:00  06:13:00
39.P*2h      05:51:00  06:13:00
40.P5ex5f    05:51:00  06:58:00

Most commentators in the press room thought that Sato had no choice but
to turn to defence and hope for a mistake, but Sato decides to fight.

41.P*5d!     06:11:00  06:58:00

Strong move. Of course Sato had seen this, but he judged that the only
way to go in this position was to activate the silver on 2b.

42.S2b-3c    06:11:00  07:08:00
43.N3g-4e!   06:30:00  07:08:00

Habu doesn't let up. 43.P5c+ is tempting, but after 44.Bx5c Rx3d Sx3d
Bx1a+ N3c black is without pawns and it is difficult to find a good
attack. Also 43.Rx3e Rx3e P5c+ is unconvincing after P3f.

44.B3e-2d    06:30:00  07:23:00

If 44.S4d then 45.P5c+ Sx4e Rx3e (not Px4e Bx7i+ and white has turned
the tables) Rx3e Px4e R3h+ Bx1a+ is good for black (for example, N*4f
is answered by +B5e).

45.R3fx3d    06:46:00  07:23:00
46.S3cx3d    06:46:00  07:23:00
47.P5d-5c+   06:46:00  07:23:00
48.S3dx4e    06:46:00  07:38:00
49.P4fx4e    06:47:00  07:38:00
50.R*2i      06:47:00  07:38:00

Sato tries everything to get back in the game, but...

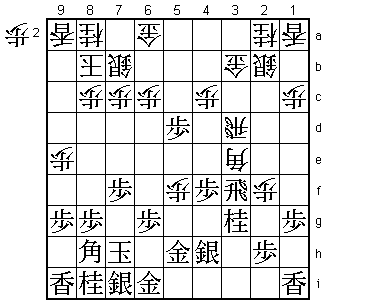
51.R*5d!     07:01:00  07:38:00

The knock-out punch. It's a bit awkward to drop the rook here, but this
attacks the bishop, defends the square 5g and also threatens +P5b. This
is too much for the white position.

52.B2dx7i+   07:01:00  07:59:00

Sato uses all of his remaining time for this bishop sacrifice, but it
was clear to everyone that it was desperation rather than a calculated
attack.

53.B8hx7i    07:08:00  07:59:00
54.S*6e      07:08:00  07:59:00
55.+P5c-5b   07:09:00  07:59:00

The shortest route to the win.

56.S6ex5d    07:09:00  07:59:00
57.+P5bx6a   07:09:00  07:59:00
58.S7bx6a    07:09:00  07:59:00
59.B7i-3e    07:09:00  07:59:00
60.N*6b      07:09:00  07:59:00
61.S*5b      07:14:00  07:59:00
62.S6ax5b    07:14:00  07:59:00
63.B3ex6b+   07:14:00  07:59:00
64.R2ix6i+   07:14:00  07:59:00
65.K7hx6i    07:14:00  07:59:00
66.G*6a      07:14:00  07:59:00
67.R*5a      07:15:00  07:59:00
Resigns      07:15:00  07:59:00

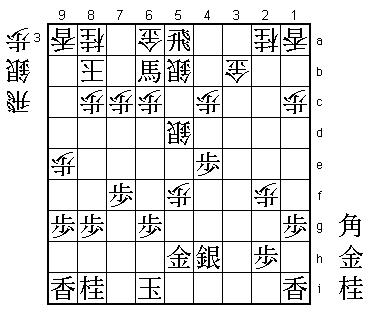
An nice final move, leading to a nice resignation position. 88.Gx5a is
hisshi after 89.B*7a K9b +B7b and 88.Gx6b is hisshi after 89.B*7a K9b
N*9d. A very convincing victory by Habu. Sato's opening preparation was
excellent as usual, but after this he was completely outplayed. Sato now
desperately needs a win in the third game to have a chance of keeping
his Osho title.
