52nd Osho Match Game 1
[Black "Sato Yasumitsu, Osho"]
[White "Habu Yoshiharu, Challenger"]
[Event "52nd Osho-sen, Game 1"]
[Date "January 15th and 16th 2003"]

1.P7g-7f     00:01:00  00:00:00
2.P3c-3d     00:01:00  00:01:00
3.P2g-2f     00:04:00  00:01:00
4.P8c-8d     00:04:00  00:03:00
5.P2f-2e     00:23:00  00:03:00
6.P8d-8e     00:23:00  00:08:00
7.G6i-7h     00:23:00  00:08:00
8.G4a-3b     00:23:00  00:11:00
9.P2e-2d     00:24:00  00:11:00
10.P2cx2d    00:24:00  00:11:00
11.R2hx2d    00:24:00  00:11:00
12.P8e-8f    00:24:00  00:17:00
13.P8gx8f    00:24:00  00:17:00
14.R8bx8f    00:24:00  00:17:00
15.R2dx3d    00:26:00  00:17:00
16.B2b-3c    00:26:00  00:19:00
17.R3d-3f    01:26:00  00:19:00
18.K5a-4a    01:26:00  00:28:00
19.P*8g      01:54:00  00:28:00
20.R8f-8e    01:54:00  00:31:00
21.R3f-2f    01:54:00  00:31:00
22.S3a-2b    01:54:00  00:32:00
23.K5i-5h    01:54:00  00:32:00

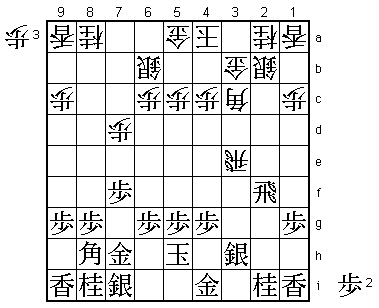
It looks like black can play 23.Bx3c+ Nx3c B*9f here, but after R6e
P6f R6d P6e R8d Bx6c+ G5b +B3f B*4d black has gained nothing.

24.S7a-6b    01:54:00  02:19:00
25.P3g-3f    02:19:00  02:19:00
26.G6a-5a    02:19:00  02:25:00
27.S3i-3h    02:49:00  02:25:00
28.P7c-7d    02:49:00  03:15:00
29.P3f-3e    03:16:00  03:15:00
30.R8ex3e    03:16:00  04:25:00

So far, this game is exactly the same as the second game of last
year's Oza match between Habu and Sato. Actually, 30.Rx3e is not
the main line here. 30.Bx8h+ or 30.N7c are more often played. However,
Habu throws a psychological punch here. In their Oza match, Sato
played 30.Rx3e and lost. By playing this move here, Habu is telling
Sato that he is going to show him that the move is not wrong, but the
player who played it. If Sato would lose this game, it would be a
double shock. Of course, this is not the only reason Habu plays
this move...

31.B8hx3c+   03:19:00  04:25:00
32.N2ax3c    03:19:00  04:25:00
33.B*4f      03:19:00  04:25:00
34.P*2e      03:19:00  04:26:00
35.R2f-1f    03:20:00  04:26:00
36.R3e-3d    03:20:00  04:26:00
37.P*3e      03:26:00  04:26:00
38.R3d-4d    03:26:00  04:27:00
39.B4fx9a+   03:27:00  04:27:00
40.N8a-7c    03:27:00  04:27:00
41.R1f-3f    04:58:00  04:27:00
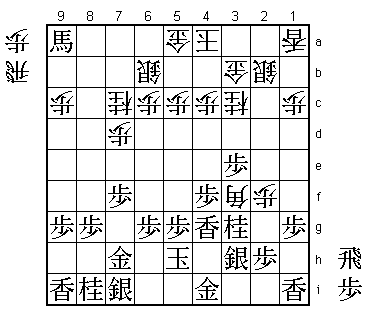
42.P*3g!     04:58:00  05:49:00

Habu actually put his money on this move, which was played by
Kobayashi Hiroshi in the Kisei tournament against Tanigawa in
November last year. It's a good move and Kobayashi managed to
beat Tanigawa with it, knocking the Oi title holder out of the
Kisei tournament.

43.N2ix3g    05:14:00  05:49:00
44.B*5d      05:14:00  06:00:00
45.R3f-4f    05:17:00  06:00:00
46.R4dx4f    05:17:00  06:02:00
47.P4gx4f    05:17:00  06:02:00
48.B5d-3f    05:17:00  06:02:00
49.L*4g      05:32:00  06:02:00
50.P2e-2f    05:32:00  06:06:00
51.P*2h      05:37:00  06:06:00

In the post-mortem analysis of the Tanigawa-Kobayashi game, this
move came up, but Tanigawa thought it was bad because it gives up
the possibility of attacking with P*2c. Therefore, Tanigawa went
for the semeai with 51.P3d. Sato of course knew this and plays
P*2h without much hesitation, since he has prepared something new.

52.N3c-2e    05:37:00  06:09:00
53.N3gx2e    05:40:00  06:09:00
54.B3fx2e    05:40:00  06:16:00
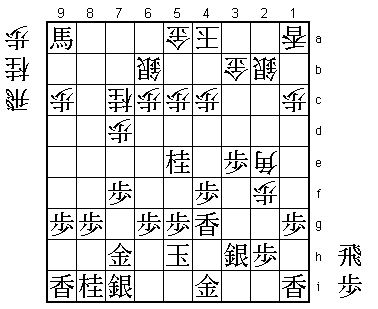
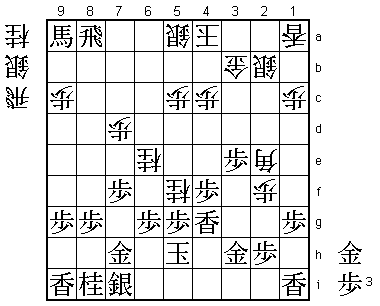
55.N*5e!     05:44:00  06:16:00

This is the move that Sato prepared. This move has both a defensive
and attacking purpose. It is a "drop where your opponent wants to
drop" defence because white threatened P*3g Sx3g N*5e. Also, black
now threatens Nx6c+ Sx6c +Bx7c, for example if white tries to pick
up the knight with 56.P5d.

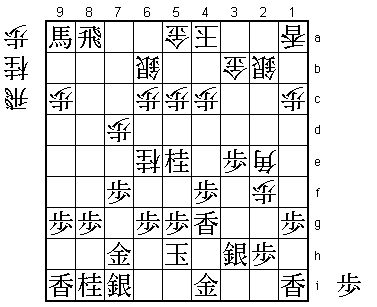
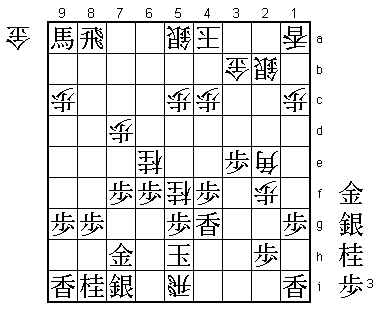
56.N7c-6e!   05:44:00  06:57:00

Great reply. This move also has a double meaning. It defends against
the black threat, as black no longer can take a knight on 7c after
Nx6c+ Sx6c. Secondly, the knight on 6e attacks the head of the king.
It seems like black can just try to win this knight with 57.P6f, but
after 58.P*3g Sx3g R*2i R*3i Rx3i+ Gx3i Nx5g+ Kx5g R*5i white gets a
big advantage.

57.R*8a?!    07:24:00  06:57:00

Not wrong, but risky. Sato take 100 minutes to decide that he can
win a razor-sharp endgame. This is a sign of confidence in his own
ability, but it might have been wiser to play 57.R*2d instead. This
bishop can't move because of Nx4c+, so white has only 58.R*2c, but
then after Rx2e Rx2e, black has at least three good looking options:
Nx4c+, B*1f or P4e.

58.P*3g      07:24:00  07:12:00
59.N5ex6c=   07:43:00  07:12:00

If black would have time, promoting the knight would have been better
(this threatens +Nx6b), but after 59.Nx6c+ Px3h+ Gx3h Sx6c +B7c N*6a
+Bx6a K3a the white king gets away.

60.P3gx3h+   07:43:00  07:18:00
61.N6cx5a+   07:43:00  07:18:00
62.S6bx5a    07:43:00  07:18:00
63.G4ix3h    07:43:00  07:18:00
64.N*5f!     07:43:00  07:23:00

This move rocked Sato. Maybe Sato had overlooked that this is a mating
threat: 66.R*4h Gx4h Nx4h+ Kx4h N*5f Px5f G*5g K3i S*3h etc.
Or maybe he had overlooked N*5f altogether.

65.P6g-6f?   07:51:00  07:23:00

Sato is unable to collect himself and plays the losing move. As Habu
pointed out after the game, things would have been very difficult after
65.S6h!. For example, 66.R*2i G*3i Rx3i+ Gx3i G*3g is answered by the
nice G3h! and then Gx3h P5f it is very difficult to get to the black
king. The players took a long time in the post-mortem analysis, but
couldn't find a good variation for white. Sato couldn't believe it, but
Habu admitted: "The position after S6h is losing for me".

66.S*4h      07:51:00  07:30:00

Now black has no defence anymore.

67.G3hx4h    07:59:00  07:30:00
68.N5fx4h+   07:59:00  07:30:00
69.K5hx4h    07:59:00  07:30:00
70.N*5f      07:59:00  07:30:00
71.K4h-5h    07:59:00  07:30:00
72.R*5i      07:59:00  07:30:00
Resigns      07:59:00  07:30:00

Mate after 73.K6g Rx5g+ or 73.Kx5i G*4h K6i Bx4g+. This will be a hard
loss to swallow for Sato, who seemed nervous at the start of the game.
Not only did he lose with black, he more or less lost against himself,
both because of the opening that he played earlier with white and because
of his endgame mistake. The rest of the match will show how Sato can
recover from this.
