52nd Oi Match Game 7
[Black "Hirose Akihito, Oi"]
[White "Habu Yoshiharu, Challenger"]
[Event "52nd Oi-sen, Game 7"]
[Date "September 12th and 13th 2011"]
1.P7g-7f 00:01:00 00:00:00
This is the final game of this match, so furigoma had to decide who starts. The result
was two pawns, one tokin and two pawns that landed on their side (no count), giving
Hirose the black pieces. Considering that black only won two of the six games in
this match, it seems unlikely that Hirose was excited about the result.
2.P3c-3d 00:01:00 00:00:00
3.R2h-6h 00:06:00 00:00:00
4.P8c-8d 00:06:00 00:03:00
5.P6g-6f 00:08:00 00:03:00
6.S7a-6b 00:08:00 00:05:00
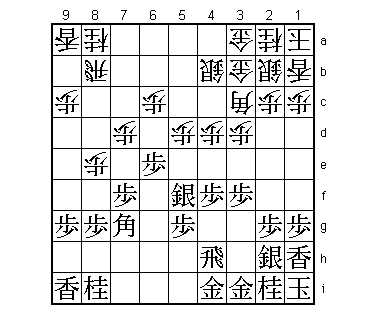
7.K5i-4h 00:10:00 00:05:00
8.P5c-5d 00:10:00 00:07:00
9.K4h-3h 00:12:00 00:07:00
10.K5a-4b 00:12:00 00:13:00
11.S7i-7h 00:15:00 00:13:00
12.K4b-3b 00:15:00 00:17:00
13.K3h-2h 00:20:00 00:17:00
14.S6b-5c 00:20:00 00:22:00
15.L1i-1h 00:28:00 00:22:00
Hirose plays his favorite opening, the Furibisha Anaguma.
16.B2b-3c 00:28:00 00:34:00
17.S7h-6g 00:33:00 00:34:00
18.P8d-8e 00:33:00 00:40:00
19.B8h-7g 00:33:00 00:40:00
20.G6a-5b 00:33:00 00:40:00
21.K2h-1i 00:37:00 00:40:00
22.K3b-2b 00:37:00 00:43:00
23.S3i-2h 00:41:00 00:43:00
24.G5b-4b 00:41:00 00:51:00
25.G4i-3i 01:05:00 00:51:00
26.L1a-1b 01:05:00 01:04:00
Habu answers by playing the Anaguma himself, just like in the fifth game that he lost
convincingly.
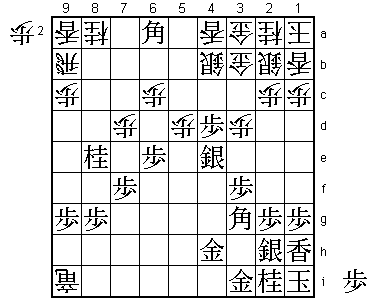
27.S6g-5f 01:27:00 01:04:00
28.P4c-4d 01:27:00 01:09:00
This is different from the fifth game. Habu closes the bishop diagonal, which is a
bit more defensive.
29.P4g-4f 01:42:00 01:09:00
30.K2b-1a 01:42:00 01:10:00
31.R6h-4h 02:06:00 01:10:00
Hirose doesn't waste any time trying to take advantage of the pawn on 4d, building
up an attacking formation to break through on the 4th file. The story of this game
will be all about the battle for controlling this file.
32.S3a-2b 02:06:00 01:13:00
33.G6i-5i 02:09:00 01:13:00
34.G4a-3a 02:09:00 01:35:00
35.G5i-4i 02:14:00 01:35:00
36.G4b-3b 02:14:00 01:46:00
37.P3g-3f 02:30:00 01:46:00
38.P7c-7d 02:30:00 03:11:00
39.P6f-6e 03:25:00 03:11:00
40.S5c-4b 03:25:00 04:14:00
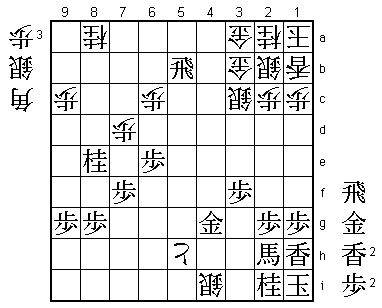
The sealed move. There are not many waiting moves left, so the fighting will start
soon.
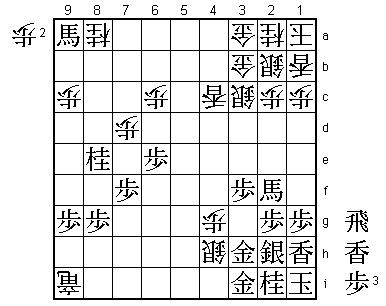
41.P4f-4e!? 03:52:00 04:14:00
If Hirose would have played 41.G4i-3h here, the position would have been exactly
the same as the game he played with black against Oikawa. There it followed 42.P7e
Px7e P8f Px8f P4e Px4e Bx7g+ Nx7g Rx8f P4d B*5i and white got the better position
and won the game. Taking the initiative with 41.P4e was probably prepared by Hirose,
but it is also possible that he wanted to throw a curve ball to make Habu use time
again, rendering the two and a half hours Habu spent on P7d and S4b useless.
42.P4dx4e 03:52:00 05:10:00
Indeed, Habu takes almost an hour for this reply, indicating that he had not been
expecting 41.P4e.
43.S5fx4e 04:14:00 05:10:00
44.B3cx7g+ 04:14:00 05:25:00
45.N8ix7g 04:14:00 05:25:00
46.B*6f 04:14:00 05:26:00
47.B*3g 05:03:00 05:26:00
48.R8b-9b 05:03:00 06:04:00
49.N7gx8e 05:22:00 06:04:00
50.B6fx5g+ 05:22:00 06:05:00
51.G4i-5h 05:24:00 06:05:00
52.+B5gx4h 05:24:00 06:18:00
53.G5hx4h 05:24:00 06:18:00
54.R*6i 05:24:00 06:18:00
55.P*4d 05:41:00 06:18:00
56.R6ix9i+ 05:41:00 06:46:00
57.B*6a 05:43:00 06:46:00
Despite his positive play, the results have not been very convincing for Hirose.
White has promoted the rook and picked up a lance. 57.B*6a is an attempt to start a
counter attack on the 4th file.
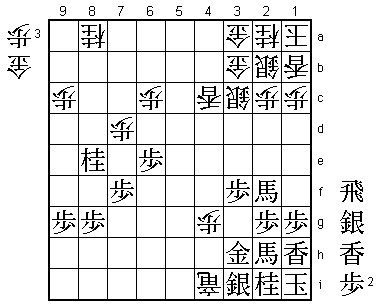
58.L*4a! 05:43:00 06:48:00
This is a very strong lance drop. It looks like a defense-only move, but this lance
is going to take over the 4th file.

59.B6ax3d+   06:11:00  06:48:00

In the press room 59.G4h-3h was analyzed, which is probably the last chance for black
to complete his Anaguma castle. However, after 60.+R6i N7c+ Nx7c Bx7c+ N*5g the white
attack looks very strong.

60.S4b-3c    06:11:00  06:52:00
61.+B3d-3e   06:11:00  06:52:00
62.R9b-4b!   06:11:00  06:56:00

This rook was a liability of the white position, but Habu has found a way to use it
in attack, combining it with the lance to start a strong counter attack on the 4th
file.

63.+B3e-2f   06:33:00  06:56:00

It is painful for black that he cannot play 63.Bx9a+. However, then white can play
64.Sx4d and after 65.Sx4d Rx4d P*4f P*4g Gx4g P*4e the white attack is in full force
and black cannot hold the position. For example, after Px4e Rx4e +Bx4e Lx4e P*4f the
diagonal of the promoted bishop on 9a is blocked, so white can attack with P*3h Gx3h
B*4i. Hirose's 63.+B2f takes the promoted bishop out of harm's way, but must have
been quite painful to play.

64.P*4f      06:33:00  07:09:00
65.B3gx4f    06:35:00  07:09:00
66.S3cx4d    06:35:00  07:18:00
67.P*4c      06:35:00  07:18:00
68.R4bx4c    06:35:00  07:18:00
69.S4ex5d    06:36:00  07:18:00
70.P*4g      06:36:00  07:18:00
71.G4h-3h    06:37:00  07:18:00
72.S4d-3c    06:37:00  07:18:00
73.S5dx4c+   07:09:00  07:18:00
74.L4ax4c    07:09:00  07:18:00
75.B4fx9a+   07:09:00  07:18:00
76.S*4h      07:09:00  07:32:00
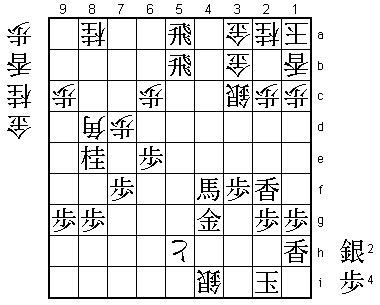
White has won the battle for the 4th file and now clearly has the upper hand.

77.P*4i      07:10:00  07:32:00
78.S4hx3i+   07:10:00  07:35:00
79.S2hx3i    07:10:00  07:35:00
80.+R9ix4i   07:10:00  07:35:00
81.+B9a-2h   07:10:00  07:35:00
All hands on deck. Hirose desperately tries to keep his position together. He is
not ready to give up his Oi title yet.

82.P*5g!     07:10:00  07:38:00

This is the type of tokin attack that is often seen against the Anaguma. It looks to
be far away from the king, but will be in time to help the attack.

83.P*5i      07:17:00  07:38:00

Necessary, but only a temporary defense.

84.G*4h      07:17:00  07:39:00
85.P*4f      07:24:00  07:39:00
86.L4cx4f    07:24:00  07:44:00
87.S*3g      07:25:00  07:44:00

No choice, but now the pawn on 5i is no longer defended.

88.+R4ix5i   07:25:00  07:45:00
89.S3ix4h    07:26:00  07:45:00

The lance on 4f, which has given black so much grief, still cannot be taken. 89.Sx4f
P5h+ and the white attack cannot be stopped.

90.P4gx4h+   07:26:00  07:45:00
91.S3gx4h    07:26:00  07:45:00
92.L4fx4h+   07:26:00  07:45:00
93.+B2fx4h   07:26:00  07:45:00
94.+R5ix4h   07:26:00  07:45:00
95.G3hx4h    07:26:00  07:45:00
96.P*4g      07:26:00  07:45:00
97.G4hx4g    07:26:00  07:45:00
98.P5g-5h+   07:26:00  07:45:00
99.R*5b      07:27:00  07:45:00

Black has managed to remove all the pieces on the 4th file and seems ready to start
a counter attack. Defense was futile, because 99.P*5i is answered by 100.P*4f and
101.Gx4f is followed by +P4h and 101.+Bx4f by +P4i or P*3h and white wins.

100.S*4i!    07:27:00  07:45:00
This snuffs out all black hope. It is not easy to see that this is good, because
this silver is not attacking anything, but black has no way to defend.

101.R*5a     07:44:00  07:45:00
102.P*4f     07:44:00  07:46:00
103.+B2hx4f  07:44:00  07:46:00
104.P*3h     07:44:00  07:46:00
105.L*3e     07:56:00  07:46:00
106.P3h-3i+  07:56:00  07:48:00
107.L3ex3c+  07:58:00  07:48:00
108.S2bx3c   07:58:00  07:49:00
109.G*2h     07:59:00  07:49:00
110.S*3h     07:59:00  07:49:00
111.L*2f     07:59:00  07:49:00
112.+P3ix2i  07:59:00  07:52:00
113.G2hx2i   07:59:00  07:52:00
114.S3hx2i+  07:59:00  07:52:00
115.K1ix2i   07:59:00  07:52:00
116.B*8d     07:59:00  07:52:00
Resigns      07:59:00  07:52:00
The immediate threat is B3i+ Kx3i G*3h mate. If black closes the bishop line then G*3h
followed by Bx5a picks up the rook while threatening mate. Black has no defense, so
Hirose resigned here. A tough match for Habu, coming back from 2-0 and 3-2 down, but
he manages to pull it out and win his 13th Oi title. This gives him a total of 80
major titles for his career, which is the same number as the great Oyama. Of course,
in Oyama's prime there were fewer title to play for, so it is hard to compare them,
but winning 80 major titles is a remarkable achievement. On the other hand, Hirose
will be quite disappointed losing his Oi title. He had several chances to decide
this match in his favor (although not in this final game) and will especially rue
the missed opportunities he had in the sixth game. Still, being young and extremely
talented, it seems likely that he will get another shot at winning titles, maybe
even against Habu.