52nd Oi Match Game 3
[Black "Habu Yoshiharu, Challenger"]
[White "Hirose Akihito, Oi"]
[Event "52nd Oi-sen, Game 3"]
[Date "August 2nd and 3rd 2011"]
1.P7g-7f 00:00:00 00:00:00
2.P3c-3d 00:00:00 00:01:00
3.P2g-2f 00:02:00 00:01:00
4.P5c-5d 00:02:00 00:04:00
5.P2f-2e 00:08:00 00:04:00
6.R8b-5b 00:08:00 00:06:00
7.S3i-4h 00:10:00 00:06:00
8.P5d-5e 00:10:00 00:08:00
9.K5i-6h 00:12:00 00:08:00
10.B2b-3c 00:12:00 00:09:00
11.P3g-3f 00:13:00 00:09:00
12.K5a-6b 00:13:00 00:14:00
13.S4h-3g 00:15:00 00:14:00
14.K6b-7b 00:15:00 00:16:00
15.K6h-7h 00:17:00 00:16:00
16.S3a-4b 00:17:00 00:23:00
17.S7i-6h 00:40:00 00:23:00
18.S4b-5c 00:40:00 00:34:00
19.S3g-4f 00:44:00 00:34:00
20.S5c-4d 00:44:00 00:39:00
21.S6h-7g 00:47:00 00:39:00
22.K7b-8b 00:47:00 00:46:00
23.S7g-6f 00:49:00 00:46:00
24.L9a-9b 00:49:00 01:02:00
25.G4i-5h 01:10:00 01:02:00
26.K8b-9a 01:10:00 01:03:00
27.N2i-3g 01:20:00 01:03:00
28.S7a-8b 01:20:00 01:18:00
29.P9g-9f 01:33:00 01:18:00
30.L1a-1b 01:33:00 01:49:00
31.P1g-1f 01:47:00 01:49:00
32.R5b-5a 01:47:00 02:08:00
33.R2h-2i 02:02:00 02:08:00
34.G4a-3b 02:02:00 02:50:00
35.P9f-9e 02:16:00 02:50:00
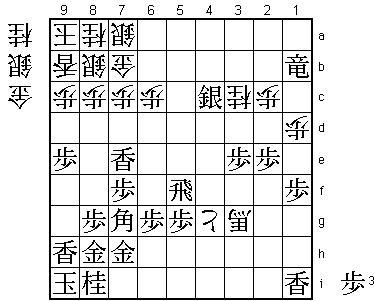
36.P1c-1d 02:16:00 02:53:00
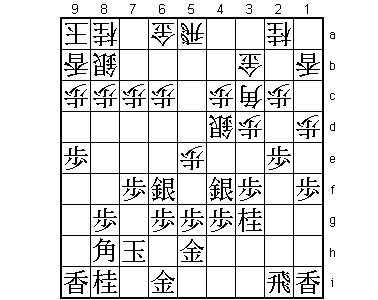
In response to Hirose's Gokigen Nakabisha, Habu has played to very popular S3g attack.
One of the aims of this strategy is to start a quick attack and set the board on fire
early, but Habu instead chooses a more quiet approach, developing his left silver as
well. In reply, Hirose takes out his favorite weapen, the Furibisha Anaguma. However,
this time he plays it with the Nakabisha, which is different from his normal Shikenbisha
Anaguma. The difference is that with the Nakabisha, white has to play the gold to 3b
to defend. This gold cannot be part of the Anaguma, which is a weak point.
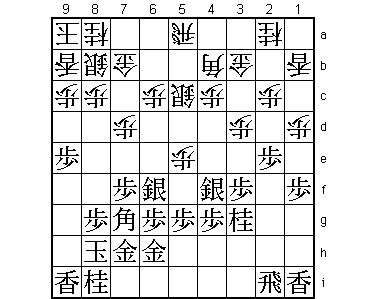
37.G5h-6h 02:26:00 02:53:00
White cannot do anything but wait for black to start the attack, but Habu shows that
he is no hurry to open the position. Still, after the game he admitted that he was not
so happy with this strategy, because he thought that 3h was an important weakness and
that a later silver or bishop drop there could be a problem.
38.G6a-7b 02:26:00 02:59:00
39.B8h-7g 02:31:00 02:59:00
40.P7c-7d 02:31:00 03:16:00
41.K7h-8h 03:38:00 03:16:00
Habu takes his time to improve his castle. The alternative was 41.B8f and the position
after 42.B4b Bx4b+ Gx4b G6i-5h seems playable for both sides.
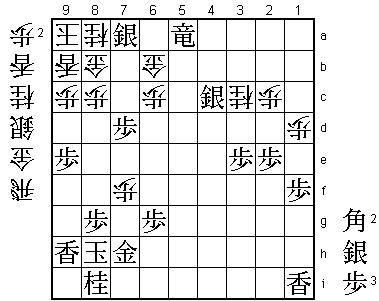
42.B3c-4b 03:38:00 04:05:00
It seems like white just gives up the important pawn on 5e here, but after 42.S6fx5e
Sx5e Sx5e P7e the white counter attack is very dangerous.
43.G6i-7h 03:51:00 04:05:00
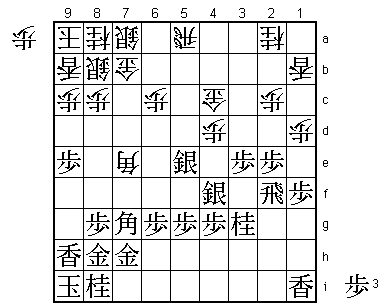
44.S4d-5c!? 03:51:00 04:11:00
Hashimoto (7-dan) commented the game for the audience at the venue and said that he
would never think about playing this move. Hirose voluntarily gives up the precious
vanguard pawn on 5e to rearrange his pieces.

45.S6fx5e    04:21:00  04:11:00
46.P4c-4d    04:21:00  04:20:00
47.L9i-9h    04:34:00  04:20:00
48.G3b-4c    04:34:00  04:42:00
49.K8h-9i    04:44:00  04:42:00
50.S5c-6b    04:44:00  04:46:00
51.G7h-8h    04:57:00  04:46:00
52.S6b-7a    04:57:00  04:50:00

For the pawn, the white silver had moved back to strengthen the Anaguma and the left
gold has moved towards the center from its passive position on 3b. It is very hard
to say if this is enough compensation for giving up the pawn on 5e, but Hirose was
widely applauded for his flexible strategic thinking.

53.G6h-7h    05:18:00  04:50:00
54.P7d-7e    05:18:00  04:59:00
55.P7fx7e    05:18:00  04:59:00
56.P3d-3e    05:18:00  04:59:00
57.P3fx3e    05:19:00  04:59:00
58.B4bx7e    05:19:00  05:00:00
59.R2i-2f    05:20:00  05:00:00
Another credit to Hirose's play is that even though the press room believed that
black had the advantage here, Habu himself was not happy at all, considering his
position too heavy and the two silvers that are defending each other a serious
liability.

60.N2a-3c?   05:20:00  05:28:00

It is unfortunate that this natural development of a passive knight turns out to
be an important mistake. In the post-mortem analysis 60.P4e was analyzed and that
seemed to have been better after 61.Nx4e P*4d Sx4d G5d where the black pieces
continue to be in each other's way and the white gold moves even further into
the center.

61.P*7f      05:37:00  05:28:00
62.B7e-8d    05:37:00  05:33:00
63.S5ex4d    05:37:00  05:33:00
64.P*4e      05:37:00  05:40:00
65.S4dx4c=   05:37:00  05:40:00
66.P4ex4f    05:37:00  05:40:00
67.G*5b      05:37:00  05:40:00
68.P4fx4g+   05:37:00  06:00:00

Up until this point the moves are forced. Habu worried about 68.Rx5b here, but
after 69.Sx5b= Px4g+ Bx3c+ S*6i N*7d the post-mortem analysis showed that black
wins the semeai.

69.G5bx5a    05:48:00  06:00:00
70.B8dx5a    05:48:00  06:00:00
71.R*1a      05:50:00  06:00:00
72.B5a-7c    05:50:00  06:04:00
73.R1ax1b+   05:51:00  06:04:00
74.B7cx3g+   05:51:00  06:07:00
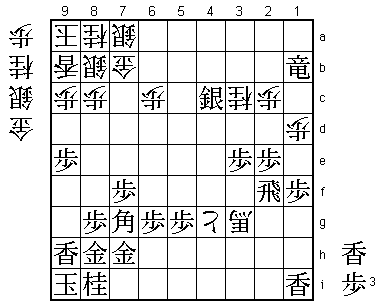
Attacks the black rook and this promoted bishop also works very strongly in defense.
It seems like black has a lot of work to do.

75.L*7e!     05:52:00  06:07:00

The perfect solution. If white would have two pawns instead of one, this would not
work because of P*7d followed by P*7c.

76.P*7c      05:52:00  06:25:00

Now the promoted bishop no longer works in defense and white has no more pawns to
drop.

77.R2f-5f    05:52:00  06:25:00
Threatens a simple rook promotion and a devastating attack from the side of the
Anaguma, which is much weaker there with a silver on 7a than a gold. Because white
has no pawns to shut out the rook, Hirose has to try something desperate.

78.+P4gx5g   05:52:00  07:06:00

This delays the promotion of the rook for a while, but the price of giving up the
promoted pawn is very high. In the press room 78.S*6e was analyzed to answer 80.R5b+
with 81.P7d and the promoted bishop again defends the Anaguma from afar. However,
after 82.+Rx7b Sx7b G*6b the black attack is also strong enough.

79.R5fx5g    06:21:00  07:06:00

This attacks the promoted bishop on 3g, so white loses two vital pieces in a row.

80.N*6e      06:21:00  07:11:00
81.R5gx3g    06:25:00  07:11:00
82.N6ex7g+   06:25:00  07:11:00
83.G8hx7g    06:25:00  07:11:00
84.S*6i      06:25:00  07:12:00
85.R3g-5g    06:40:00  07:12:00

Again the rook threatens to promote and now there is nothing white can do about it.

86.S6ix7h+   06:40:00  07:16:00
87.G7gx7h    06:40:00  07:16:00
88.B*6i      06:40:00  07:16:00
89.K9i-8h    06:43:00  07:16:00
90.P7c-7d    06:43:00  07:36:00
91.R5g-5a+   06:53:00  07:36:00
92.P7dx7e    06:53:00  07:39:00
93.N*7d      06:57:00  07:39:00
94.G*7c      06:57:00  07:39:00
95.S*6a      06:58:00  07:39:00
96.P*5b      06:58:00  07:41:00
97.S6ax7b+   07:03:00  07:41:00
98.G7cx7b    07:03:00  07:41:00
99.G*7i      07:03:00  07:41:00
100.B6ix7h+  07:03:00  07:45:00
101.G7ix7h   07:03:00  07:45:00
102.P7ex7f   07:03:00  07:45:00
103.N7dx8b+  07:08:00  07:45:00
104.S7ax8b   07:08:00  07:45:00
105.P*7c     07:08:00  07:45:00
106.S8bx7c   07:08:00  07:50:00
107.P*7d     07:08:00  07:50:00
108.S7c-8b   07:08:00  07:50:00
109.S*7c     07:16:00  07:50:00
110.G*7a     07:16:00  07:50:00
111.+R1bx5b  07:17:00  07:50:00
112.S*6b     07:17:00  07:52:00
113.S7cx8b+  07:18:00  07:52:00
114.G7ax8b   07:18:00  07:52:00
115.+R5bx6b  07:18:00  07:52:00
116.G7bx6b   07:18:00  07:52:00
117.S*7a     07:18:00  07:52:00
Resigns      07:18:00  07:52:00
White has nothing else but 118.G*7b, but then 119.Sx8b+ Gx8b (Kx8b S*7c leads to
mate) S*7a there is no defense. The black king clearly cannot be mated, so Hirose
resigned here. Habu must have felt a little relieved, because not only does he
avoid a 3-0 hole, it is also the first time he has ever beaten Hirose in an official
game. He had lost all of their four previous encounters. Can he even the match
with the white pieces in game four?