52nd Oi Match Game 2
[Black "Hirose Akihito, Oi"]
[White "Habu Yoshiharu, Challenger"]
[Event "52nd Oi-sen, Game 2"]
[Date "July 26th and 27th 2011"]
1.P7g-7f     00:01:00  00:00:00
2.P3c-3d     00:01:00  00:00:00
3.P2g-2f     00:03:00  00:00:00

Hirose's stellar record with playing the Anaguma in the Furibisha opening has landed
him the nickname "Furbisha Anaguma Prince", but here he willingly steers away from
that, playing Ibisha instead. His win in the opening game of this match may have
given him the psychological boost to show Habu that he is not a one trick pony.

4.G4a-3b     00:03:00  00:05:00
5.G6i-7h     00:07:00  00:05:00
6.P8c-8d     00:07:00  00:11:00
7.P2f-2e     00:08:00  00:11:00
8.B2bx8h+    00:08:00  00:14:00

Habu responds by selecting the Kakugawari with tempo loss.

9.S7ix8h     00:08:00  00:14:00
10.S3a-2b    00:08:00  00:14:00
11.S3i-3h    00:16:00  00:14:00
12.S2b-3c    00:16:00  00:18:00
13.K5i-6h    00:20:00  00:18:00
14.S7a-7b    00:20:00  00:21:00
15.S8h-7g    00:25:00  00:21:00
16.P7c-7d    00:25:00  00:42:00
17.G4i-5h    00:47:00  00:42:00
18.P9c-9d    00:47:00  00:49:00
19.P3g-3f    01:08:00  00:49:00
20.S7b-7c    01:08:00  01:01:00
21.S3h-3g    01:39:00  01:01:00
22.S7c-6d    01:39:00  01:16:00
23.S3g-4f    01:46:00  01:16:00
24.P8d-8e    01:46:00  01:36:00
25.P6g-6f    02:15:00  01:36:00
26.P7d-7e    02:15:00  01:38:00
27.G5h-6g    02:39:00  01:38:00
28.P7ex7f    02:39:00  02:00:00
29.S7gx7f    02:40:00  02:00:00

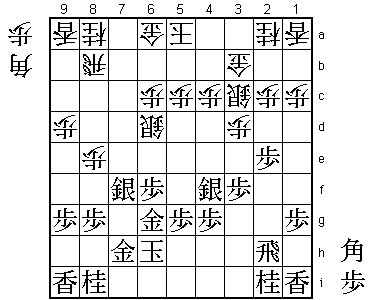
Habu actually has experience with this position playing it from the black side.
It appeared in the final of the NHK television tournament against Itodani. Even
though Habu won that game, Habu thought that the white attack was sound (despite
being behind in development) and that he could improve the white play.

30.P*7e      02:40:00  02:00:00

In the NHK final, it followed 30.P8f Px8f Rx8f P*8g R8b P6e S7c P*7e and black
got a very solid position after P4d N7g R4b K7i G6b S5e P5d S6f. According to
Habu, 30.P*7e is the right way to play, because it is the only way to justify
the early white attack.

31.S7f-6e    02:42:00  02:00:00
32.P8e-8f    02:42:00  02:26:00
33.P8gx8f    02:43:00  02:26:00
34.R8bx8f    02:43:00  02:26:00
35.P*8g      02:45:00  02:26:00
36.R8f-8d    02:45:00  02:26:00
37.S6e-5f    03:08:00  02:26:00
38.S6d-7c    03:08:00  02:49:00
39.P6f-6e    03:30:00  02:49:00
40.G6a-6b    03:30:00  03:06:00
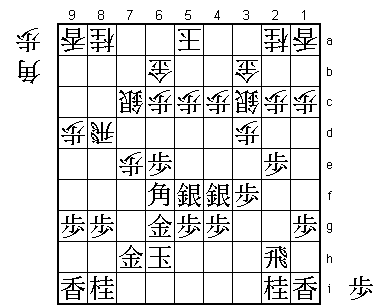
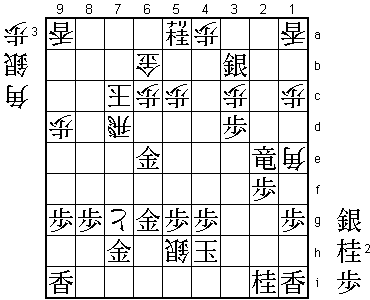
41.B*6f!     03:39:00  03:06:00

Hirose shows that he really has the flexibility needed to be a top player these
days. This move was a surprise for the people in the press room. Considering that
Hirose likes his king to be safe (hence his liking of the Anaguma), it was expected
that he would play 41.S4f-5e S7d S6f here which leads to a solid king formation.
Instead, Hirose plays 41.B*6f, which is a very positive attack on the long diagonal,
aiming to play P3e next. On the flip side, this bishop can become a target for attack,
so this move needed precise judgment. After B*6f, Habu is forced to sit back and
defend for a while.

42.S7c-7d    03:39:00  04:03:00
43.P3f-3e    04:39:00  04:03:00
44.N8a-7c    04:39:00  04:16:00
45.P3ex3d    04:45:00  04:16:00
46.S3c-4d    04:45:00  04:16:00
47.P2e-2d    05:17:00  04:16:00
48.P2cx2d    05:17:00  04:16:00
49.P*2b      05:18:00  04:16:00
50.G3bx2b?   05:18:00  04:39:00

After the game, Habu pointed out that this was an important mistake. Correct would
have been 50.P*8h. It seems a bit awkward to play this pawn sacrifice here, but it
is the only time white gets a chance to play it, so it should have been played here.
It forces an important weakness in the black castle, which might have been the
difference between winning and losing.

51.S4f-5e    05:41:00  04:39:00
52.S7dx6e    05:41:00  05:25:00
53.S5fx6e    05:44:00  05:25:00
54.N7cx6e    05:44:00  05:25:00
55.P*7d!     05:46:00  05:25:00

Habu had underestimated the power of this pawn drop. If white ignores it, black can
simply play S*7c or weaken the center with Sx4d Px4d P7c+ Gx7c followed by Bx7e.
Habu openly admitted in the post-mortem analysis that he realized that he was in
serious trouble here, as he seemed doomed to a long defensive struggle. Hirose said
that he knew that he had a big advantage here, but that he was surprised at how
close the endgame became.

56.R8dx7d    05:46:00  06:30:00
57.S5ex4d    05:47:00  06:30:00
58.P4cx4d    05:47:00  06:30:00
59.S*5f      05:49:00  06:30:00
60.S*5d      05:49:00  06:33:00
61.B6fx4d    06:10:00  06:33:00
62.P*3c      06:10:00  06:34:00
63.P3dx3c+   06:12:00  06:34:00
64.G2bx3c    06:12:00  06:35:00
65.B4dx3c+   06:13:00  06:35:00
66.N2ax3c    06:13:00  06:35:00
67.R2hx2d    06:13:00  06:35:00
68.P7e-7f    06:13:00  06:41:00
69.S5fx6e    06:57:00  06:41:00
70.S5dx6e    06:57:00  06:41:00
71.R2d-2a+   06:58:00  06:41:00
72.P*4a      06:58:00  06:41:00
73.N*4c      07:02:00  06:41:00
74.K5a-4b    07:02:00  06:43:00
75.S*3b      07:04:00  06:43:00
76.N3c-4e    07:04:00  06:44:00
77.N4c-5a+   07:04:00  06:44:00
78.K4b-3c    07:04:00  06:45:00
79.P*3e      07:17:00  06:45:00
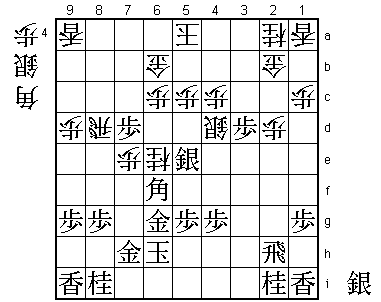
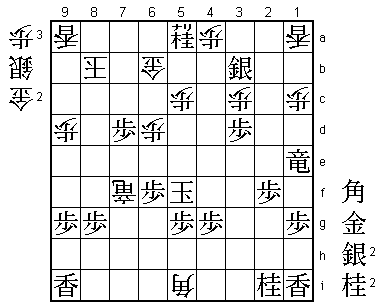
80.S*7g!     07:17:00  06:54:00

Finally, Habu gets a chance to start some kind of counter attack. However, the
white king is in grave danger because of the mating threat G*4c and because K4d
can be answered by +R2d. It seems like the end of the game is near, but it is
actually only beginning.

81.K6h-5i    07:17:00  06:54:00

No choice. 81.Nx7g Px7g+ G7hx7g Rx7g+ leads to a long mate.

82.B*1e      07:17:00  06:55:00

The real point of 80.S*7g. Because this bishop now covers square 2d, the black
promoted rook can no longer move here to finish off the white king.

83.P*2f      07:18:00  06:55:00
84.K3c-4d    07:18:00  06:55:00
85.+R2a-2e   07:24:00  06:55:00
86.P*3c      07:24:00  07:02:00
87.N8ix7g    07:30:00  07:02:00
88.P7fx7g+   07:30:00  07:02:00
89.S*4f      07:30:00  07:02:00
90.S*5h      07:30:00  07:24:00
91.K5i-4h?   07:31:00  07:24:00

Now black gets into some real trouble. Correct was 91.Kx5h +Px6g Gx6g R7h+ G*6h
and because this gold attacks the white promoted rook black wins.

92.N*5e      07:31:00  07:25:00
93.S4fx4e    07:34:00  07:25:00
94.K4dx4e    07:34:00  07:26:00
95.P3e-3d    07:34:00  07:26:00
96.K4e-5d    07:34:00  07:31:00
97.G*4e      07:40:00  07:31:00
98.K5d-6d    07:40:00  07:31:00
99.G4ex5e    07:41:00  07:31:00
100.K6d-7c   07:41:00  07:31:00
101.G5ex6e   07:41:00  07:31:00

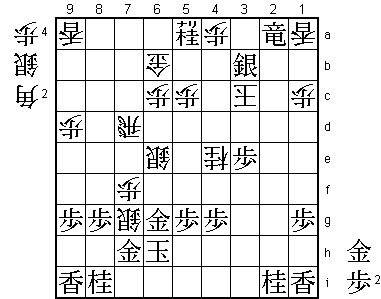
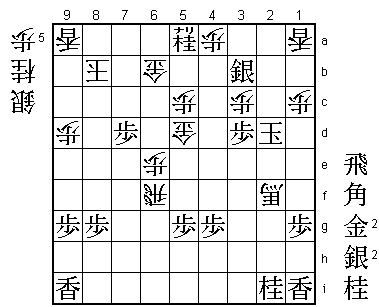
102.B*5i?    07:41:00  07:31:00

Habu fails to take his opportunity to win the game. Here 102.R4d Kx5h +Px7h would
have been very interesting for white. Both players thought that that white king
would be mated after P*7d or N*8e (the move Hirose intended to play), but the
post-mortem analysis showed that there is no mate here. 103.N*8e K8b S*7c looks
very dangerous, but the white king can escape to the 6th and 5th file and black
is unable to catch it.

103.K4hx5h   07:42:00  07:31:00

Hirose originally intended to play 103.K3i here, but realized just in time that
104.R4d is then a mating threat. Because he was forced into this change of plan,
Hirose thought here that he had lost the game.

104.+P7gx6g  07:42:00  07:32:00
105.K5hx6g   07:42:00  07:32:00
106.R7dx7h+  07:42:00  07:41:00
107.K6g-5f   07:42:00  07:41:00
108.+R7h-7f  07:42:00  07:53:00
109.P*6f     07:42:00  07:53:00
110.G*6d     07:42:00  07:54:00
111.P*7d     07:47:00  07:54:00
112.K7c-8b   07:47:00  07:54:00
113.G6ex6d   07:50:00  07:54:00
114.P6cx6d   07:50:00  07:54:00
115.+R2ex1e  07:56:00  07:54:00

116.+R7fx6f? 07:56:00  07:59:00

Habu goes for a mate that isn't there. Things still would have been very complicated
had he played 116.S*5d here. There is no way to mate the white king because S*7c
Gx7c Px7c+ +Rx7c but there is seems to be no good way to defend against the white
mating threat with a mating threat. This position was analyzed for a long time during
and after the game, but no definite conclusion could be reached. In any case, there
were a lot more variations that lead to a white win than there were variations leading
to a black win.

117.K5fx6f   07:56:00  07:59:00
118.G*6e     07:56:00  07:59:00
119.+R1ex6e  07:56:00  07:59:00
120.P6dx6e   07:56:00  07:59:00
121.K6f-5f   07:56:00  07:59:00
122.R*7f     07:56:00  07:59:00
123.N*6f     07:56:00  07:59:00
124.R7fx6f   07:56:00  07:59:00
125.K5f-4e   07:56:00  07:59:00
126.G*5d     07:56:00  07:59:00
127.K4e-3e   07:56:00  07:59:00
128.B5ix2f+  07:56:00  07:59:00
129.K3e-2d   07:56:00  07:59:00
Resigns      07:56:00  07:59:00

No mate against the black king and black threatens mate after R*8d S*8c B*7a Kx7a
G*8a etc. Even if white defends against this mating threat, black has a pile of
pieces in hand, so no defense will work. Therefore Habu resigned here, giving Hirose
a rather unexpected 2-0 lead in the match. Hirose played very positively, gaining the
early lead, but Habu made some uncharacteristic mistakes in the endgame that cost him
the game. He now needs to convert with the black pieces in the next game to avoid
digging him a 3-0 hole in a best-of-seven match for the second time this year.
