52nd Oi Match Game 1
[Black "Habu Yoshiharu, Challenger"]
[White "Hirose Akihito, Oi"]
[Event "52nd Oi-sen, Game 1"]
[Date "July 12th and 13th 2011"]
1.P7g-7f     00:00:00  00:00:00
2.P3c-3d     00:00:00  00:01:00
3.P6g-6f     00:04:00  00:01:00

The furigoma resulted in three tokins, giving challenger Habu the black pieces for
this first game. Before the match, it was expected that Hirose would play the
Furibisha Anaguma almost every game and that it was up to Habu to show what he had
prepared against Hirose's favorite opening. In the first game, he plays to avoid the
Furibisha Anaguma by closing the bishop diagonal with 3.P6f. This is an invitation
to play the Ai-Furibisha opening and Hirose accepts.

4.R8b-3b     00:04:00  00:06:00
5.B8h-7g     00:09:00  00:06:00
6.K5a-6b     00:09:00  00:10:00
7.S7i-7h     00:14:00  00:10:00
8.P3d-3e     00:14:00  00:15:00
9.S7h-6g     00:18:00  00:15:00
10.P3e-3f    00:18:00  00:29:00
11.P3gx3f    00:22:00  00:29:00
12.R3bx3f    00:22:00  00:29:00
13.R2h-8h    00:35:00  00:29:00
14.S3a-4b    00:35:00  00:38:00
15.P8g-8f    01:03:00  00:38:00
16.S7a-7b    01:03:00  01:00:00
17.P8f-8e    01:18:00  01:00:00
18.K6b-7a    01:18:00  01:00:00
19.S3i-2h    01:19:00  01:00:00
20.R3f-3d    01:19:00  01:30:00

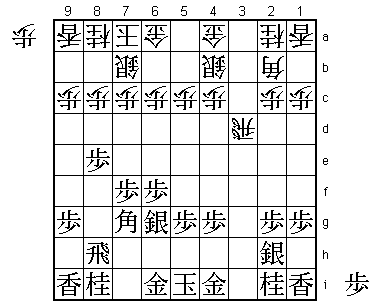
So far, the game has followed the game between Hashimoto and Habu in the Ryu-O
tournament that was played 6 days before. Not a good memory for Habu, who lost
this game, thereby ending his bid for the Ryu-O title prematurely.

21.P*3g      01:51:00  01:30:00

Dropping this pawn is a hard move to play for a professional player, but here it
seems that black has no choice. For example, if black aims for the Yagura formation
with 21.G6i-5h G4a-5b P4f S3c G4g S4d P6e B3c S3g then the counter P6d Px6d S5e
leads to a good position for white. However, after 21.P*3g the game develops into
a high Mino castle for white against the Kinmuso (Golden Excelsior) for black, which
is considered to be good for white.

22.G4a-5b    01:51:00  01:49:00
23.K5i-4h    01:52:00  01:49:00
24.P2c-2d    01:52:00  01:51:00
25.P9g-9f    02:12:00  01:51:00
26.P2d-2e    02:12:00  02:03:00
27.K4h-3h    02:13:00  02:03:00
28.S4b-3c    02:13:00  02:15:00
29.G4i-4h    02:21:00  02:15:00
30.S3c-2d    02:21:00  02:40:00
31.G6i-5h    02:59:00  02:40:00
32.S2d-3e    02:59:00  02:43:00
33.P7f-7e    03:00:00  02:43:00
34.R3d-2d    03:00:00  02:55:00
35.B7g-6h    03:11:00  02:55:00
36.P1c-1d    03:11:00  03:16:00
37.P5g-5f    03:30:00  03:16:00
38.R2d-3d    03:30:00  03:19:00
39.P7e-7d    03:32:00  03:19:00
40.P7cx7d    03:32:00  03:41:00
41.P8e-8d    03:32:00  03:41:00
42.P8cx8d    03:32:00  03:43:00
43.R8hx8d    03:33:00  03:43:00
44.P*8c      03:33:00  03:43:00
45.R8d-8e    03:50:00  03:43:00
46.B2b-1c    03:50:00  03:48:00
47.N8i-7g    03:50:00  03:48:00
48.P6c-6d    03:50:00  04:10:00
49.P*8d      04:01:00  04:10:00
50.P8cx8d    04:01:00  04:11:00
51.R8ex8d    04:01:00  04:11:00
52.P*8c      04:01:00  04:23:00
53.R8dx7d    04:01:00  04:23:00
54.G5b-6c    04:01:00  04:23:00
55.R7d-7f    04:25:00  04:23:00
56.P*7d      04:25:00  04:25:00
57.P6f-6e    04:29:00  04:25:00

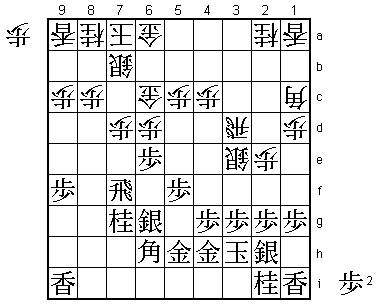
Habu starts the attack, more or less because he has no other option.

58.P2e-2f?!  04:29:00  05:13:00

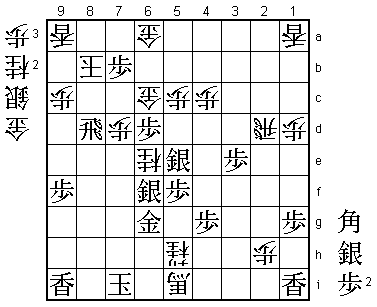
Hirose immediately plays a counter attack, but this should not have worked. However,
it is not easy to see what he should have played instead. Developing the knight with
58.N3c would give him an ideal attacking formation with rook, bishop, silver and
knight, but after 59.P5e things are not so clear because the sideways working of the
rook is very strong.

59.P2gx2f    04:30:00  05:13:00
60.P*3f      04:30:00  05:13:00
61.P3gx3f    04:36:00  05:13:00
62.S3ex3f    04:36:00  05:13:00
63.B6hx1c+   04:37:00  05:13:00
64.P*3g      04:37:00  05:14:00
65.S2hx3g    04:50:00  05:14:00
66.S3fx3g+   04:50:00  05:15:00
67.G4hx3g    04:55:00  05:15:00
68.N2ax1c    04:55:00  05:17:00
69.P*3e      05:34:00  05:17:00
70.R3d-4d    05:34:00  05:38:00
71.R7f-8f    05:41:00  05:38:00
72.P6dx6e    05:41:00  06:00:00
73.S*5e      05:43:00  06:00:00
74.R4d-2d    05:43:00  06:01:00
75.P*6d      05:58:00  06:01:00
76.G6c-6b    05:58:00  06:01:00
77.N7gx6e    06:20:00  06:01:00
78.P*3f      06:20:00  06:08:00

79.G3gx3f?   06:30:00  06:08:00

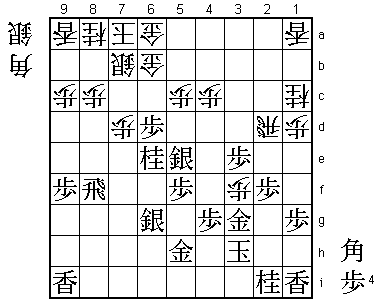
Habu was quite happy with his position here, having a whole stack of pawns in hand
to use for attack. Taking the pawn with 78.Gx3f is a bad mistake, uncharacteristic
of Habu. Correct was 79.G2g and even the strong looking 80.S*5g can be met with
81.Nx5c+ Sx5h= Sx5h B*7e R8i and it seems like black can keep his position together.

80.S*4i      06:30:00  06:09:00

Habu admitted after the game that he had seriously underestimated the strength of
this silver drop.

81.K3hx4i    06:38:00  06:09:00
82.B*2g      06:38:00  06:09:00
83.S*3h      06:43:00  06:09:00
84.B2gx3f+   06:43:00  06:09:00

White has made a very strong promoted bishop and Hirose felt that he suddenly had a
position that would not be losing quickly, giving him time to set up his own attack.

85.P*7c?     06:49:00  06:09:00

After the game, the conclusion of the post-mortem analysis was that 85.Nx5c+ Gx5c
B*4b would still have been unclear.

86.N8ax7c    06:49:00  06:20:00
87.N6ex7c+   06:49:00  06:20:00
88.S7bx7c    06:49:00  06:21:00
89.N*9e      07:06:00  06:21:00
90.P8c-8d    07:06:00  06:40:00
91.N9e-8c+   07:06:00  06:40:00
92.+B3fx2f   07:06:00  06:41:00
93.P*2e      07:25:00  06:41:00

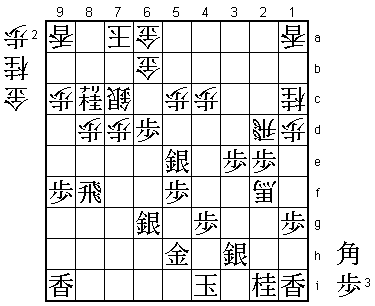
Habu is opening his bag of tricks. The white king is still quite safe, being far
away from the black attacking pieces, while the black king is already in a lot of
danger because of the strength of the promoted bishop. However, Hirose said that
after 93.P*2e he suddenly didn't know how to continue because taking this pawn
with either the bishop or the rook would importantly change the position of this
piece, with consequences that are difficult to foresee.

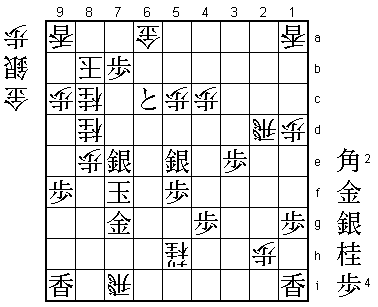
94.N*5g!     07:25:00  07:13:00

Hirose takes one long think to find a solution.

95.K4i-3i    07:25:00  07:13:00
96.P*2h!     07:25:00  07:13:00

This one-two punch of 94.N*5g and 96.P*2h decides the game in white's favor.

97.N2i-3g    07:40:00  07:13:00

Or 97.Px2d Px2i+ Kx2i N*3f and white wins. It is important that white still has
a pawn in hand so that B*8b Sx8b +Nx8b Kx8b Rx8d can be answered by P*8c. Also,
97.Kx2h is answered by the painful drop 98.P*3g and after either 99.Nx3g Nx2e
Nx2e P*2g or 99.Sx3g G*2g K3i Gx3g white wins.

98.N1cx2e    07:40:00  07:14:00
99.K3i-4h    07:40:00  07:14:00
100.N2ex3g+  07:40:00  07:14:00
101.K4hx5g   07:41:00  07:14:00

No choice. 101.Sx3g is answered by N4i+.

102.N*6e     07:41:00  07:14:00
103.K5g-6h   07:41:00  07:14:00
104.+N3gx3h  07:41:00  07:14:00
105.S6g-6f   07:44:00  07:14:00
106.+N3h-4h  07:44:00  07:24:00
107.N*6c     07:45:00  07:24:00
108.G6bx6c   07:45:00  07:28:00
109.P*7b     07:51:00  07:28:00
110.K7a-8a   07:51:00  07:29:00
111.G5h-6g   07:51:00  07:29:00
112.+N4h-5h  07:51:00  07:48:00
113.K6h-7i   07:52:00  07:48:00
114.+B2f-5i  07:52:00  07:48:00
115.P*8b     07:53:00  07:48:00
116.S7cx8b   07:53:00  07:48:00
117.+N8cx8b  07:53:00  07:48:00
118.K8ax8b   07:53:00  07:48:00
119.R8fx8d   07:53:00  07:48:00

Habu sets a final trap.

120.N*8c!    07:53:00  07:51:00

Hirose not only avoids the trap, but finds the shortest path to victory. Dropping
a knight here is a hard move to play, because it doesn't attack the rook on 8d and
therefore seems a move without any punch. However, 120.P*8c would have been a blunder
because after 121.Px6c+ there is no mate against the black king. Therefore, in the
press room 120.S*8c was expected, which seems to win after 121.Px6c+ Sx8d B*6d N*7c.
Sugimoto (7-dan) was very impressed by 120.N*8c, because it covers the important
square 7e and is therefore a mating threat. Quite a long and difficult mate, so there
was quite a lot of pressure on Hirose to get it exactly right, but he didn't hesitate.

121.P6dx6c+  07:54:00  07:51:00

Habu may have seen that he is being mated next, but he has no choice anyway.

122.+B5i-6i  07:54:00  07:51:00
123.K7i-8h   07:54:00  07:51:00
124.S*8g     07:54:00  07:51:00
125.R8dx8g   07:54:00  07:51:00
126.+B6ix8g  07:54:00  07:51:00
127.K8hx8g   07:54:00  07:51:00
128.P*8f     07:54:00  07:51:00
129.K8gx8f   07:57:00  07:51:00
130.P*8e     07:57:00  07:51:00
131.K8f-7f   07:59:00  07:51:00
132.R*7i     07:59:00  07:51:00
133.S*7g     07:59:00  07:51:00
134.P7d-7e   07:59:00  07:54:00
135.S6fx7e   07:59:00  07:54:00
136.N6ex7g+  07:59:00  07:54:00
137.G6gx7g   07:59:00  07:54:00
138.N*8d     07:59:00  07:54:00
Resigns      07:59:00  07:54:00

Mate after 139.Sx8d G*8f etc. or 139.Kx8e (K6e) S*7f etc. The two rooks are working
very well together to make this mate possible. A great start for Hirose, who wins his
first title match game against Habu with the white pieces. Game two will decide how
big this win was, because Hirose actually is one of the few professionals doing
better with the white pieces than with the black pieces.
