51st Oza Match Game 3
[Black "Habu Yoshiharu, Oza"]
[White "Watanabe Akira, Challenger"]
[Event "51st Oza-sen, Game 3"]
[Date "September 25th 2003"]
1.P7g-7f     00:00:00  00:00:00
2.P3c-3d     00:00:00  00:02:00
3.P2g-2f     00:01:00  00:02:00
4.P8c-8d     00:01:00  00:02:00
5.P2f-2e     00:19:00  00:02:00
6.P8d-8e     00:19:00  00:03:00
7.G6i-7h     00:19:00  00:03:00
8.G4a-3b     00:19:00  00:04:00
9.P2e-2d     00:20:00  00:04:00
10.P2cx2d    00:20:00  00:05:00
11.R2hx2d    00:20:00  00:05:00
12.P8e-8f    00:20:00  00:05:00
13.P8gx8f    00:21:00  00:05:00
14.R8bx8f    00:21:00  00:06:00
15.R2dx3d    00:22:00  00:06:00
16.B2b-3c    00:22:00  00:06:00
17.R3d-3f    00:23:00  00:06:00
18.S3a-2b    00:23:00  00:08:00
19.K5i-5h    00:25:00  00:08:00
20.K5a-4a    00:25:00  00:11:00
21.P*8g      00:29:00  00:11:00
22.R8f-8e    00:29:00  00:13:00
23.B8hx3c+   00:30:00  00:13:00
24.N2ax3c    00:30:00  00:14:00
25.N8i-7g    00:30:00  00:14:00
26.R8e-2e    00:30:00  00:18:00
27.P*2f      00:30:00  00:18:00
28.R2e-2d    00:30:00  00:18:00
29.R3f-5f    00:30:00  00:18:00
30.G6a-6b    00:30:00  00:39:00

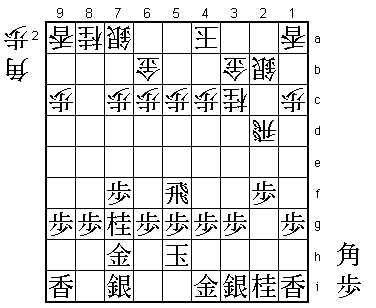
Up until this move, the game is identical to game 2. There Habu played
30.B*4e and lost quickly after 31.N6e. Of course, Watanabe plays it
differently. He just defends the pawn on 5c.

31.G4i-3h    00:31:00  00:39:00
32.R2d-5d    00:31:00  00:53:00
33.R5f-6f    00:35:00  00:53:00
34.K4a-5b    00:35:00  00:55:00
35.P7f-7e    00:39:00  00:55:00
36.G6b-7b    00:39:00  01:03:00
37.S7i-6h    00:42:00  01:03:00
38.S7a-8b    00:42:00  01:12:00
39.R6f-7f    00:54:00  01:12:00
40.S8b-8c    00:54:00  01:23:00
41.S3i-4h    01:35:00  01:23:00
42.P7c-7d    01:35:00  01:40:00
43.P7ex7d    01:38:00  01:40:00
44.S8cx7d    01:38:00  01:44:00
45.P*7e      01:41:00  01:44:00
46.S7d-8c    01:41:00  01:45:00
47.P8g-8f    01:41:00  01:45:00
48.P9c-9d    01:41:00  02:32:00
49.P8f-8e    01:52:00  02:32:00
50.P9d-9e    01:52:00  02:32:00
51.P3g-3f    02:34:00  02:32:00
52.P1c-1d    02:34:00  02:55:00
53.N2i-3g    02:49:00  02:55:00
54.P1d-1e    02:49:00  03:05:00

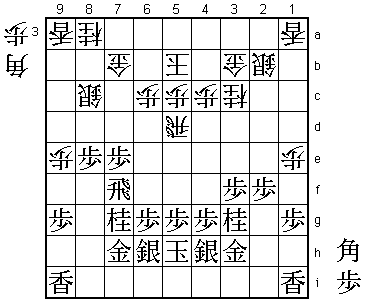
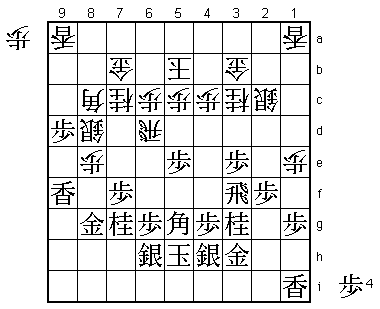
55.P5g-5f!   03:18:00  03:05:00

White has extended both of his edge pawns and it seems that white has
a solid, active position. However, Habu shows his deep strategic
understanding of this position by finding a plan that will soon make
it impossible for Watanabe to defend his position. Step one of this
plan is 55.P5f. Black aims at S4h-5g followed by P5e next (Rx5e is
then answered by B*4f).

56.R5d-2d    03:18:00  03:28:00

Watanabe decides to move the rook early, but this sets up the second
stage of black's plans.

57.B*4f      03:41:00  03:28:00
58.R2d-9d    03:41:00  03:30:00
59.P9g-9f!   03:41:00  03:30:00

The combination of the bishop on 4f and the counter attack against the
extended edge pawn gets white in trouble. For example, 60.Px9f fails
to 61.P*9e Rx9e P7d and black breaks through on 7c.

60.P*7c      03:41:00  04:03:00

The threat of the bishop on 4f has to be stopped, but dropping a pawn
here sets up the final stage of the black plan.

61.P9fx9e    03:44:00  04:03:00
62.R9d-3d    03:44:00  04:03:00
63.R7f-8f    03:50:00  04:03:00
64.P*8d      03:50:00  04:06:00
65.P8ex8d    03:55:00  04:06:00
66.S8cx8d    03:55:00  04:06:00
67.P5f-5e    03:58:00  04:06:00
68.P*9f      03:58:00  04:11:00
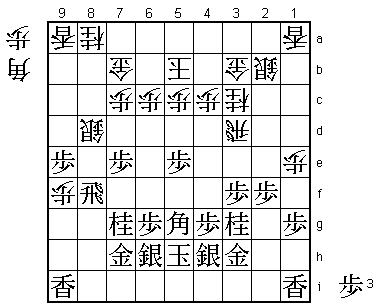
69.B4f-5g!   04:05:00  04:11:00

Habu's plan is complete. The indirect attack of the white silver
on 8d will soon make it impossible for white to hold the position
together. The pawn on 7c is important because the silver on 8d can
now no longer retreat from the attack of the bishop. From now on,
Habu is no longer aiming at only winning this game, but winning it
in the same fashion that Watanabe won game two: complete destruction.

70.P*8e      04:05:00  04:28:00
71.R8f-5f    04:08:00  04:28:00
72.B*8c      04:08:00  04:40:00
73.P3f-3e    04:13:00  04:40:00
74.R3d-4d    04:13:00  04:41:00
75.R5f-4f?   04:17:00  04:41:00

Here Habu could have ended the game quickly with 75.P7d. Then 76.Bx7d
R3f threatens both Bx8d and P3d and 76.Rx7d P5d! Px5d (Rx5d Rx5d
Px5d Bx8d) P3d Rx7g+ (what else?) Sx7g Bx5f P*5c wins for black.

76.R4d-6d    04:17:00  04:41:00
77.R4f-3f    04:21:00  04:41:00
78.S2b-2c    04:21:00  04:41:00
79.L9ix9f    04:26:00  04:41:00
80.P7c-7d    04:26:00  04:45:00
81.P7ex7d    04:27:00  04:45:00
82.R6dx7d    04:27:00  04:45:00
83.G7h-8g    04:31:00  04:45:00
84.N8a-7c    04:31:00  04:53:00
85.P*7f      04:35:00  04:53:00
86.R7d-6d    04:35:00  04:55:00
87.P9e-9d?   04:41:00  04:55:00

Looks good, as black will win easily if he manages to make a promoted
pawn on 9c, but there is a very important problem with this move.
Habu should have played 87.P2e here and it is still very likely that
black will win.

88.P*9e      04:41:00  04:55:00
89.L9fx9e    04:41:00  04:55:00
90.S8dx9e    04:41:00  04:55:00
91.P9d-9c+   04:41:00  04:55:00
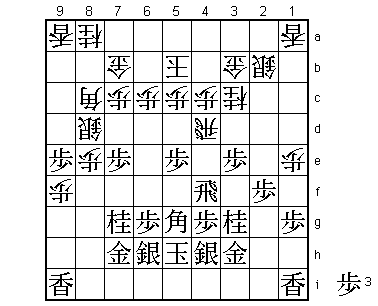
92.B8c-7d!   04:41:00  04:55:00
93.P7f-7e    04:48:00  04:55:00
94.B7d-6e!   04:48:00  04:55:00

The problem. By sacrificing this bishop, white brings the knight on
7c into play. Furthermore, by first moving the bishop to 7d, white
has forced the pawn to 7e, which blocks the black bishop on 5g.
Suddenly, the tables have been turned.

95.N7gx6e    04:48:00  04:55:00

The alternative 95.G7f is also good for white after 96.Bx7f Rx7f S*8f
P*7d Sx7g+ Sx7g N*6e.

96.N7cx6e    04:48:00  04:55:00
97.B5g-6f    04:48:00  04:55:00
98.N*4d      04:48:00  04:55:00
99.R3f-4f    04:48:00  04:55:00
100.L9ax9c   04:48:00  04:55:00
101.G8g-7f   04:50:00  04:55:00
102.L*5f     04:50:00  04:56:00

The combination of the knight on 4d and the lance on 5f is very strong.
White is winning, albeit just barely.

103.K5h-4i   04:50:00  04:56:00
104.P*3f     04:50:00  04:56:00
105.N3g-2e   04:51:00  04:56:00
106.N3cx2e   04:51:00  04:56:00
107.P2fx2e   04:51:00  04:56:00
108.N*3g     04:51:00  04:57:00
109.S4hx3g   04:53:00  04:57:00
110.P3fx3g+  04:53:00  04:57:00
111.G3hx3g   04:53:00  04:57:00
112.L5f-5g+  04:53:00  04:58:00
113.N*4e     04:55:00  04:58:00
114.+L5gx6h  04:55:00  04:59:00
115.K4i-3h   04:56:00  04:59:00
116.+L6hx6g  04:56:00  04:59:00
117.G7fx6e   04:58:00  04:59:00
118.R6dx6e   04:58:00  04:59:00
119.P5e-5d   04:58:00  04:59:00
120.P*3f!    04:58:00  04:59:00

In byoyomi, Watanabe shows his great endgame instincts. He was unable
to calculate this to the end in 60 seconds, but he felt that his
attack was stronger.

121.P5dx5c+  04:58:00  04:59:00
122.K5b-4a   04:58:00  04:59:00
123.G3gx3f   04:58:00  04:59:00
124.N4dx3f   04:58:00  04:59:00
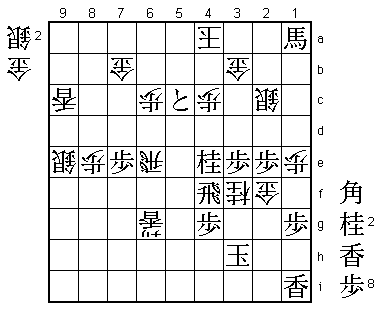
125.B6fx1a+  04:59:00  04:59:00
126.G*2f     04:59:00  04:59:00
Resigns      04:59:00  04:59:00

After 127.N*3c or N3c=, white can just play K5a and there is no
continuation. On the other hand, the black king can not be defended.
A shocking defeat for Habu. From Habu's demeanor after the game it is
always impossible to tell if he won or lost but today was different.
He was very clearly upset with himself for letting such a golden
opportunity slip away. The last thing he wanted was to give his
young challenger the feeling that he could win the match. This
is exactly what happened and Habu will now need all his experience
and magic to come back from 2-1 down.
