51st Osho Match Game 5
Black: Habu Yoshiharu, Osho
White: Sato Yasumitsu, Challenger
51st Osho-sen, Game 5, March 4th and 5th 2002
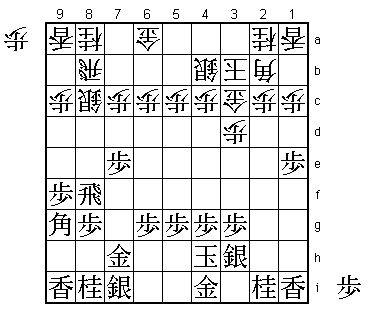
1.P2g-2f 00:00:00 00:00:00
2.P8c-8d 00:00:00 00:03:00
3.P2f-2e 00:02:00 00:03:00
4.P8d-8e 00:02:00 00:03:00
5.G6i-7h 00:03:00 00:03:00
6.G4a-3b 00:03:00 00:03:00
7.P1g-1f 00:04:00 00:03:00
8.S7a-7b 00:04:00 00:49:00
9.S3i-3h 00:36:00 00:49:00
10.P8e-8f 00:36:00 01:09:00
11.P8gx8f 00:36:00 01:09:00
12.R8bx8f 00:36:00 01:09:00
13.P*8g 00:36:00 01:09:00
14.R8f-8b 00:36:00 01:20:00
15.P1f-1e 01:09:00 01:20:00
16.S7b-8c 01:09:00 01:25:00
17.P2e-2d 01:14:00 01:25:00
18.P2cx2d 01:14:00 01:25:00
19.R2hx2d 01:14:00 01:25:00
20.P*2c 01:14:00 01:25:00
21.R2d-2f 01:15:00 01:25:00
22.S8c-7d 01:15:00 01:28:00
23.P7g-7f 01:27:00 01:28:00
24.P3c-3d 01:27:00 01:31:00
25.R2f-3f 01:57:00 01:31:00
26.G3b-3c 01:57:00 02:16:00
27.P9g-9f 02:00:00 02:16:00
28.K5a-4a 02:00:00 02:22:00
29.K5i-4h 02:15:00 02:22:00
30.K4a-3b 02:15:00 02:25:00
31.B8h-9g 02:33:00 02:25:00
32.S3a-4b 02:33:00 02:26:00
33.P7f-7e 02:33:00 02:26:00
34.S7d-8c 02:33:00 02:26:00
35.R3f-8f 02:46:00 02:26:00
Both players play a similar strategy to game 2: Habu the hineribisha
and Sato a climbing silver. Still, the colors are reversed here and the
position also has more differences than similarities.

36.P5c-5d    02:46:00  02:56:00
37.S7i-6h    03:13:00  02:56:00
38.B2b-3a    03:13:00  03:02:00
39.S6h-7g    03:23:00  03:02:00
40.S8c-8d    03:23:00  03:35:00
41.R8f-6f    04:44:00  03:35:00
42.G6a-5b    04:44:00  03:47:00
43.S7g-7f    04:44:00  03:47:00
44.S4b-5c    04:44:00  03:54:00
45.S7f-6e    04:46:00  03:54:00
46.P6c-6d    04:46:00  04:32:00
47.S6e-7f    04:48:00  04:32:00
48.P9c-9d    04:48:00  04:35:00
49.B9g-8h    05:00:00  04:35:00
50.P7c-7d    05:00:00  05:26:00
51.P7ex7d    05:02:00  05:26:00
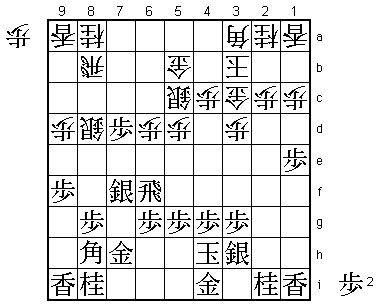
52.G5b-6c 05:02:00 05:29:00
A change of plan. Sato originally intended to go for the silver with
52.P*7e, but he realized in time that after 53.P7c+ Nx7c P*7d Px7f
Rx7f G6c Px7c+ Sx7c N*4e S4d Nx3c+ Sx3c, black has the strong attack
P1d Px1d P*1b Lx1b G*1b. Fortunately for white, there are several
other options here. 52.R7b is also a good move, but 52.G*6c is
probably the most active one. Habu admitted after the game that he
didn't have much confidence in the position here.
53.P8g-8f 05:15:00 05:29:00
54.G6cx7d 05:15:00 05:29:00
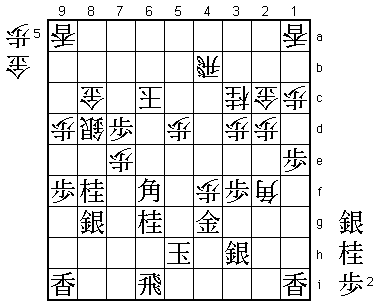
55.R6f-2f 05:15:00 05:29:00
56.P4c-4d 05:15:00 05:31:00
57.K4h-3i 05:16:00 05:31:00
58.P2c-2d 05:16:00 05:38:00
59.N8i-7g 06:00:00 05:38:00
60.N8a-7c 06:00:00 05:50:00
61.B8h-7i 06:02:00 05:50:00
62.P*7e 06:02:00 05:55:00
63.S7f-8g 06:03:00 05:55:00
64.K3b-4c 06:03:00 05:56:00
65.P5g-5f 06:28:00 05:56:00
66.R8b-2b 06:28:00 05:59:00
67.P3g-3f 06:28:00 05:59:00
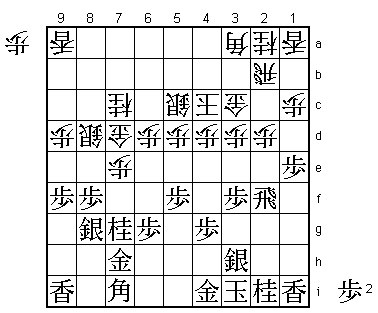
68.G3c-2c! 06:28:00 06:34:00
An interesting position. The white king looks very exposed, but black
has no good way to open the position to try and make use of that. The
position looks a little like the two piece handicap joseki, where the
king is also in the middle of the board, but far from easy to mate.
69.N2i-3g 06:36:00 06:34:00
70.N2a-3c 06:36:00 06:38:00
71.G4i-4h 06:43:00 06:38:00
72.P6d-6e 06:43:00 06:41:00
73.P4g-4f 06:54:00 06:41:00
74.S5c-6d 06:54:00 06:47:00
75.G4h-4g 07:04:00 06:47:00
76.B3a-5c 07:04:00 06:47:00
77.B7i-5g 07:04:00 06:47:00
78.K4c-5b 07:04:00 06:56:00
79.R2f-2i 07:06:00 06:56:00
80.K5b-6c 07:06:00 06:57:00
81.K3i-4h 07:07:00 06:57:00
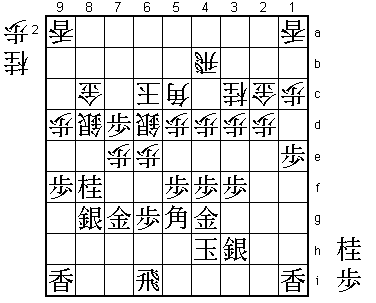
82.R2b-4b 07:07:00 07:16:00
83.P*2e 07:12:00 07:16:00
In the two title matches between Habu and Sato, we have seen a lot
of early fireworks. However, in this game both players show a different
side of their shogi: patience. It has taken them 83 moves and almost
all of their thinking time to finally start the hostilities. Perhaps
not a great service to the fans, but this is also an important part
of professional shogi.
84.P2dx2e 07:12:00 07:16:00
85.N3gx2e 07:12:00 07:16:00
86.N3cx2e 07:12:00 07:16:00
87.R2ix2e 07:12:00 07:16:00
88.P*2d 07:12:00 07:16:00
89.R2e-2i 07:12:00 07:16:00
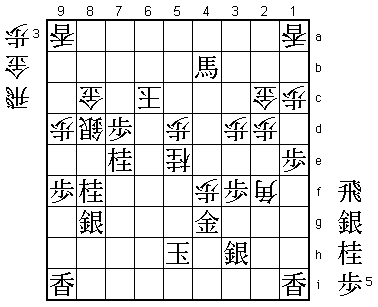
90.N*3c 07:12:00 07:22:00

Interesting point in the game. With this move, Sato shows that he is
in control of the position. White threatens a strong attack with P4e
next and if black defends with N*3g the attack with 83.P*2e would be
pointless (black just loses a move). Habu is therefore forced to open
the game here. Ironically, Sato's position turns out to be quite
vulnerable to black's attack. Sato may have been able to make Habu
jump through a hoop here, but he is shooting himself in the foot at
the same time.

91.P8f-8e    07:22:00  07:22:00
92.N7cx8e    07:22:00  07:22:00
93.N*8f      07:22:00  07:22:00
94.N8ex7g+   07:22:00  07:29:00
95.G7hx7g    07:22:00  07:29:00
96.G7d-7c    07:22:00  07:31:00
97.P*7d      07:22:00  07:31:00
98.G7c-8c    07:22:00  07:35:00
99.R2i-6i!   07:32:00  07:35:00
Great move. This looks extremely show, but this is not the case. If
white goes for the knight with 100.P*8e, then black wins very quickly
after 101.P6f Px6f Gx6f P*6e Gx6e Sx6e P*6d Kx6d N*7f.

100.P4d-4e?! 07:32:00  07:43:00

After the game, there was no clear mistake found in Sato's play, but
this move might have overstretched the white position. 100.K5b might
have been better.

101.P6g-6f   07:33:00  07:43:00
102.N*5e?!   07:33:00  07:50:00

Looks like a strong shobute that had some commentators in the press
room speculating about Sato taking the Osho title. However, this
move backfires as Habu has a very nice reply. Better might have
been 102.Px6f, but after 103.Gx6f P*6h Rx6h Px4f Bx4f Rx4f Gx4f it
is hard to find a good move for white despite the fact that the
black pieces are all over the place. B*7i is answered by P*6i and
N*4e is not very effective after K5h.

103.P5fx5e   07:36:00  07:50:00
104.S6dx5e   07:36:00  07:50:00
105.N*6g!    07:36:00  07:50:00

Great move. White can't take on 4f now, as black captures the silver
on 5e with check. Also, 106.Sx4f P*4c Rx4c Gx4f Px4f N*5e wins the
rook and is good for black.

106.B5c-2f   07:36:00  07:54:00
107.K4h-5h   07:43:00  07:54:00
108.S5ex6f   07:43:00  07:54:00
109.G7gx6f   07:44:00  07:54:00
110.P6ex6f   07:44:00  07:54:00
111.B5gx6f   07:44:00  07:54:00
112.P4ex4f   07:44:00  07:58:00
113.N6gx7e!  07:47:00  07:58:00

Nice finish. The knight on 6g has done an important job and is now
sacrificed to open up the lines to the king, win the rook on 4b and
decide the game.

114.K6c-5b   07:47:00  07:58:00
115.N7e-6c+  07:49:00  07:58:00
116.K5bx6c   07:49:00  07:58:00
117.B6fx3c+  07:49:00  07:58:00
118.P*6h     07:49:00  07:58:00
119.R6ix6h   07:49:00  07:58:00
120.P*6g     07:49:00  07:58:00
121.R6hx6g   07:49:00  07:58:00
122.K6c-7b   07:49:00  07:58:00
123.+B3cx4b  07:49:00  07:58:00
124.N*5e     07:49:00  07:58:00
125.R6g-6c+  07:51:00  07:58:00
126.K7bx6c   07:51:00  07:58:00
127.N*7e     07:51:00  07:58:00
Resigns      07:51:00  07:58:00
Mate after 128.Sx7e R*7c Gx7c Px7c+ Kx7c N*6e etc. A tight game where
the fighting started very late. Habu saves his Osho title for at least
another game. Still, he is 2-3 down and needs to win both of the
remaining games to defend his title. Especially game 6 will be important,
as Sato will play with the black pieces then.