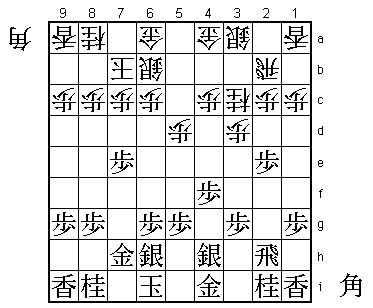
51st Osho Match Game 3
Black: Habu Yoshiharu, Osho
White: Sato Yasumitsu, Challenger
51st Osho-sen, Game 3, February 12th and 13th 2002
1.P7g-7f 00:00:00 00:00:00
2.P3c-3d 00:00:00 00:09:00
3.P2g-2f 00:04:00 00:09:00
4.P5c-5d 00:04:00 00:10:00
5.P2f-2e 00:56:00 00:10:00
6.R8b-5b 00:56:00 00:15:00
Sato sticks with his game plan and plays Furibisha again, like in
Game 1. This time an even more unusual variation: the Kondo-style
Gokigen Nakabisha. Leaving the bishop diagonal open is the main
feature of this opening. It has some pitfalls, but judging from
the popularity of this opening among top professionals, it doesn't
seem to be completely sound.
7.G6i-7h 00:57:00 00:15:00
8.K5a-6b 00:57:00 00:23:00
9.K5i-6i 01:08:00 00:23:00
10.K6b-7b 01:08:00 00:25:00
11.S3i-4h 01:10:00 00:25:00
12.S7a-6b 01:10:00 00:32:00
13.P4g-4f 02:00:00 00:32:00
14.B2b-3c 02:00:00 01:01:00
15.B8hx3c+ 02:27:00 01:01:00
16.N2ax3c 02:27:00 01:01:00
17.S7i-6h 02:27:00 01:01:00
18.R5b-2b 02:27:00 01:07:00
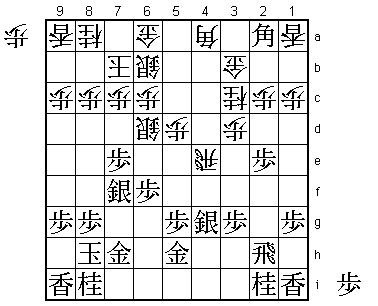
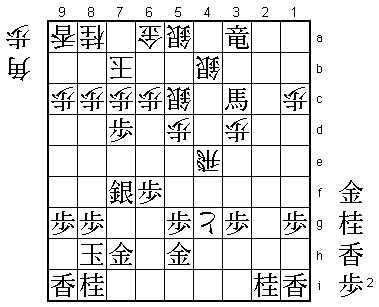
19.P7f-7e!? 02:43:00 01:07:00
A hard move to play, as this pawn is quite lonely out there.
Supporting it with S7f will give white tactical chances with an
open diagonal to the king and a bishop in hand. Still, this pawn
move is going to be the reason for black's victory.
20.S3a-4b 02:43:00 01:27:00
21.S6h-7g 02:43:00 01:27:00
22.S4b-5c 02:43:00 02:29:00
23.K6i-7i 02:49:00 02:29:00
24.P4c-4d 02:49:00 02:57:00
25.K7i-8h 03:13:00 02:57:00
26.G4a-3b 03:13:00 03:06:00
27.G4i-5h 04:38:00 03:06:00
28.S5c-6d 04:38:00 03:34:00
29.S7g-7f 04:53:00 03:34:00
30.R2b-2a 04:53:00 03:38:00
31.S4h-4g 04:56:00 03:38:00
32.R2a-4a 04:56:00 04:00:00
33.P6g-6f 05:03:00 04:00:00
34.P4d-4e?! 05:03:00 04:40:00
A natural exchange to activate the rook, but one with a serious
drawback. Better is probably 34.S5e.
35.P4fx4e 05:08:00 04:40:00
36.R4ax4e 05:08:00 04:42:00
37.B*2a! 05:20:00 04:42:00
Habu said he wasn't sure about this move and that he played it
because there was nothing else.
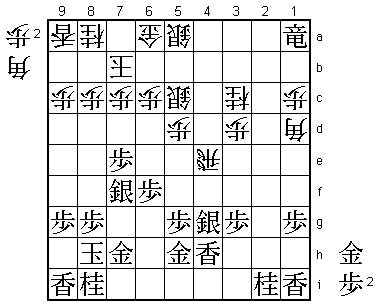
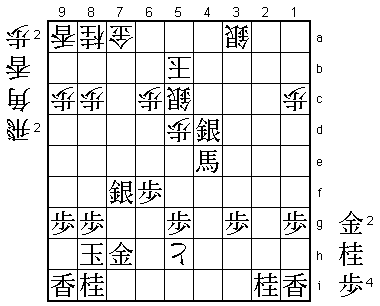
38.B*4a! 05:20:00 05:44:00
Great reply. 38.P*4f S3f R4b P*4d B*4a P2d Px2d Rx2d Rx2d S3e! is
good for black. This bishop is not only defending the gold on 3b,
but it will also jump out to 1d, threatening to exchange two pieces
for one on 4g.
39.P2e-2d 05:54:00 05:44:00
40.P2cx2d 05:54:00 05:44:00
41.R2hx2d 05:54:00 05:44:00
42.S6d-5c 05:54:00 05:45:00
43.B2ax3b+ 06:16:00 05:45:00
44.B4ax3b 06:16:00 05:45:00
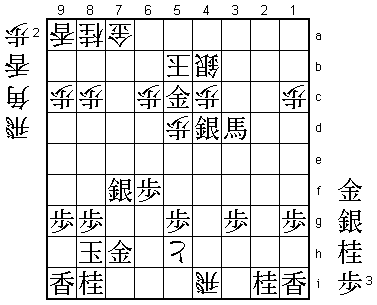
45.R2d-2b+ 06:16:00 05:45:00
46.B3b-1d 06:16:00 05:45:00
There it is.
47.+R2bx1a 06:16:00 05:45:00
48.S6b-5a! 06:16:00 06:18:00
Sato is doing everything to stay in this game. Black is threatening
a devastating attack with L*8f next. 48.S5a is the perfect defense
against this.
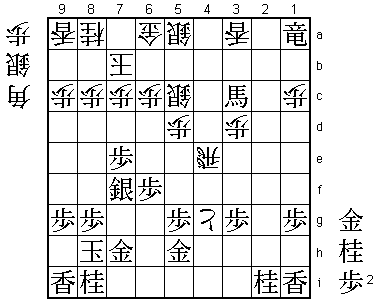
49.L*4h! 07:00:00 06:18:00
In the press room variations like 49.+R2b S5b, 49.P*4f R2e +Rx1c
B4a +Rx3c S5a-4b and 49.L*8f Rx4g+ Gx4g Bx4g+ R*4a B*6i were
analyzed, but all these variations end with white on top. For a
moment, it was thought that Sato had managed to turn the tables,
but Habu's 49.L*4h made clear that this was not the case. This move
gives up the option of L*8f, but defends against the captures on
4g and white can't move the rook to 2e as after 50.R2e +Rx1c B4a
S3f both rook and bishop are attacked.

50.B1dx4g+   07:00:00  07:16:00
51.L4hx4g    07:11:00  07:16:00
52.P*4f      07:11:00  07:17:00
53.B*2d      07:12:00  07:17:00
54.P4fx4g+   07:12:00  07:21:00
55.B2dx3c+   07:12:00  07:21:00
56.L*3a!     07:12:00  07:24:00
Sato is really opening his bag of tricks in this game. The simple
56.L*4b fails to 57.+Bx3d +Px5h N*8d Px8d G*8b and after both Kx8b
+Bx6a and K6b +Bx6a Kx6a +R4a black wins. 56.S5c-4b also loses after
+Bx3d +Px5h +Bx4e and even G*6h is not very frightening as the
promoted bishop on 4e also works in defense.

57.+R1ax3a   07:33:00  07:24:00
58.S*4b      07:33:00  07:24:00
59.P7e-7d!   07:39:00  07:24:00
Habu follows suit with a great move to decide the game. This is the
pawn that was pushed forward so daringly on move 19.

60.S4bx3a    07:39:00  07:49:00

No choice. 60.Px7d P*7c Nx7c P*7e wins for black.

61.P7dx7c+   07:39:00  07:49:00
62.K7bx7c    07:39:00  07:49:00
63.+B3cx3d   07:39:00  07:49:00

Game over. This bishop works in attack and defense.

64.S5a-5b    07:39:00  07:50:00
65.L*7e      07:42:00  07:50:00
66.K7c-6b    07:42:00  07:51:00
67.+B3dx4e   07:42:00  07:51:00
68.+P4gx5h   07:42:00  07:53:00
69.R*8b      07:44:00  07:53:00
70.K6b-5a    07:44:00  07:53:00
71.L7e-7b+   07:45:00  07:53:00
72.G*7a      07:45:00  07:57:00
73.+L7bx7a   07:48:00  07:57:00
74.G6ax7a    07:48:00  07:57:00
75.R8bx5b+   07:48:00  07:57:00
76.K5ax5b    07:48:00  07:57:00
77.S*4d      07:48:00  07:57:00
Winning. White has no way to stop black's attack.

78.S3a-4b    07:48:00  07:59:00
79.P*4c      07:49:00  07:59:00
80.R*4i      07:49:00  07:59:00
81.P4cx4b+   07:51:00  07:59:00
82.S5cx4b    07:51:00  07:59:00
83.+B4e-3d   07:51:00  07:59:00
84.P*4c      07:51:00  07:59:00
85.G*5c      07:51:00  07:59:00
Resigns      07:51:00  07:59:00
And mate after 86.Sx5c +Bx4c K6b +Bx5c K7c S*6b Gx6b +Bx6b Kx6b
N*7d. White can avoid mate with 86.K6a, but then 87.Gx6c leads to
a simple black win. Habu finally managed to win a title match game
against Sato after three consecutive losses. If this is the start
of a come-back that will safe his titles is another matter. He is
still 1-2 down and needs to win game 4 to keep the momentum.