51st Osho Match Game 2
Black: Sato Yasumitsu, Challenger
White: Habu Yoshiharu, Osho
51st Osho-sen, Game 2, January 25th and 26th 2002
1.P2g-2f     00:02:00  00:00:00
2.P8c-8d     00:02:00  00:04:00

A small surprise. It was expected that Habu would defend with the
Yokofudori in this game.

3.P2f-2e     00:04:00  00:04:00
4.P8d-8e     00:04:00  00:07:00
5.G6i-7h     00:04:00  00:07:00
6.G4a-3b     00:04:00  00:09:00
7.P2e-2d     00:06:00  00:09:00
8.P2cx2d     00:06:00  00:10:00
9.R2hx2d     00:06:00  00:10:00
10.P*2c      00:06:00  00:11:00
11.R2d-2h    00:06:00  00:11:00
12.P8e-8f    00:06:00  00:33:00
13.P8gx8f    00:06:00  00:33:00
14.R8bx8f    00:06:00  00:33:00
15.P*8g      00:07:00  00:33:00
16.R8f-8d    00:07:00  00:33:00
17.S3i-3h    00:09:00  00:33:00
18.P3c-3d    00:09:00  00:34:00
19.S3h-2g    00:17:00  00:34:00
20.P1c-1d    00:17:00  01:29:00
21.P7g-7f    00:48:00  01:29:00
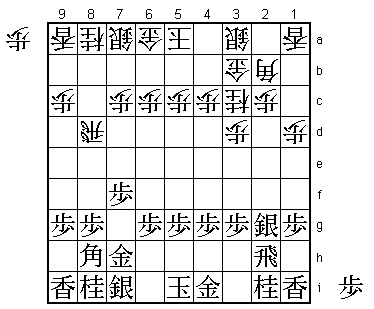
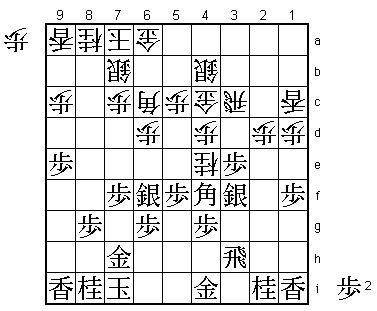
22.N2a-3c?!  00:48:00  01:42:00

This position is similar to an earlier game between these players:
A Nihon Series game played on October 14th last year. That game was
won by Habu, but the colors were reversed. Both players must have
been well aware of this and Habu is the first one to try and improve
the play in that game. There, Sato played N3c only after the silver
had come up to 3f. Habu's idea is the same: pushing back the silver
on 3f by playing B1c followed by P3e if the silver moves up. Pushing
back the silver and moving into a hineribisha position (R3d, N3c, B1c)
wins white some moves. However, with the silver not yet played to 3f,
this plan is not so strong. Sato just abandons this idea in favor of
another one.

23.S7i-6h    01:03:00  01:42:00
24.R8d-7d    01:03:00  01:49:00
25.S6h-7g!?  01:29:00  01:49:00

A risky move, but Sato has correctly judged this. Often played in this
type of position is G7g, but this gold eventually has to return to 7h,
giving white an extra move. Sato doesn't want to give up that move and
aims for a Yagura position instead. The problem is that 25.S7g weakens
5g, which is exactly the point where white's attack is aimed at.

26.P3d-3e    01:29:00  01:55:00
27.B8h-7i    01:31:00  01:55:00
28.R7d-3d    01:31:00  02:08:00
29.P5g-5f    01:39:00  02:08:00
30.K5a-6b    01:39:00  02:14:00
31.K5i-6i    01:45:00  02:14:00
32.S7a-7b    01:45:00  02:21:00
33.P9g-9f    02:40:00  02:21:00

In this game, Sato spent most of his time on this move: 55 minutes. It
is a subtle waiting move. 33.B6h followed by K7i and K8h is the obvious
way to continue, but Sato didn't like P7d followed by N7c in that case.
Sato is playing P9f to see what his opponent is going to do.

34.B2b-1c    02:40:00  02:42:00

Habu plays the active plan. He judged that answering P9f with P9d
wasn't good for white. B1c is a natural development move in the
hineribisha, but also a small trap.

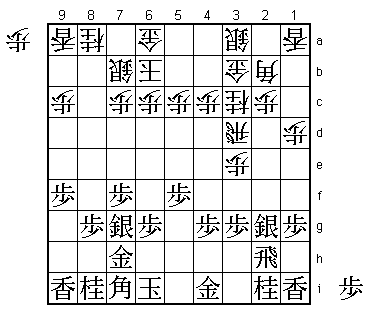
35.S7g-6f!   02:54:00  02:42:00

Of course Sato doesn't fall for it. 35.B6h? would have been very
dangerous after 36.N4e and after both 37.G3h or G4h, white strongly
attacks with 38.P3f. With the gold on 3h, the hole on 5g is undefended
and with a gold on 4h, there is always a bishop drop on 3i. 35.S6f
abandons the plan of building a perfect Yagura, but is a good, active
move.

36.K6b-7a    02:54:00  02:57:00
37.P9f-9e    03:21:00  02:57:00
38.S3a-4b    03:21:00  03:21:00
39.P1g-1f    03:29:00  03:21:00
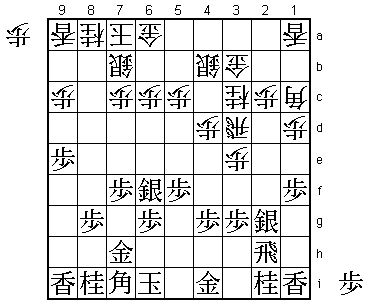
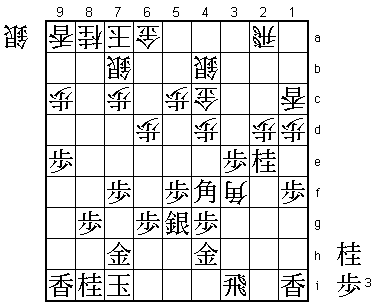
40.P4c-4d?   03:29:00  04:11:00

Professional shogi can be decided by very subtle things. This innocent
looking move might well have been the difference in this game. Habu
should have played 40.P6d immediately, threatening to attack the silver
on 6f at any time with P6e. In this case, black can not play 41.B6h
because of 42.P*8h and white has a strong attack. After 40.P6d the
following variation can be expected: 41.S2f P3f Px3f Rx3f S3g Rx5f S4f
R5d. Habu said after the game that he wasn't very confident about this
position, but that it was much better than what happened after 40.P4d.

41.B7i-6h    03:44:00  04:11:00
42.P6c-6d    03:44:00  04:22:00
43.K6i-7i    04:09:00  04:22:00

The difference. Black is now in time to stop the attack with 43.P*8h.

44.N3c-4e    04:09:00  04:53:00

Habu realizes he is in trouble and tries to force the position.

45.R2h-5h!   04:30:00  04:53:00

Cool defense. This rook is now out of harm's way after P3f, which is
the only attack white has.

46.P3e-3f?   04:30:00  05:31:00

Going in strong, but based on a mistake in Habu's calculations.

47.B6hx1c+   05:02:00  05:31:00
48.L1ax1c    05:02:00  05:47:00

Here Habu realized that his planned 48.Px3g+ fails to 49.B*2e! and
now 50.+Px4g is answered by R1h and 50.R3c by P*3d.

49.P3gx3f    05:02:00  05:47:00
50.P2c-2d    05:02:00  05:58:00
51.B*4f!     05:08:00  05:58:00

Another good move by Sato. 51.B*6h is the most natural looking drop
for the bishop, but Sato didn't like a future N5g+. Furthermore, there
is no way black can go and kill the knight with P4f (the hole on 4g
would be too severe), so Sato thought it better to drop the bishop on 4f.

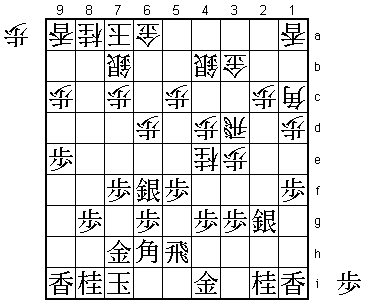
52.R3d-3c    05:08:00  06:06:00
53.P3f-3e    05:09:00  06:06:00
54.G3b-4c    05:09:00  06:14:00
55.S2g-3f    05:18:00  06:14:00

Finally, the silver moves up. Black has a big advantage here.

56.B*6c      05:18:00  06:35:00
57.R5h-3h    05:31:00  06:35:00

58.R3c-3a    05:31:00  06:51:00

It looks like white might have a chance here with 58.P*3g 59.Nx3g
60.N5g=, but after 61.N2e! Nx4i+ Nx3c+ Sx3c Bx6d +N4h Rx4h Bx3f R*1b
followed by capturing the lance on 1c, black keeps his advantage.

59.G4i-4h    05:54:00  06:51:00
60.R3a-2a    05:54:00  06:53:00
61.R3h-3i    05:54:00  06:53:00

Habu is hoping for some attack with P*3g, but Sato doesn't give
him any hope.

62.P*3g      05:54:00  06:57:00
63.N2ix3g    06:02:00  06:57:00
64.N4e-5g+   06:02:00  06:57:00
65.S6fx5g    06:08:00  06:57:00
66.B6cx3f    06:08:00  06:57:00
67.N3g-2e!   06:10:00  06:57:00

The game winner. If white moves the bishop, Nx1c+ is too severe.

68.B3fx2e    06:10:00  07:13:00
69.P*2f      06:10:00  07:13:00

This completely kills white's attack.

70.P4d-4e    06:10:00  07:13:00
71.B4f-5e    06:12:00  07:13:00
72.G4c-5d    06:12:00  07:13:00
73.P2fx2e    06:12:00  07:13:00
74.G5dx5e    06:12:00  07:13:00
75.P5fx5e    06:12:00  07:13:00
76.B*2h      06:12:00  07:13:00
77.R3i-5i    06:21:00  07:13:00
78.B2hx5e+   06:21:00  07:17:00
79.S5g-6f    06:21:00  07:17:00
80.+B5e-5d   06:21:00  07:17:00
81.P3e-3d    06:27:00  07:17:00
82.K7a-8b    06:27:00  07:20:00
83.K7i-8h    06:33:00  07:20:00
84.R2a-3a    06:33:00  07:23:00
85.B*2b      06:36:00  07:23:00
86.R3ax3d    06:36:00  07:32:00
87.B2bx1c+   06:36:00  07:32:00
88.P4e-4f    06:36:00  07:32:00
89.+B1c-2c   06:47:00  07:32:00
90.R3d-3f    06:47:00  07:32:00
91.+B2c-5f   06:48:00  07:32:00
Resigns      06:48:00  07:32:00

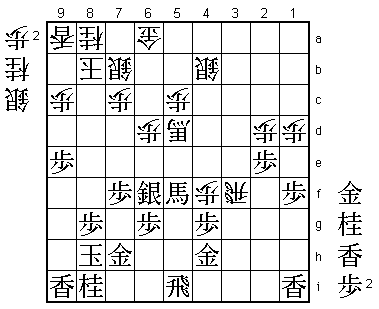
Not a position in which many amateur players would resign, but Habu
sees that he has to defend against L*8f P*8c Lx8c+ Sx8c +Bx8c Kx8c
N*7e K7b Rx5d. The only way to do that is by playing 92.P*8c, but
this makes his only attacking chance with P*8f impossible, so there
is no way to win for white from there. The white position is much
worse than it looks at first glance. A complete victory for Sato in
this game, who really stepped up his game so far. For Habu this is
the first time in seven Osho matches that he starts with two losses.
Is the writing on the wall, or can Habu find a way to fight back?
