51st Osho Match Game 1
Black: Habu Yoshiharu, Osho
White: Sato Yasumitsu, Challenger
51st Osho-sen, Game 1, January 16th and 17th 2002
1.P7g-7f     00:00:00  00:00:00
2.P3c-3d     00:00:00  00:08:00
3.P2g-2f     00:05:00  00:08:00
4.P4c-4d     00:05:00  00:09:00
5.P2f-2e     00:09:00  00:09:00
6.B2b-3c     00:09:00  00:09:00
7.S3i-4h     00:10:00  00:09:00
8.R8b-3b     00:10:00  00:12:00

This was a big surprise. It is not that Sato never ranges the rook,
but until now he has always does that when invited by the opponent
(for example, in the 2.G3b opening) or when he wanted to put the
opponent on the wrong foot by playing Yodo Furibisha. Ranging the
rook by himself is a first. He said he wanted to give it a try, as
he had studied it extensively. Perhaps the more important reason was
psychological. Sato has been beaten badly by Habu in all of their
recent title match encounters (including a 4-0 in the Osho match two
years ago). Playing something he has never played before might be his
way of saying: "This time will be different!".

9.K5i-6h     00:14:00  00:12:00
10.S3a-4b    00:14:00  00:13:00
11.K6h-7h    00:16:00  00:13:00
12.K5a-6b    00:16:00  00:13:00
13.B8h-7g    00:29:00  00:13:00
14.S7a-7b    00:29:00  01:01:00
15.K7h-8h    00:45:00  01:01:00
16.K6b-7a    00:45:00  01:03:00
17.P5g-5f    00:52:00  01:03:00
18.G4a-5b    00:52:00  01:11:00
19.S4h-5g    01:19:00  01:11:00
20.P6c-6d    01:19:00  01:37:00
21.L9i-9h    01:45:00  01:37:00
22.P5c-5d    01:45:00  01:50:00
23.K8h-9i    01:46:00  01:50:00
24.S4b-5c    01:46:00  01:52:00
25.S7i-8h    01:53:00  01:52:00
26.P7c-7d    01:53:00  01:57:00
27.P3g-3f    02:24:00  01:57:00
28.P9c-9d    02:24:00  02:13:00
29.G6i-7i    02:52:00  02:13:00
30.P9d-9e    02:52:00  02:26:00
31.G4i-5i    03:03:00  02:26:00
32.N8a-7c    03:03:00  03:05:00
33.B7g-6h    03:17:00  03:05:00
34.P6d-6e    03:17:00  03:15:00
35.G5i-6i    03:47:00  03:15:00
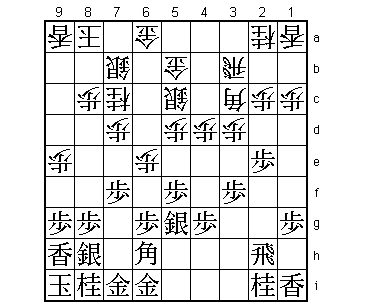
36.K7a-8a!?  03:47:00  03:59:00

Up until now this looks like an old-fashioned third file rook from the
times that the late Oyama had so much success with it. However, from
now it gets something modern. Playing the king to 8a instead of 8b is
what Sato prepared: "I thought it was the best". The idea behind this
is to keep the king out of a potential bishop diagonal. A normal
continuation from here would be P6f followed by Px6e Nx6e S4h. In
this case the diagonal to the king is invitingly open, allowing all
kinds of nasty checks for black. A second idea is to move the rook to
the king side to support an edge attack against the anaguma. We will
see how this works very soon...

37.G6i-7h    04:03:00  03:59:00
38.G5b-6c    04:03:00  04:01:00
39.S5g-4f    04:45:00  04:01:00
40.S5c-6d    04:45:00  04:13:00
41.P3f-3e    04:50:00  04:13:00

Habu doesn't hesitate.

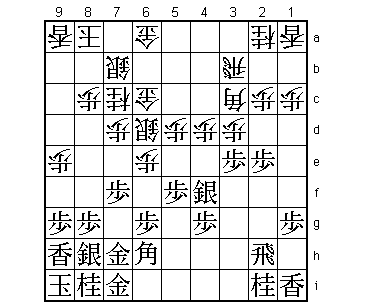
42.P7d-7e?!  04:50:00  04:20:00

Sato didn't like 42.Px3e Sx3e and goes for a semeai (mutual attack)
instead. This is in style, but in the press room the comment: "Static
rook player playing ranging rook" was heard. Sato gives up some pawns
here to get an attack against the anaguma.

43.P3ex3d    05:05:00  04:20:00
44.B3c-5a    05:05:00  06:05:00
45.P7fx7e    06:01:00  06:05:00
46.S6dx7e    06:01:00  06:05:00
47.B6h-5g    06:07:00  06:05:00
48.P6e-6f    06:07:00  06:13:00
49.P6gx6f    06:08:00  06:13:00
50.P*7f      06:08:00  06:13:00
51.R2h-3h    06:18:00  06:13:00
52.N7c-8e    06:18:00  06:18:00

It seems that Sato thought he had good play here. However, in reality
he has no good attack without pawns so there is no real compensation
for the sacrificed material. Even worse, he has overlooked something.

53.B5g-4h    06:21:00  06:18:00
54.S7b-7c    06:21:00  06:34:00
55.B4h-2f    06:36:00  06:34:00
56.G6c-5c    06:36:00  07:01:00

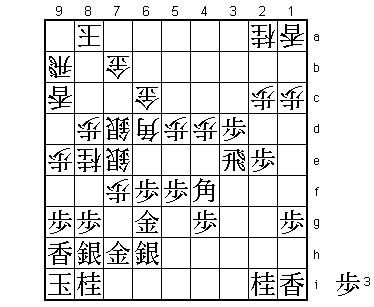
Now white's position looks horrible with all the generals scattered
around. Sato intended to play 56.B6b here, but after 57.B1e there is
no defense against the breakthrough on the third file. Sato is lucky
that there is no obvious way to attack his position. Here everyone
thought that Habu had an overwhelming position.

57.S4f-5g?   07:05:00  07:01:00

Habu regretted this passive move. He thought that white had no good
plan and that he had time to further improve his position. After the
game Habu said he probably should have attacked here, but no variations
were given.

58.S7c-7d    07:05:00  07:05:00
59.R3h-3f    07:18:00  07:05:00
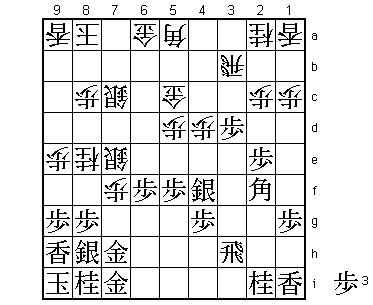
60.L9a-9c!   07:18:00  07:16:00

There is the rook switch! Suddenly white gets a very powerful attack
against the anaguma.

61.B2f-3g    07:24:00  07:16:00
62.R3b-9b    07:24:00  07:20:00

The rocket is ready to fire at any convenient moment.

63.S5g-6h    07:29:00  07:20:00
64.G5c-6c    07:29:00  07:21:00
65.G7h-6g    07:33:00  07:21:00
66.G6a-7b    07:33:00  07:29:00

White has not only set up his attack, but also regrouped his defense.
Suddenly black is in a lot of danger.

67.R3f-3e    07:34:00  07:29:00
68.B5a-4b    07:34:00  07:38:00
69.G7i-7h    07:41:00  07:38:00
70.P8c-8d    07:41:00  07:48:00
71.B3g-4f    07:44:00  07:48:00
72.B4b-6d!   07:44:00  07:51:00

Good judgment with less than 10 minutes on the clock. This bishop
exchange is good for white. The bishop picks up the right pieces for
the white attack. Furthermore, there is no fear of a rook promotion
on the third file, as black can always plug his castle with an anchor
pawn after playing P7g+ first.

73.B4fx6d    07:44:00  07:51:00
74.S7ex6d    07:44:00  07:51:00
75.P3d-3c+   07:44:00  07:51:00
76.B*6i      07:44:00  07:51:00
77.P*7i      07:44:00  07:51:00
78.B6ix4g+   07:44:00  07:51:00
79.+P3c-4c   07:44:00  07:51:00
80.P7f-7g+   07:44:00  07:51:00
81.R3e-3a+   07:44:00  07:51:00
82.P*7a      07:44:00  07:51:00
83.S6hx7g    07:44:00  07:51:00
84.+B4gx2i   07:44:00  07:51:00
85.S7g-8f    07:45:00  07:51:00
86.+B2ix1i   07:45:00  07:51:00
87.+R3ax2a   07:45:00  07:51:00
88.L*9d      07:45:00  07:51:00

Awesome power on the edge.

89.S8fx8e    07:50:00  07:51:00
90.S7dx8e    07:50:00  07:51:00
91.N*7g      07:50:00  07:51:00
92.N*7c      07:50:00  07:51:00
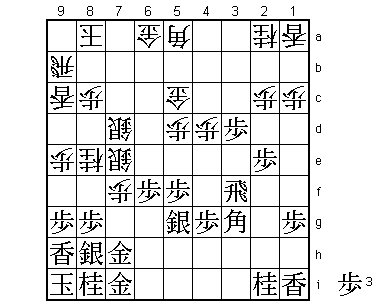
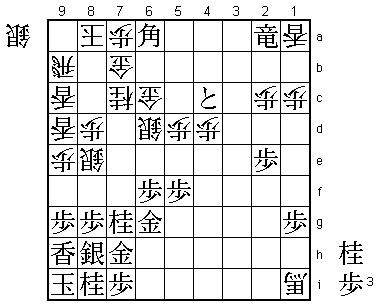
93.B*6a?     07:54:00  07:51:00

A rare endgame mistake by Habu. He should have played 93.Nx8e 94.Nx8e
95.S*8f here. Then the black threat is Sx8e followed by N*8d.
Furthermore, 96.S*7d leads to sennichite (Sx8e Sx8e N*7g N*7c Nx8e etc.)
and if white tries to avoid that with 96.S*7e instead, then 97.Sx8e
Px8e N*7f is a problem.

94.P9e-9f    07:54:00  07:55:00
95.N7gx8e    07:54:00  07:55:00
96.N7cx8e    07:54:00  07:55:00
97.P9gx9f    07:54:00  07:55:00

Or 97.S*8c Px9g+ Nx9g Nx9g+ Sx9g Lx9g+ and white wins. It is important
to leave the lance on 9c, as a lance in hand for black or an empty 9c
square would now lead to mate after Bx7b+ Rx7b L*8b or N*9c.

98.L9dx9f    07:54:00  07:55:00
99.P*9g      07:54:00  07:55:00
100.N8ex9g+  07:54:00  07:55:00
101.N8ix9g   07:54:00  07:55:00
102.L9fx9g+  07:54:00  07:55:00
103.S8hx9g   07:54:00  07:55:00
104.L9cx9g+  07:54:00  07:55:00
105.L9hx9g   07:54:00  07:55:00
106.P*9h     07:54:00  07:55:00
107.K9i-8h   07:54:00  07:55:00

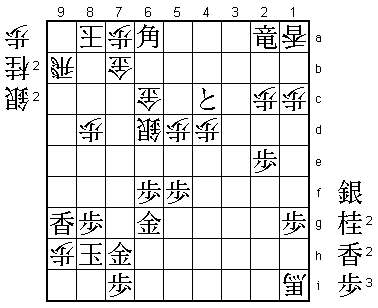
Habu has given up on this game. 107.K8i Rx9g+ S*8h is no direct mate,
but black wouldn't have any fighting chance.

108.R9bx9g+  07:54:00  07:57:00
109.K8hx9g   07:54:00  07:57:00

Again Habu could have avoided mate with 109.K7g, but after something
like 110.+B4f there is nothing left to play for.

110.N*8e     07:54:00  07:57:00
111.K9g-9f   07:54:00  07:57:00
112.S*9e     07:54:00  07:57:00
113.K9fx9e   07:54:00  07:57:00
114.N*8c     07:54:00  07:57:00
115.K9e-9d   07:54:00  07:57:00
116.S*9c     07:54:00  07:57:00
117.K9dx9c   07:54:00  07:57:00
118.L*9a     07:54:00  07:57:00
Resigns      07:54:00  07:57:00

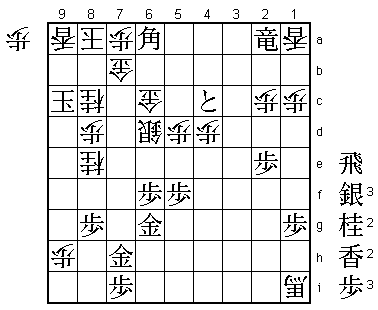
Mate after 119.K8d S*7e Kx8e G7d Kx7d +B7c. A huge win for Sato. He
played with white, had a terrible position in the middle game and won
from an opening he played for the first time in his career. Have we
seen a "new Sato"?
