51st Oi Match Game 5
[Black "Hirose Akihito, Challenger"]
[White "Fukaura Koichi, Oi"]
[Event "51st Oi-sen, Game 5"]
[Date "August 24th and 25th 2010"]
1.P7g-7f     00:00:00  00:00:00
2.P8c-8d     00:00:00  00:02:00
3.R2h-6h     00:10:00  00:02:00
4.P3c-3d     00:10:00  00:03:00
5.P6g-6f     00:10:00  00:03:00
6.S7a-6b     00:10:00  00:03:00
7.K5i-4h     00:10:00  00:03:00
8.K5a-4b     00:10:00  00:04:00
9.K4h-3h     00:11:00  00:04:00
10.K4b-3b    00:11:00  00:04:00
11.S7i-7h    00:12:00  00:04:00
12.P5c-5d    00:12:00  00:14:00
13.K3h-2h    00:12:00  00:14:00
14.B2b-3c    00:12:00  00:14:00
15.S7h-6g    00:13:00  00:14:00
16.K3b-2b    00:13:00  00:14:00
17.L1i-1h    00:15:00  00:14:00
18.G4a-3b    00:15:00  00:24:00
19.K2h-1i    00:19:00  00:24:00
20.L1a-1b    00:19:00  00:36:00
21.S6g-5f    00:55:00  00:36:00
22.P8d-8e    00:55:00  01:10:00
23.B8h-7g    00:55:00  01:10:00
24.P5d-5e    00:55:00  01:10:00

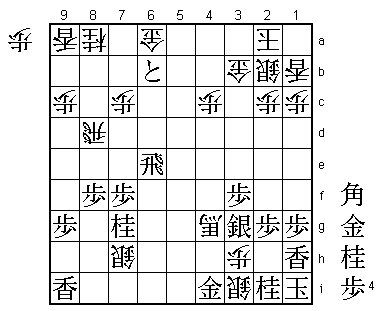
Inviting the silver up the board is not a strategy that is often played. White can
win this silver, but the cost is considerable.

25.S5f-4e    01:03:00  01:10:00
26.B3c-2d    01:03:00  01:12:00
27.G6i-5h    01:15:00  01:12:00
28.N2a-3c    01:15:00  02:04:00
29.S4ex3d    01:18:00  02:04:00
30.R8b-8d    01:18:00  02:06:00
31.S3dx3c+   01:19:00  02:06:00
32.B2dx3c    01:19:00  02:06:00

White has won the silver, but has given up a knight and pawn in return, so as far
as material is concerned, the exchange is almost even. Furthermore, black has
exchanged an attacking silver for a defensive knight and the hole on 3d seems
like a long term liability. It is no wonder that Hirose felt pretty good about
the development so far, but things are far from easy.

33.P6f-6e    01:25:00  02:06:00
34.K2b-2a    01:25:00  02:33:00
35.S3i-2h    01:42:00  02:33:00
36.S3a-2b    01:42:00  02:33:00
37.P3g-3f    01:59:00  02:33:00
38.P8e-8f    01:59:00  03:09:00
39.P8gx8f    02:03:00  03:09:00
40.P5e-5f    02:03:00  03:09:00
41.P6e-6d    02:06:00  03:09:00
42.B3cx7g+   02:06:00  04:21:00
43.N8ix7g    02:14:00  04:21:00
44.P5fx5g+   02:14:00  04:21:00
45.G5hx5g    02:19:00  04:21:00
46.B*7i      02:19:00  04:21:00
47.R6h-6g    02:31:00  04:21:00
48.S*7h      02:31:00  04:21:00
49.R6g-6e    02:35:00  04:21:00
50.B7ix5g+   02:35:00  04:54:00
51.P6dx6c+   02:37:00  04:54:00
52.G*4h      02:37:00  04:54:00
53.G4ix4h    03:12:00  04:54:00
54.+B5gx4h   03:12:00  04:54:00
55.+P6cx6b   03:12:00  04:54:00
56.G*3h      03:12:00  05:01:00
57.S*3g      03:12:00  05:01:00
58.+B4hx4g   03:12:00  05:24:00
59.G*3i      03:19:00  05:24:00
60.G3hx3g    03:19:00  05:43:00
61.S2hx3g    03:55:00  05:43:00
62.P*3h      03:55:00  05:45:00
63.G3i-4i    03:56:00  05:45:00
64.S*3i      03:56:00  05:51:00

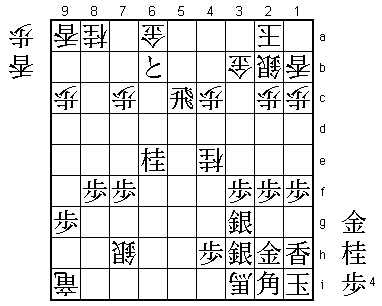
Whatever Fukaura's game plan was, it seems to have blown up in his face. The white
attack looks dangerous, but actually it is already desperation by white. Black needs
to be very careful, though. This silver is threatening mate with +Bx3g followed by S*2h.

65.B*2f!     04:19:00  05:51:00

Part of a difficult to find defensive one-two punch.

66.R8d-2d    04:19:00  05:52:00
67.P*4h!     04:25:00  05:52:00

This is not an easy move to play, especially for a professional player. Even though
the rook on 6e is defended by the knight on 7g, white can still take this rook at any
time with the promoted bishop. Forcing white into this exchange with 67.P*4h therefore
looks like it just gives white an extra move. However, Hirose has correctly judged that
he can stop the white attack if it is carried out with a rook instead of a promoted bishop.

68.+B4gx6e   04:25:00  06:18:00
69.N7gx6e    04:27:00  06:18:00
70.R*6i      04:27:00  06:18:00
71.G4ix3h    04:34:00  06:18:00
72.R6i-4i+   04:34:00  06:18:00
73.G3hx3i    04:40:00  06:18:00
74.+R4ix3i   04:40:00  06:18:00
75.G*2h      04:40:00  06:18:00
76.R2dx2f    04:40:00  06:33:00
77.P2gx2f    04:45:00  06:33:00
78.B*4i      04:45:00  06:35:00
79.B*1f      06:09:00  06:35:00
80.B4ix1f+   06:09:00  06:36:00
81.P1gx1f    06:10:00  06:36:00
82.B*4i      06:10:00  06:36:00
83.R*5i      06:42:00  06:36:00
84.G*3h      06:42:00  06:42:00
85.G2hx3h    06:42:00  06:42:00
86.B4ix3h+   06:42:00  06:42:00
87.R5ix3i    06:42:00  06:42:00
88.+B3hx3i   06:42:00  06:42:00
89.S*4a      06:42:00  06:42:00
90.G*3a      06:42:00  06:50:00
91.S4ax3b+   06:42:00  06:50:00
92.G3ax3b    06:42:00  06:50:00
93.G*2h      06:42:00  06:50:00
94.S*3h      06:42:00  07:03:00
95.B*5f      06:42:00  07:03:00
96.S3hx2i+   06:42:00  07:10:00
97.B5fx2i    06:42:00  07:10:00
98.R*5i      06:42:00  07:10:00
99.S*3h      06:51:00  07:10:00
100.N*4e     06:51:00  07:11:00
101.R*5c     07:02:00  07:11:00
102.R5ix9i+  07:02:00  07:24:00

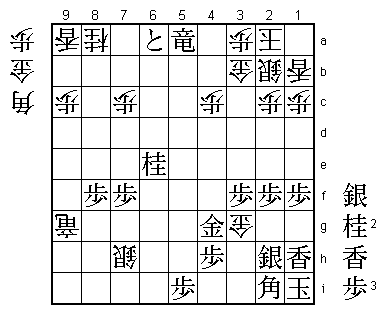
103.+P6bx6a? 07:09:00  07:24:00

Hirose thinks it is time to cash in, but he should have been patient a little longer.
Correct was 103.P*5i which he didn't like because of 104.Nx3g+ Sx3g S*4b R5f+ Gx6b,
but after the game he admitted that this would have been a lot better than what
happened in the game.

104.L*2g     07:09:00  07:29:00
105.P*5i     07:09:00  07:29:00
106.+R9ix9g  07:09:00  07:30:00

Hirose had underestimated the sideways power of the promoted rook from here, which
pretty much makes P*5i useless. Hirose said that after this he was sure that he would
lose the game, but luck is on his side.

107.G*4g     07:40:00  07:30:00
108.N4ex3g+  07:40:00  07:30:00
109.S3hx3g   07:40:00  07:30:00
110.S*4f     07:40:00  07:30:00
111.G*3h     07:40:00  07:30:00
112.S4fx3g+  07:40:00  07:35:00
113.G3hx3i   07:40:00  07:35:00
114.L2gx2h+  07:40:00  07:35:00
115.G3ix2h   07:40:00  07:35:00
116.S*3i     07:40:00  07:35:00
117.R5c-5a+  07:42:00  07:35:00
118.P*3a     07:42:00  07:37:00
119.B*1g     07:42:00  07:37:00
120.S3ix2h+  07:42:00  07:38:00
121.B1gx2h   07:43:00  07:38:00
122.G*2g     07:43:00  07:39:00
123.B2hx3g   07:46:00  07:39:00
124.G2gx3g   07:46:00  07:39:00
125.S*2h     07:51:00  07:39:00

Fukaura has fought hard to get back in this game, but he comes up just short. Here
neither player can afford to break out of the sennichite sequence.

126.G*2g     07:51:00  07:49:00
127.S2hx3g   07:55:00  07:49:00
128.G2gx3g   07:55:00  07:49:00
129.S*3i     07:56:00  07:49:00
130.S*2g     07:56:00  07:52:00
131.G*2h     07:56:00  07:52:00
132.S2gx2h=  07:56:00  07:54:00
133.S3ix2h   07:56:00  07:54:00
134.G*2g     07:56:00  07:54:00
135.S2hx3g   07:56:00  07:54:00
136.G2gx3g   07:56:00  07:54:00
137.S*3i     07:56:00  07:54:00
138.S*2g     07:56:00  07:54:00
139.G*2h     07:56:00  07:54:00
140.S2gx2h=  07:56:00  07:55:00
141.S3ix2h   07:56:00  07:55:00
142.G*2g     07:56:00  07:55:00
143.S2hx3g   07:56:00  07:55:00
144.G2gx3g   07:56:00  07:55:00
145.S*3i     07:56:00  07:55:00
146.S*2g     07:56:00  07:55:00
147.G*2h     07:56:00  07:55:00
148.S2gx2h=  07:56:00  07:58:00
149.S3ix2h   07:56:00  07:58:00
Sennichite   07:56:00  07:58:00

An unusually hard-fought sennichite game. We are well into the evening of the second
day of play, but the game will be replayed with reversed colors with only 1 hour for
the players to get themselves ready.
