51st Oi Match Game 1
[Black "Hirose Akihito, Challenger"]
[White "Fukaura Koichi, Oi"]
[Event "51st Oi-sen, Game 1"]
[Date "July 13th and 14th 2010"]
1.P7g-7f     00:02:00  00:00:00

Fukaura has won the Oi title three times in a row, all three after going the full
distance of seven games. This shows that he is strong under pressure, but this title
defense brings a pressure that is much different from the previous ones. His opponent,
Hirose Akihito, is one of the bright new stars in professional shogi. He is only 23
years old (born January 18th, 1987), but even before he became a professional in 2005,
he was considered to be an exceptional talent. Despite the high expectations, he has
been flying under the radar a little earlier in his career, but becoming challenger of
Fukaura in this Oi title match will put him on the map. He beat no-one else than Habu
to become the challenger. Now Fukaura has to stop him from joining Watanabe as a title
holder from the new generation. Fukaura, who only played title match with Habu and Kimura,
who are roughly of the same age, now finds himself in the middle of a battle of generations.
This first game is of course very important, because Hirose has no experience in playing
a title match, let alone one that is spread over two days. Can he adapt quickly enough to
avoid an early deficit?

2.P3c-3d     00:02:00  00:00:00
3.P6g-6f     00:07:00  00:00:00

Hirose is considered a specialist in the Furibisha Anaguma, but he also likes to play
Nakabisha or Sankenbisha while keeping the bishop diagonal open. Not in this first game.
Closing the bishop diagonal with 3.P6f makes it almost a certainty that this will be a
Shikenbisha Anaguma game.

4.P8c-8d     00:07:00  00:02:00
5.R2h-6h     00:09:00  00:02:00
6.S7a-6b     00:09:00  00:02:00
7.K5i-4h     00:10:00  00:02:00
8.K5a-4b     00:10:00  00:02:00
9.K4h-3h     00:11:00  00:02:00
10.K4b-3b    00:11:00  00:02:00
11.S7i-7h    00:11:00  00:02:00
12.P5c-5d    00:11:00  00:23:00
13.K3h-2h    00:13:00  00:23:00
14.B2b-3c    00:13:00  00:23:00
15.S7h-6g    00:14:00  00:23:00
16.S6b-5c    00:14:00  00:23:00
17.L1i-1h    00:18:00  00:23:00
18.K3b-2b    00:18:00  00:23:00
19.K2h-1i    00:18:00  00:23:00
20.P8d-8e    00:18:00  00:24:00
21.B8h-7g    00:18:00  00:24:00
22.L1a-1b    00:18:00  00:26:00

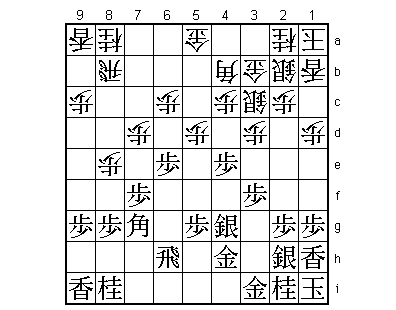
Fukaura responds by playing the Anaguma as well. This was not a big surprise, because the
only game that Fukaura and Hirose played against each other (for the Daiwa Cup about a
month earlier), was also a double Anaguma game. Actually, both players follow this game
for a while, despite the fact that the colors are reversed here.

23.S6g-5f    00:19:00  00:26:00
24.S5c-4d    00:19:00  00:38:00
25.P4g-4f    00:20:00  00:38:00
26.G4a-3b    00:20:00  00:38:00
27.S3i-2h    00:38:00  00:38:00
28.K2b-1a    00:38:00  00:40:00
29.G6i-5h    00:51:00  00:40:00
30.S3a-2b    00:51:00  00:40:00
31.G5h-4h    00:53:00  00:40:00
32.P7c-7d    00:53:00  00:43:00
33.G4i-3i    01:20:00  00:43:00
34.P1c-1d    01:20:00  01:15:00
35.P3g-3f    01:39:00  01:15:00
36.B3c-4b    01:39:00  01:30:00
37.P6f-6e    01:48:00  01:30:00
38.G6a-5a    01:48:00  01:32:00
39.P4f-4e    02:05:00  01:32:00
40.S4d-3c    02:05:00  01:32:00
41.S5f-4g    02:09:00  01:32:00

42.R8b-7b    02:09:00  01:56:00

This is a "show me what you think" move. White threatens to exchange the pawns on the
seventh file which is a small but significant advantage because the head of the bishop
is weak. Black can defend with 43.B6f, but then white can rook the move back to 44.R8b
and black has no choice to move the bishop back as well with 45.B7g. If black would go
for this line, he would admit that sennichite is an acceptable outcome in this position.
This also admits strategic defeat, because black shouldn't be satisfied with sennichite
so early in the game.

43.P5g-5f    03:14:00  01:56:00

Hirose decides to give white the seventh file and go for a counter attack in the center.

44.P7d-7e    03:14:00  02:23:00
45.P7fx7e    03:16:00  02:23:00
46.R7bx7e    03:16:00  02:35:00
47.P5f-5e    03:18:00  02:35:00
48.P8e-8f    03:18:00  03:22:00
49.P8gx8f    03:37:00  03:22:00
50.N8a-7c    03:37:00  03:26:00

Black wants to take the pawn on 5e, but after 50.Px5e, black can play R5h followed
by Rx5e and P*5c, which is a very strong attack against which it is hard to defend.

51.P5ex5d    03:40:00  03:26:00

52.N7cx6e    03:40:00  03:52:00

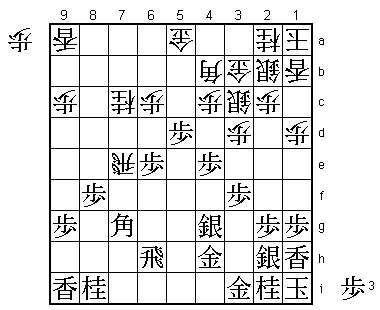
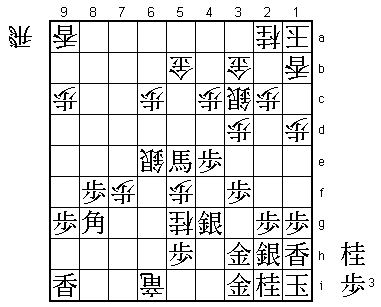
The sealed move, which leads to the sabaki of both the rooks and a straightforward
attacking race. Hirose had been looking at 52.R7d here to get rid of the pawn on 5d.
However, after 53.R5h P*5g R7h (threatens Bx3c+ because the gold on 3b hangs) G4a P*7i
and black again threatens Bx3c+. If white takes the pawn on 5d after P*7i with Rx5d,
then B6f opens the rook file for promotion and black has the advantage.

53.B7gx3c+   03:51:00  03:52:00
54.S2bx3c    03:51:00  03:52:00
55.P*7f      03:56:00  03:52:00
56.R7ex7f    03:56:00  03:52:00
57.R6hx6e    03:57:00  03:52:00
58.R7f-7i+   03:57:00  03:52:00
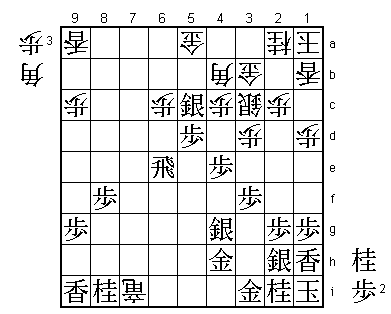
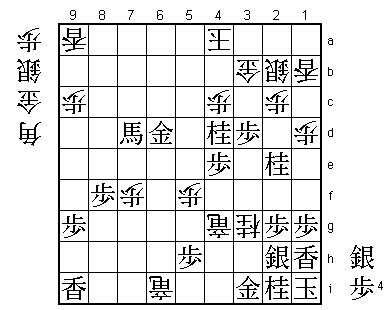
59.S*5c?!    04:41:00  03:52:00

A change of plan and this "heavy" move was generally criticized in the press room.
Hirose originally intended the natural 59.P4d here, but the more he looked at it,
the more he didn't like 60.Sx4d N*5f and he changed to 59.S*5c. However, the post
mortem analysis showed that 59.P4d still was probably the best move and after 60.Sx4d
Rx6c+ P*6b +R6e +Rx8i N*5f black controls the center of the board and the possibility
of defending with the anchor pawn P*4i is a very important extra defensive option.
Despite the criticism of 59.S*5c, Hashimoto (7-dan) noticed that this move actually
fits Hirose's personal style of playing the Anaguma very well. Hirose likes to make
a promoted bishop and make this bishop work from outside the opponent's camp. Pushing
the pawn to 4e is actually a preparation for this way of attacking the Anaguma of
the opponent.

60.B*7d?!    04:41:00  04:28:00

Considering how much Hirose likes to use the bishop, 60.B3a was an obvious alternative.
Not only that, it was probably the best move against any player here. For example,
61.Rx6c+ P*5f P4d Px4d S5b= B7e P*6f B*5e P*4i G5a-4b and black cannot take the pawn
on 5f with Sx5f because the attack with Bx2h+ is too strong.

61.R6e-6g    05:19:00  04:28:00
62.+R7ix8i   05:19:00  04:29:00
63.S5cx4b+   05:28:00  04:29:00
64.G5ax4b    05:28:00  04:29:00
65.P5d-5c+   05:28:00  04:29:00
66.G4bx5c    05:28:00  04:32:00
67.R6g-7g    05:28:00  04:32:00
68.P*7f      05:28:00  04:49:00
69.R7gx7f    05:29:00  04:49:00

70.P*7c?     05:29:00  04:49:00

This gives Hirose the opportunity to create the promoted bishop and attack from a
distance which he likes so much. Correct was 70.P*7e Rx7e G6d and after Rx7d Gx7d
P4d R*5i Px4c+ Rx3i+ Sx3i +Rx3i B*5e P*4f R*3h N*1e and Hirose admitted in the post
mortem analysis that he didn't like his position at all here. Fukaura probably didn't
 play this variation because of the awful gold on 7d, but in the game there is not
much difference because white is forced to drop a silver which ends up in no man's
land.

71.B*6b      05:55:00  04:49:00
72.G5c-5b    05:55:00  05:13:00
73.B6bx7c+   05:56:00  05:13:00
74.B7d-6e    05:56:00  05:13:00
75.R7f-7e    06:07:00  05:13:00
76.S*6d      06:07:00  05:17:00
77.R7ex6e    06:12:00  05:17:00
78.S6dx6e    06:12:00  05:18:00
79.G4h-3h    06:13:00  05:18:00
80.P*5f      06:13:00  05:34:00
81.P*5h      06:14:00  05:34:00
82.N*5g      06:14:00  05:36:00
83.B*9h      06:40:00  05:36:00

Hirose is using his favorite piece to attack the weak silver on 6e. It seems like this
bishop can be closed out easily, but Hirose shows that he has found a clever way to
keep it involved.

84.+R8i-6i   06:40:00  05:52:00
85.+B7c-5e   06:40:00  05:52:00
86.P*7f      06:40:00  05:52:00
87.B9h-8g    06:45:00  05:52:00

Phase one in getting the bishop involved in the decisive attack.

88.+R6i-6g   06:45:00  05:58:00
89.P3f-3e    06:57:00  05:58:00

This is another feature of how Hirose handles the double Anaguma. Instead of attacking
from the side (keeping the own Anaguma intact), he likes to attack from the top.

90.R*5i      06:57:00  06:07:00
91.P3ex3d    07:03:00  06:07:00
92.S3c-2b    07:03:00  06:07:00
93.N*3c      07:03:00  06:07:00
94.N5g-4i+   07:03:00  07:03:00
95.G3ix4i    07:06:00  07:03:00
96.R5ix4i+   07:06:00  07:03:00
97.N3cx2a+   07:06:00  07:03:00
98.K1ax2a    07:06:00  07:03:00
99.N*2e      07:06:00  07:03:00
100.N*4a     07:06:00  07:07:00
101.N*3c     07:13:00  07:07:00
102.K2a-3a   07:13:00  07:07:00
103.B8g-9f   07:13:00  07:07:00

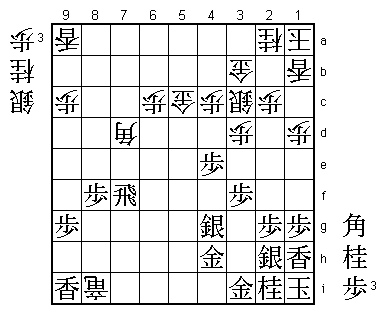
There it is. The bishop that looked helpless at 9h, now joins the attack to give
it decisive strength.

104.K3a-4b   07:13:00  07:35:00
105.P*6d     07:17:00  07:35:00
106.K4b-5c   07:17:00  07:35:00
107.P6dx6c+  07:21:00  07:35:00
108.G5bx6c   07:21:00  07:35:00
109.B9fx6c+  07:21:00  07:35:00
110.K5cx6c   07:21:00  07:35:00
111.G*6d     07:21:00  07:35:00
112.K6c-5b   07:21:00  07:35:00
113.N3cx4a+  07:23:00  07:35:00
114.+R6g-6i  07:23:00  07:39:00
115.G3h-3i   07:23:00  07:39:00
116.+R4ix4g  07:23:00  07:39:00
117.+B5ex6e  07:24:00  07:39:00
118.K5bx4a   07:24:00  07:57:00
119.N*4d     07:27:00  07:57:00
120.N*3g     07:27:00  07:57:00
121.+B6e-7d  07:27:00  07:57:00
Resigns      07:27:00  07:57:00

Mate after 122.K3a Nx3b+ Kx3b S*3c etc. If there were any butterflies for Hirose in
his first title match game he didn't show it. A very good start for him with a game
where he could show all of his skills in his favorite opening. One could question
Fukuara's decision to meet his young challenger head on, because now the genie could
be out of the bottle. Fukaura knows how to play from behind (remember he was 3-0
down to Kimura last year), but he doesn't want Hirose to become too comfortable.
He has to win with the black pieces in game two.
