50th Oza Match Game 3
Black: Sato Yasumitsu, Challenger
White: Habu Yoshiharu, Oza
50th Oza-sen, Game 3, October 9th 2002
1.P7g-7f     00:02:00  00:00:00

This was the 50th Oza match and to celebrate this, this third game
was played in Shanghai. There were some big events around this game,
the most interesting one a shogi tournament for children in which
about 600(!) Chinese children participated. It seems obvious that
with so many children who still have the possibility of entering the
Shoreikai, the first non-Japanese professional will come from China.

2.P3c-3d     00:02:00  00:01:00
3.P2g-2f     00:02:00  00:01:00
4.P8c-8d     00:02:00  00:04:00
5.P2f-2e     00:04:00  00:04:00
6.P8d-8e     00:04:00  00:05:00
7.G6i-7h     00:04:00  00:05:00
8.G4a-3b     00:04:00  00:06:00
9.P2e-2d     00:04:00  00:06:00
10.P2cx2d    00:04:00  00:07:00
11.R2hx2d    00:04:00  00:07:00
12.P8e-8f    00:04:00  00:07:00
13.P8gx8f    00:04:00  00:07:00
14.R8bx8f    00:04:00  00:07:00
15.R2dx3d    00:09:00  00:07:00
16.B2b-3c    00:09:00  00:07:00
17.R3d-3f    00:15:00  00:07:00
18.S3a-2b    00:15:00  00:10:00
19.P*8g      00:26:00  00:10:00
20.R8f-8e    00:26:00  00:13:00
21.R3f-2f    00:27:00  00:13:00
22.K5a-4a    00:27:00  00:22:00
23.S3i-4h    00:52:00  00:22:00
24.P7c-7d    00:52:00  01:03:00
25.G4i-3h    01:09:00  01:03:00
26.S7a-6b    01:09:00  01:06:00
27.P3g-3f    01:14:00  01:06:00
28.G6a-5a    01:14:00  01:13:00
29.K5i-5h    01:24:00  01:13:00
30.N8a-7c    01:24:00  01:29:00
31.N2i-3g    01:25:00  01:29:00
32.P*8f      01:25:00  02:01:00
33.P8gx8f    01:42:00  02:01:00
34.R8ex8f    01:42:00  02:01:00
35.P3f-3e    01:44:00  02:01:00
36.R8f-8e    01:44:00  02:04:00
37.B8hx3c+   02:41:00  02:04:00
38.N2ax3c    02:41:00  02:04:00
39.P3e-3d    02:48:00  02:04:00
40.P*2e      02:48:00  02:30:00

41.R2f-4f    02:51:00  02:30:00

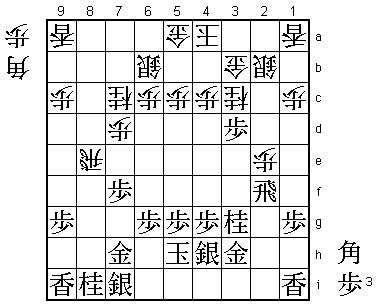
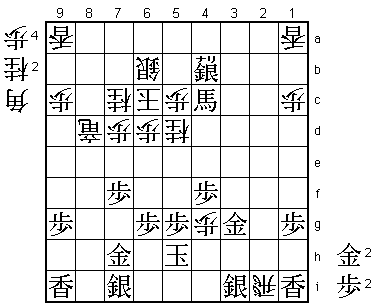
An interesting opening battle in this popular variation. The position
after 40.P*2e is known from the game between Goda and Moriuchi, which
was played in the challenger finals of this Oza tournament. Goda
played 41.R2i here, but after 42.Rx8i+ Px3c+ Sx3c Nx2e S3d! P*3c G3a
B*5f N*4e N*4f P*3g Moriuchi got a decisive attack. This game was the
start of some deep analysis of the position after P*2e, and the
conclusion was that 41.R4f was good for black. Both Sato and Habu
will have been aware of this, so it was a surprise that Habu
challenged the general opinion by allowing Sato to play 41.R4f.
However, in the rest of the game Habu shows that things are not
that easy and that black needs to play very accurately to actually
win from here.

42.R8ex8i+   02:51:00  02:54:00
43.P*2c      02:56:00  02:54:00
44.S2bx2c    02:56:00  03:15:00
45.P3dx3c+   03:05:00  03:15:00
46.G3bx3c    03:05:00  03:15:00
47.N3gx2e    03:07:00  03:15:00
48.G3c-3b    03:07:00  03:33:00
49.P*3c      03:14:00  03:33:00
50.G3b-4b    03:14:00  03:33:00
51.P*2d      03:21:00  03:33:00
52.S2cx2d!   03:21:00  03:44:00

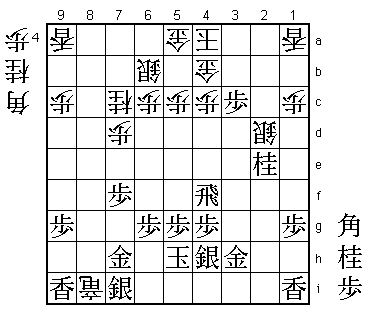
It is very unlikely that this move was deeply analysed. It just seems
to give up a full gold. The normal move would be 52.S3d, but then
53.B*2c Sx2c Px2c P*3a P3b+ Px3b P*3c N*8f Px3b+ K5b +Px4b Gx4b G*6i!
holds the black position together because Nx7h+ Sx7h is an attack on
the promoted rook.

53.B*2c      03:39:00  03:44:00

The obvious reply, but black's advantage is much smaller than it looks
(if there is an advantage at all). Alternatives are 53.N*3d or 53.B*3d.

54.K4a-5b    03:39:00  04:03:00
55.P3c-3b+   03:41:00  04:03:00
56.N*5d      03:41:00  04:14:00
57.+P3bx4b   04:02:00  04:14:00
58.G5ax4b    04:02:00  04:14:00
59.N*3d?     04:02:00  04:14:00

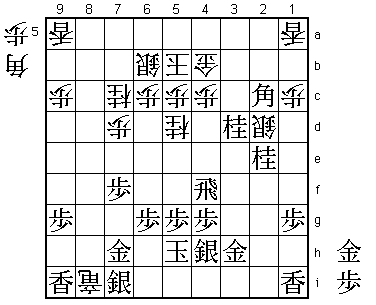
It was very difficult to calculate this to the end, but this was a
mistake. Correct was 59.R2f. Then 60.Sx2e Rx2e N*4f K4i B*5h K3i P*3g
Sx3g Bx4g+ Gx4g +Rx7h looks winning for white as the black king is
hisshi. However, black can continue with N*4d Px4d B3d+ N*4c +Bx4c
Gx4c R2b+ B*4b S*4a Kx4a B*3b K5a G*5b Kx5b Bx4c+ Kx4c G*3c K5b Gx4b
K6a +Rx1a S*5a Gx5a Sx5a B*1f which defends against the mating threat
on 3h with check, so black can take the rook on 7h on the next move.
Even Sato, who is famous for his deep calculation, could not find
this long winning sequence.

60.N5dx4f    04:02:00  04:16:00
61.P4gx4f    04:02:00  04:16:00
62.S2dx2e    04:02:00  04:16:00
63.N3dx4b+   04:07:00  04:16:00
64.K5bx4b    04:07:00  04:17:00
65.N*3d      04:08:00  04:17:00

66.S2ex3d    04:08:00  04:28:00

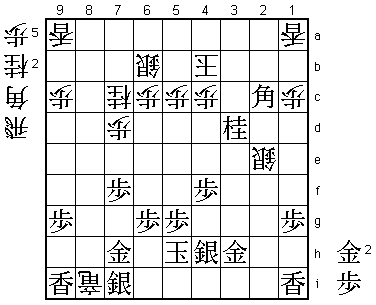
A change of plan. Habu thought he could play 66.K3c here, but realised
here that this would lose to 67.N2b+ (68.Kx2b G*2d leaves white without
defence). Usually a change of plan in a sharp position like this is
fatal, but Habu has luck on his side. 66.Sx3d is actually a playable
alternative to 66.K3c.

67.B2cx3d+   04:08:00  04:28:00
68.P*3c      04:08:00  04:29:00
69.S*3a      04:16:00  04:29:00

If black could play 69.S*4a here, the game would be over. Unfortunately
for Sato, this fails to 70.B*1d.

70.K4b-5b    04:16:00  04:29:00
71.+B3dx3c   04:19:00  04:29:00
72.N*5d      04:19:00  04:32:00
73.G3h-3g    04:23:00  04:32:00
74.P6c-6d!   04:23:00  04:35:00

Good move. Opening this escape route suddenly makes it difficult for
black to mate the white king. Still, Sato gets one more chance to win
this close endgame...

75.P*8d      04:47:00  04:35:00
76.+R8ix8d   04:47:00  04:47:00
77.S3a-4b+   04:51:00  04:47:00
78.K5b-6c    04:51:00  04:47:00
79.+B3cx4c   04:52:00  04:47:00
80.P*4g      04:52:00  04:49:00
81.S4h-3i    04:55:00  04:49:00
82.R*2i      04:55:00  04:56:00

83.+S4b-5b?  04:55:00  04:56:00

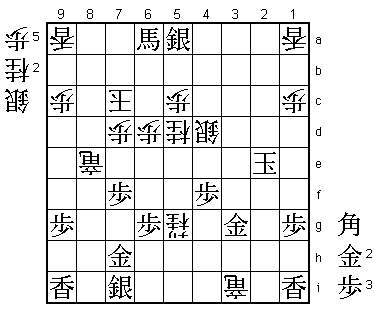
The losing move. Sato could have won the game here with the hidden
move 83.P*8c!. 84.+Rx8c fails to 85.G*6a and 84.N6e to 85.G*8b.
Nobody in the press room had seen P*8c, but Habu pointed it out
after the game, adding that he had no idea who would win this game
until the very end.

84.N7c-6e    04:55:00  04:56:00

Now it is clear that black has no way to give his attack decisive
strength. Habu wins the game and the match.

85.K5hx4g    04:55:00  04:56:00
86.R2ix3i+   04:55:00  04:56:00
87.+S5bx6b   04:55:00  04:56:00
88.K6cx6b    04:55:00  04:56:00
89.S*5a      04:55:00  04:56:00
90.K6b-7c    04:55:00  04:56:00
91.+B4c-6a   04:56:00  04:56:00
92.N6ex5g+   04:56:00  04:57:00
93.K4g-3f    04:56:00  04:57:00
94.S*3e      04:56:00  04:57:00
95.K3f-4e    04:58:00  04:57:00
96.+R8d-8e   04:58:00  04:59:00
97.K4e-3d    04:58:00  04:59:00
98.B*2e      04:58:00  04:59:00
99.K3dx2e    04:58:00  04:59:00
100.S3e-4d   04:58:00  04:59:00
Resigns      04:59:00  04:59:00

Not an easy mate, but mate nonetheless after 101.G*7e (or B*7e)
102.+Rx7e and 104.S*1d. Sato took his final minute to make sure
and then resigned. Habu wins the Oza match in straight games, picking
up his 11th Oza title in a row. Sato will be disappointed with this
performance in the first two games, but in this third game he showed
that he can make life difficult for Habu. If he would have started
this match like he played in this game, the match would not have
been over so quickly.
