50th Oza Match Game 2
Black: Habu Yoshiharu, Oza
White: Sato Yasumitsu, Challenger
50th Oza-sen, Game 2, October 1st 2002
1.P7g-7f     00:01:00  00:00:00
2.P3c-3d     00:01:00  00:02:00
3.P2g-2f     00:02:00  00:02:00
4.P8c-8d     00:02:00  00:02:00
5.P2f-2e     00:05:00  00:02:00
6.P8d-8e     00:05:00  00:02:00
7.G6i-7h     00:08:00  00:02:00
8.G4a-3b     00:08:00  00:02:00
9.P2e-2d     00:08:00  00:02:00
10.P2cx2d    00:08:00  00:02:00
11.R2hx2d    00:08:00  00:02:00
12.P8e-8f    00:08:00  00:02:00
13.P8gx8f    00:08:00  00:02:00
14.R8bx8f    00:08:00  00:02:00
15.R2dx3d    00:09:00  00:02:00
16.B2b-3c    00:09:00  00:03:00
17.R3d-3f    00:16:00  00:03:00
18.K5a-4a    00:16:00  00:04:00
19.P*8g      00:33:00  00:04:00
20.R8f-8e    00:33:00  00:05:00
21.R3f-2f    00:36:00  00:05:00
22.S3a-2b    00:36:00  00:05:00
23.K5i-5h    00:37:00  00:05:00
24.S7a-6b    00:37:00  00:09:00
25.P3g-3f    00:39:00  00:09:00
26.G6a-5a    00:39:00  00:14:00
27.S3i-3h    00:41:00  00:14:00
28.P7c-7d    00:41:00  00:16:00
29.P3f-3e    00:48:00  00:16:00

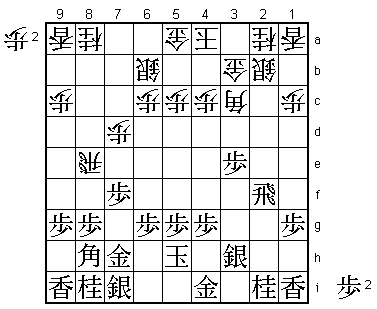
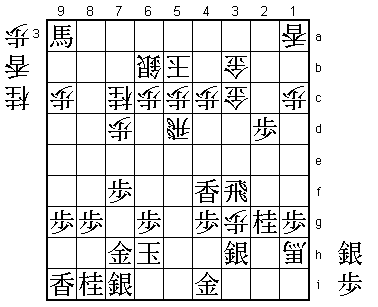
A well-known move that leads to one of the sharpest variations of the
Chuza-style  Yokofudori. It seems that 30.Rx3e is bad here because of
the fork 31.Bx3c+ Nx3c B*4f, so 30.N7c is the obvious move. Then
31.Bx3c+ Nx3c P3d N4e P3c+ Nx5g+ Kx5g B*3e K5h Bx2f +Px3b Kx3b is
an example from game 1 of the 47th Oza-sen between Habu and Maruyama.
Habu won that game, but it is far from clear that this position is
actually better for black.

30.R8ex3e!?  00:48:00  01:11:00

A big surprise. Sato allows the bishop fork. It is not clear if he
actually prepared this at home, since he took 55 minutes for this move.

31.B8hx3c+   01:03:00  01:11:00
32.N2ax3c    01:03:00  01:11:00
33.B*4f      01:04:00  01:11:00
34.P*2e      01:04:00  01:14:00
35.R2f-1f    01:10:00  01:14:00
36.R3e-3d    01:10:00  01:14:00
37.P*3e      01:10:00  01:14:00
38.R3d-4d    01:10:00  01:16:00
39.B4fx9a+   01:29:00  01:16:00
40.N8a-7c    01:29:00  01:16:00
41.R1f-3f    01:30:00  01:16:00

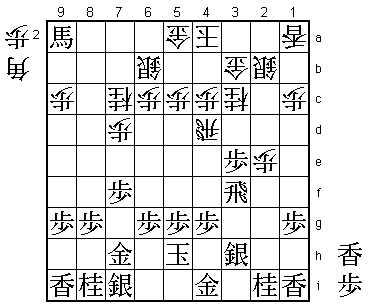
42.N3c-4e?   01:30:00  02:44:00

Played after 88 minutes, showing that Sato was having trouble with
evaluating this position. As often happens, the move that Sato
finally played is the worst of the three possible continuations
here. Better were both 42.P*3g Nx3g B*5d R4f P*3f Rx4d Px4d P3d
Px3g+ Px3c+ Gx3c Sx3g B2g+ P*3h N*4e S4h P*3g and 42.S2c P7e Px7e
+B9b R2d P*7d N8e P7c+ Sx7c +B5f B*5d P3d. In both cases there are
many difficult variations and it is hard to say who is better. It
seemed that Sato didn't fancy his chances after 42.P*3g or 42.S2c
and decided at the end of his long thought that the only move was
42.N4e. Unfortunately for him, this can already be considered the
losing move.

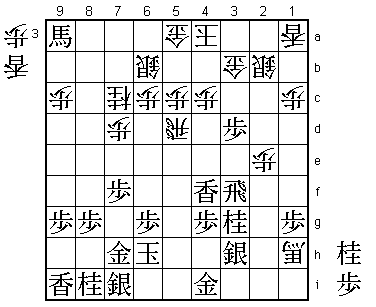
43.L*4f!     01:59:00  02:44:00

Not a very nice looking move, as black uses his lance in a spot where
it doesn't seem to be doing much and blocks the rook at the same time.
However, in this position it is a good move. The pressure on 4c is
going to be very important. Maybe Sato was a bit mesmerized by the
fact that the natural 43.P4f is good for white after 44.P*3g S4g B*2g.
After 43.L*4f, white is suddenly stuck for moves.

44.B*2h      01:59:00  03:22:00

White doesn't have much choice. He is still a lance behind and black
has a promoted bishop. Time for white to reduce the material deficit.

45.N2i-3g!   02:36:00  03:22:00

This move needs careful calculation, but it works and this means
that black can further activate his pieces.

46.N4ex5g+   02:36:00  03:25:00
47.K5hx5g    02:36:00  03:25:00
48.R4d-5d    02:36:00  03:25:00
49.K5g-6h    02:37:00  03:25:00
50.B2hx1i+   02:37:00  03:25:00
51.P3e-3d    02:54:00  03:25:00
52.+B1i-1h   02:54:00  03:27:00

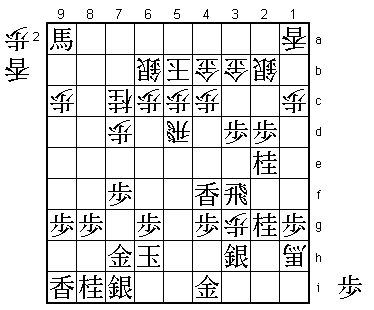
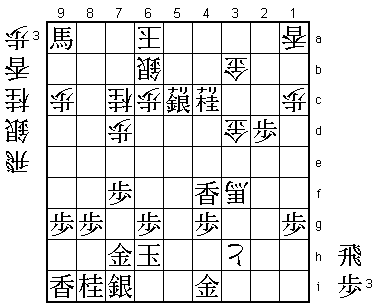
53.N*2g!!    02:58:00  03:27:00

Brilliant. 53.R3e fails to +Bx1g and 53.P*2g has the same problem
after 54.P*3e Rx3e +Bx1g. However, 53.N*2g is the second
strange-looking drop that Habu plays in this game, and again
his judgement is perfect. This knight drop is so strange, that
it actually took the people in the press room a couple of minutes
to realise that the piece on 2g was a knight instead of a pawn.
Even Sato was completely taken by surprise. "I thought that maybe
he had dropped the knight by mistake", he said after the game.
The main reason why 53.N*2g works is that it gives black the
option of playing P*2c next. This is very severe, as Gx2c is
answered by Lx4c+ and Sx2c by P3c+. If white sticks to his plan
and plays 54.P*3e Rx3e +Bx1g then after Nx2e +Bx3e Nx3e the
black knights are an awesome attacking force.

54.G5a-4b    02:58:00  04:06:00
55.N3gx2e    03:24:00  04:06:00
56.K4a-5b    03:24:00  04:06:00
57.P*2d      03:25:00  04:06:00
58.P*3g      03:25:00  04:30:00

A desperate counter attack, but Sato already knows that he will be
too late here.

59.P3d-3c+   03:39:00  04:30:00

Of course. 59.Sx3g +B2g or 59.Rx3g P*2f N3e P*3f and white has some
hope again.

60.S2bx3c    03:39:00  04:32:00
61.N2ex3c+   03:39:00  04:32:00
62.G4bx3c    03:39:00  04:33:00

And things still don't seem to be that easy. Black is clearly better,
but how to win from here? In the press room the professionals
couldn't find a clear win, so they had to wait for Habu to show
them how to finish this game in 10 moves.

63.P*3d      03:45:00  04:33:00
64.G3cx3d    03:45:00  04:33:00
65.S*4e!     03:45:00  04:33:00

The decider. White can't take this silver because of 65.Rx3b+.

66.P3gx3h+   03:45:00  04:39:00
67.S4ex5d    03:52:00  04:39:00

This silver can't be taken right away and will thus play a decisive
role in attack.

68.P*3e      03:52:00  04:41:00
69.N2gx3e    04:11:00  04:41:00

The knight, which was dropped in a strange place, jumps out to
the perfect spot to give the black attack the extra firepower it
needs.

70.+B1hx3f   04:11:00  04:41:00
71.N3ex4c+   04:11:00  04:41:00
72.K5b-6a    04:11:00  04:41:00
73.S5dx5c+   04:11:00  04:41:00
Resigns      04:11:00  04:41:00

Only 73 moves, but Sato has no choice. 74.Sx5c +Nx5c is hopeless and
74.N*5f or 74.S*5g pointless after 75.K7g. It seems that losing the
Oi title to Tanigawa has made Habu very angry and that he is using
this Oza match to take out his anger on Sato. The double title holder
has looked completely helpless in the first two games. Still, he took
the Kisei title from Goda after going 2-0 down, so there is still
some hope that he can make a comeback in this match.
