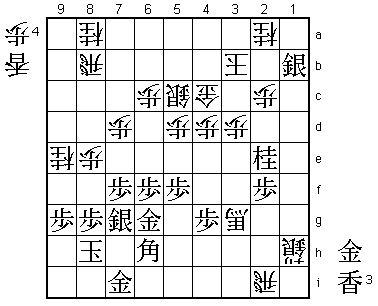
50th Oza Match Game 1
Black: Sato Yasumitsu, Challenger
White: Habu Yoshiharu, Oza
50th Oza-sen, Game 1, September 18th 2002
1.P7g-7f 00:01:00 00:00:00
2.P8c-8d 00:01:00 00:01:00
3.S7i-6h 00:08:00 00:01:00
4.P3c-3d 00:08:00 00:11:00
5.P6g-6f 00:08:00 00:11:00
6.S7a-6b 00:08:00 00:12:00
7.P5g-5f 00:08:00 00:12:00
8.P5c-5d 00:08:00 00:14:00
9.S3i-4h 00:10:00 00:14:00
10.S3a-4b 00:10:00 00:18:00
11.G4i-5h 00:10:00 00:18:00
12.G4a-3b 00:10:00 00:19:00
13.G6i-7h 00:10:00 00:19:00
14.K5a-4a 00:10:00 00:20:00
15.K5i-6i 00:10:00 00:20:00
16.G6a-5b 00:10:00 00:21:00
17.S6h-7g 00:11:00 00:21:00
18.S4b-3c 00:11:00 00:22:00
19.B8h-7i 00:11:00 00:22:00
20.B2b-3a 00:11:00 00:22:00
21.P3g-3f 00:11:00 00:22:00
22.P4c-4d 00:11:00 00:22:00
23.G5h-6g 00:19:00 00:22:00
24.P7c-7d 00:19:00 00:23:00
25.S4h-3g 00:23:00 00:23:00
26.B3a-6d 00:23:00 00:23:00
27.B7i-6h 00:35:00 00:23:00
28.G5b-4c 00:35:00 00:25:00
29.K6i-7i 00:35:00 00:25:00
30.K4a-3a 00:35:00 00:26:00
31.K7i-8h 00:35:00 00:26:00
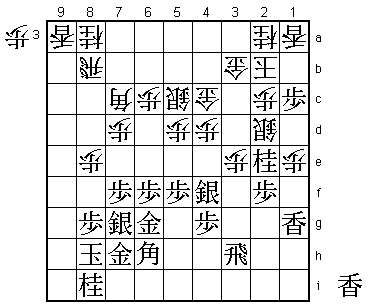
32.K3a-2b 00:35:00 00:28:00
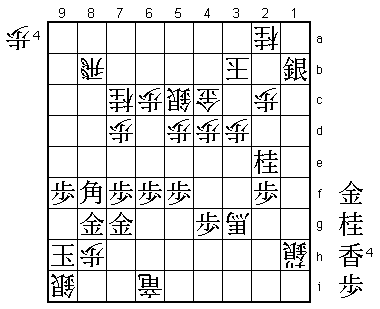
This almost feels like an old-fashioned opening. The double Yagura has
always been played by many professionals, but the peak of its popularity
is already 10 years ago. Sato has always been an expert in the Yagura
(and one of the few top players who is not afraid to play it with white),
so it is interesting to see how Habu would play it against him.
33.S3g-4f 00:42:00 00:28:00
34.S6b-5c 00:42:00 00:36:00
35.N2i-3g 00:42:00 00:36:00
36.B6d-7c 00:42:00 00:37:00
37.P2g-2f 00:42:00 00:37:00
38.S3c-2d 00:42:00 00:40:00
39.P1g-1f 00:45:00 00:40:00
40.P1c-1d 00:45:00 00:42:00
41.R2h-3h 01:16:00 00:42:00
42.P9c-9d 01:16:00 00:58:00
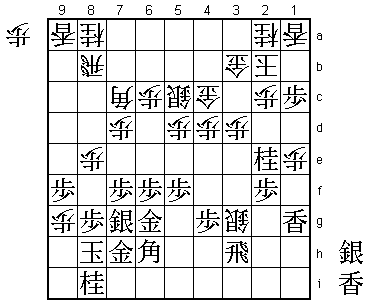
43.P9g-9f 01:42:00 00:58:00

At least in this game we will not find out how Habu planned to fight
Sato's Yagura, as Sato is the first one to leave the common variations.
This edge push is not considered sound opening play. It gives white
the opportunity to attack and the general opinion is that black should
be the first to attack in closed positions or black has lost the opening
battle. However, Sato is known for challenging common beliefs in the
opening, and this is an example. To attack, white has to give black
a lance in hand, which can be used for a counter attack. Things are
actually very complicated, so it is far from certain that the common
43.L1h or 43.L1g is actually better than 43.P9f.
44.P8d-8e 01:42:00 01:26:00
45.L1i-1g 01:50:00 01:26:00
46.P9d-9e 01:50:00 01:48:00
47.P9fx9e 02:03:00 01:48:00
48.L9ax9e 02:03:00 01:48:00
49.P*9f 02:04:00 01:48:00
50.L9ex9f 02:04:00 01:48:00
51.L9ix9f 02:04:00 01:48:00
52.P*9e 02:04:00 01:48:00
53.L9fx9e 02:04:00 01:48:00
54.B7cx9e 02:04:00 01:48:00
55.P3f-3e 02:10:00 01:48:00
56.P3dx3e 02:10:00 01:50:00
57.N3g-2e 02:12:00 01:50:00
58.B9e-7c 02:12:00 02:50:00
59.P1f-1e 03:23:00 02:50:00
60.P1dx1e 03:23:00 02:52:00
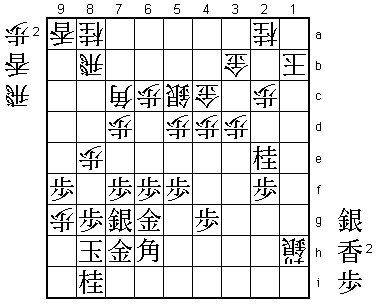
61.P*1c 03:25:00 02:52:00
62.L*9a 03:25:00 03:47:00
Looks threatening, as black has no pawns in hand.
63.S4fx3e? 04:09:00 03:47:00
Black has two choices here: 64.Sx3e and 64.L*1b. After 44 minutes,
Sato picks the wrong one. It was indeed a very difficult choice,
as 64.L*1b looks like a very heavy way of attacking. However, after
for example 65.R9b K7i R9i+ S8h or 65.P*9g Nx9g P*9f Lx1a+ Px9g+ K7i
the black attack seems at least as strong as the white one. The problem
of 63.Sx3e is that is not a move that goes well in combination with
61.P*1c. Such a small unbalance in attack can be quite important.
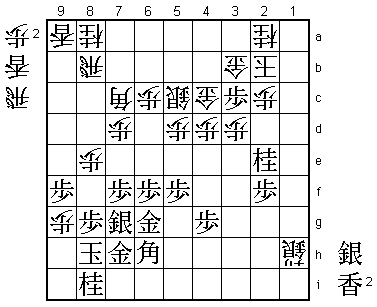
64.P*9g! 04:09:00 03:53:00
Nice footwork. This attack forces black to drop his final pawn, after
which white turns to defence to kill the black attack.
65.P*9f 04:12:00 03:53:00
66.S2dx3e 04:12:00 04:03:00
67.R3hx3e 04:12:00 04:03:00
68.P*3d 04:12:00 04:03:00
69.R3e-3h 04:12:00 04:03:00
70.S*3g 04:12:00 04:04:00
71.R3h-1h?!  04:14:00  04:04:00

Incredible move. If an amateur would play this, it would be laughed at.
Sato realises that he needs something special to win this game and he
decides to sacrifice a full rook and use the time that Habu needs to
take the rook to launch a desperate attack. During the game Sato
thought that this was actually playable and that there were still
winning chances for black, but it turns out that white can still
bring black's attack to a full stop.

72.S3g-2h+   04:14:00  04:07:00
73.P1c-1b+   04:16:00  04:07:00
74.L1ax1b    04:16:00  04:09:00
75.L1gx1e    04:16:00  04:09:00
76.+S2hx1h   04:16:00  04:10:00
77.L1ex1b+   04:16:00  04:10:00
78.K2bx1b!   04:16:00  04:11:00
This looks very dangerous as the king is now nearer to black's
attacking forces, but this is the correct move.

79.P*3c?!    04:17:00  04:11:00

Habu needed to calculate very accurately that 79.S*1c Nx1c Bx1c+ K2a
N*3c G3bx3c Nx3c+ Gx3c G*3a K1a P*1b Rx1b L*1d is still winning for
white after S*9i K7i R*4i L*6i Rx1c Lx1c+ B*3e. Objectively, this
would probably have been a better way to lose for black. After
79.P*3c, Habu has a nice move to end all of black's hopes...

80.K1b-2b!   04:17:00  04:14:00
Habu gives back a gold to bring his king to safety. 80.G4cx3c would be
a terrible blunder after 81.S*1c.

81.P3cx3b+   04:17:00  04:14:00
82.K2bx3b    04:17:00  04:14:00

Now the white king is completely safe (black has no pawns in hand) and
Habu can concentrate on the quickest way to win.

83.N8ix9g    04:19:00  04:14:00
84.L9ax9f    04:19:00  04:15:00
85.P*9h      04:21:00  04:15:00
86.R*2i      04:21:00  04:19:00
87.G7h-7i    04:28:00  04:19:00
88.B7c-3g+   04:28:00  04:37:00
89.S*1b      04:37:00  04:37:00
90.L9fx9g+   04:37:00  04:39:00
91.P9hx9g    04:37:00  04:39:00
92.N*9e!     04:37:00  04:39:00
The fastest way to win.

93.G7i-7h    04:40:00  04:39:00
94.N9ex8g+   04:40:00  04:45:00
95.G7hx8g    04:41:00  04:45:00
96.L*8f      04:41:00  04:45:00
97.S7gx8f    04:49:00  04:45:00
98.P8ex8f    04:49:00  04:45:00
99.B6hx8f    04:49:00  04:45:00
100.R2i-6i+  04:49:00  04:51:00
101.G6g-7g   04:54:00  04:51:00
102.S*9i     04:54:00  04:53:00
103.K8h-9h   04:54:00  04:53:00
104.P*8h     04:54:00  04:53:00
105.P9g-9f   04:56:00  04:53:00
106.N8a-7c   04:56:00  04:53:00
Resigns      04:56:00  04:53:00
A simple mating threat (108.+R8i K9g N8e), but black has no good
defence. On the other hand, there is no attack on the white king,
so Sato resigned. After losing the Oi title 4-1, some questioned
Habu's form and most considered the odds in this Oza match about
even. In reply, Habu plays a flawless opening game, winning with
white against Sato's favourite Yagura. In short title matches, the
first game is often very important and now all pressure is on Sato
to win game 2. Despite this, the post-mortem analysis was conducted
in a very relaxed mood, showing that both players have plenty of
experience with playing on the big stage. It is unlikely that Sato's
play in the rest of the match will suffer from losing this opening game.