50th Osho Match Game 3
Black: Tanigawa Koji, Challenger
White: Habu Yoshiharu, Challenger
50th Osho-sen, Game 3, January 29th and 30th 2001
1.P7g-7f     0/0       0/0
2.P3c-3d     0/0       2/2
3.P2g-2f     3/3       0/2
4.P4c-4d     0/3       2/4
5.P2f-2e     12/15     0/4
6.B2b-3c     0/15      2/6
7.S3i-4h     1/16      0/6
8.R8b-4b     0/16      5/11
9.K5i-6h     7/23      0/11
10.P9c-9d    0/23      1/12
11.K6h-7h    19/42     0/12
12.S3a-3b    0/42      6/18
13.P5g-5f    19/61     0/18
14.S7a-7b    0/61      9/27
15.G4i-5h    1/62      0/27
16.S3b-4c    0/62      34/61
17.S4h-5g    17/79     0/61
18.P9d-9e    0/79      17/78
19.B8h-7g    22/101    0/78
20.P7c-7d    0/101     22/100
21.P6g-6f    6/107     0/100
22.P6c-6d    0/107     7/107
23.G5h-6g    2/109     0/107
24.N8a-7c    0/109     3/110

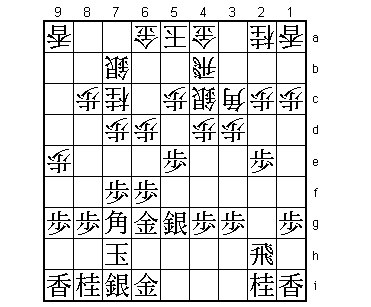
If you can't beat them, join them. After some tough lessons by the
inventor in the Ryu-O match, Habu gives the Fujii system a try himself.

25.P5f-5e!?  17/126    0/110

Positive play, as is Tanigawa's style. Rather then being forced to
defend after 25.K8h, he is aiming for early complications. It is
unclear which move is better.

26.R4b-5b!   0/126     44/154

Habu doesn't back down. Normal would have been the development 26.P4e
followed by S4d, but he doesn't want to give black the nice formation
P5e-S5f. With this move Habu makes clear that he is prepared to fight
with the king on 5a. Castling with the rook on 5b is difficult, as
the head of the knight is weak and white's rook is blocking the route
of the gold on 4a to 6c.

27.S5g-5f    47/173    0/154
28.P5c-5d    0/173     8/162

Off we go after only 28 moves. This surely will be short game, or...

29.R2h-5h!   8/181     0/162

Good for white is 29.Px5d Sx5d P*5e Sx5e Sx5e Rx5e and now P6e R5c N6e.

30.P5dx5e    0/181     34/196
31.S5fx5e    1/182     0/196
32.S7b-6c    0/182     0/196
33.B7g-8f    63/245    0/196
34.B3c-4b    0/245     24/220

The sealed move.

35.P*5d      37/282    0/220
36.S4cx5d    0/282     47/267
37.S5ex5d    46/328    0/267
38.S6cx5d    0/328     0/267
39.K7h-8h    1/329     0/267

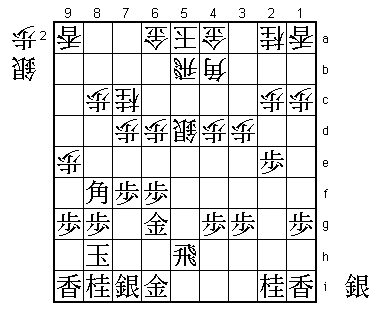
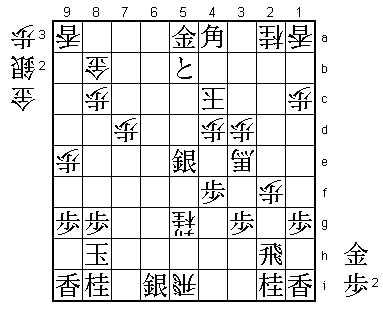
An important turning point in the game. Tanigawa of course looked at
the direct 39.Rx5d Rx5d S*4c R5c Sx4b+ Gx4b Bx6d, but that just doesn't
work after R*2h S6h S*5h Bx5c+ Sx6i= Kx6i S*5h K7i Gx5c R*3a K4b Rx6a+
and even though black is threatening mate, white has just enough material
to mate himself after G*7h.

Turning to defence with 39.K8h means that white has won the opening.
Tanigawa has not been able to break through and he is a pawn down. Still,
things are far from easy for white, whose pieces are all over the place.

40.G4a-3b    0/329     78/345
41.P7f-7e    32/361    0/345
42.P7dx7e    0/361     0/345
43.B8fx7e    0/361     0/345
44.S*6c      0/361     8/353
45.B7e-8f    3/364     0/353
46.K5a-4a    0/364     6/359
47.R5h-7h    15/379    0/359
48.P*7d      0/379     1/360
49.R7h-2h    0/379     0/360
50.G6a-5a    0/379     28/388
51.S7i-7h    6/385     0/388
52.K4a-3a    0/385     2/390
53.B8f-6h    15/400    0/390
54.P6d-6e    0/400     12/402
55.P2e-2d    8/408     0/402
56.P2cx2d    0/408     2/404
57.B6hx2d    1/409     0/404
58.B4bx2d    0/409     18/422
59.R2hx2d    0/409     0/422
60.P6ex6f    0/409     0/422
61.G6gx6f    9/418     0/422
62.B*5g      0/418     22/444
63.R2d-2f    0/418     0/444
64.B5g-3e+   0/418     0/444

65.R2f-2h?!  1/419     0/444

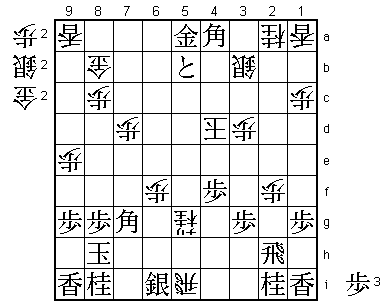
Probably better is 65.R3f to aim at exchanging major pieces, followed
by B*8f.

66.P*2g      0/419     1/445
67.R2hx2g    3/422     0/445
68.P*2f      0/422     2/447
69.R2g-2h    0/422     0/447
70.S5d-6e    0/422     1/448
71.P*5c      6/428     0/448
72.R5bx5c    0/428     0/448
73.P*5d      0/428     0/448
74.R5cx5d    0/428     1/449
75.S*5e      5/433     0/449
76.R5d-5b    0/433     1/450
77.P*5c      15/448    0/450
78.R5b-9b    0/448     0/450
79.G6fx6e    0/448     0/450
80.N7cx6e    0/448     0/450
81.P*2c      0/448     0/450
82.P*6g      0/448     17/467
83.P4g-4f    7/455     0/467
84.N6e-5g+   0/455     0/467
85.B*8a      7/462     0/467
86.R9b-6b    0/462     1/468
87.S*2b      0/462     0/468
88.G3bx2b    0/462     2/470
89.P2cx2b+   0/462     0/470
90.K3ax2b    0/462     0/470
91.G*7c      6/468     0/470
92.R6b-6a    0/468     0/470
93.B8ax6c+   0/468     0/470
94.R6ax6c    0/468     0/470
95.G7cx6c    0/468     0/470
96.P6g-6h+   0/468     2/472
97.R*7b      3/471     0/472
98.P*6b      0/471     1/473
99.G6cx6b    0/471     0/473
100.G*8a!!   0/471     1/474

This is one of those Habu moves that makes you wonder whether he is
psychic, brilliant or just lucky. This is a terrible looking move, as
this gold seems to be in a hopeless position. However, forcing the rook
from the king rank is the right decision. The second exclamation mark
is for the fact that this gold is going to save Habu's king at the
very end.

101.R7b-7c+  0/471     0/474
102.+P6hx6i  0/471     0/474
103.S7hx6i   0/471     0/474
104.B*8b     0/471     0/474
105.+R7cx8b  0/471     0/474
106.G8ax8b   0/471     0/474
107.G6bx5a   0/471     0/474
108.R*5i     0/471     0/474
109.S*3b     5/476     0/474
110.K2bx3b   0/476     0/474
111.B*4a     0/476     0/474
112.K3b-4c   0/476     0/474
113.P5c-5b+? 0/476     0/474

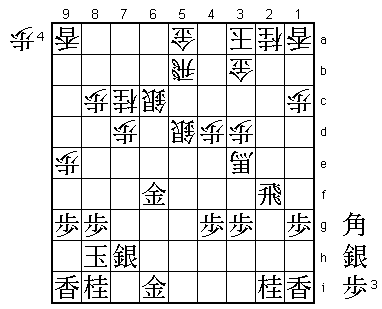
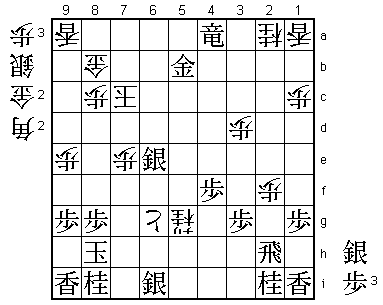
Objectively this is not a bad move, as it does not change the result
of the game. However, 113.G*2c would have given Tanigawa the most
practical chances to win this game. During the post-mortem none of
the professionals could find a win for white after that. It was only
when the position was given to the computer program Todai Shogi 3 that
a mate for white was found here. It is so long and complicated that
Shukan Shogi only gives S*7i as (the obvious) first move. It is
doubtful that Habu would have found this with only six minutes left.

114.S*3b?!   0/476     1/475

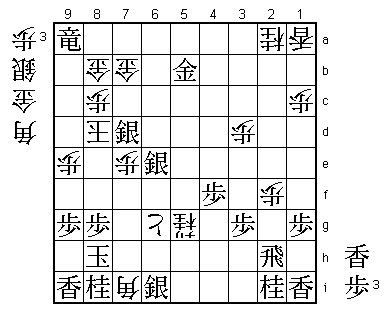
A similar mate as in the previous position is still possible here.
Todai Shogi gives 114.S*7i Kx7i Rx6i+ Kx6i +B2e S*3f +Bx3f Px3f
S*5h Rx5h +Nx5h Kx5h P*5g leading to mate even though it will take most
of us a very long time to figure out all the variations. After 114.S*3b
Habu has to sweat a little, but he can just survive the attack.

115.G*5d     1/477     0/475
116.K4c-3c   0/477     0/475
117.S5ex4d   0/477     0/475
118.+B3ex4d  0/477     0/475
119.G5dx4d   0/477     0/475
120.K3cx4d   0/477     0/475
121.B*7g     0/477     0/475
122.P*6f     0/477     0/475

This pawn gives the white attack the extra strength that is needed. The
loss of the rook is not so important.

123.B7gx5i   0/477     0/475
124.S3bx4a   0/477     0/475
125.R*4e     0/477     0/475
126.K4d-5d   0/477     0/475
127.B5i-8f   0/477     0/475
128.S*7e     0/477     1/476
129.B8fx7e   0/477     0/476
130.P7dx7e   0/477     0/476
131.S*6e     0/477     0/476
132.K5d-6c   0/477     0/476
133.+P5b-6b  1/478     0/476
134.K6cx6b   0/478     1/477
135.R4ex4a+  1/479     0/477
136.P6f-6g+  0/479     0/477
137.G5a-5b   0/479     0/477
138.K6b-7c   0/479     0/477

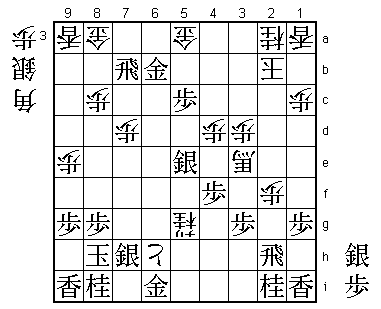
There it is. The gold on 8b just gives enough cover for the white
king to escape.

139.+R4a-7a  0/479     0/477
140.G*7b     0/479     1/478
141.S*7d     0/479     0/478
142.K7c-8d   0/479     0/478
143.+R7ax9a  0/479     0/478
144.B*7i     0/479     0/478
Resigns      0/479     0/478
Time:        07:59:00  07:58:00

Mate after 145.Kx7i S*6h Rx6h +Nx6h Sx6h G*7h.

The best title match game I have seen in a very long time. Everything
that makes shogi such a great game was in this one. We got two fights
for the price of one, with Habu winning the early battle but just
surviving the second one as Tanigawa tried everything he could to
win. One would almost wish that a draw was possible in shogi, because
Tanigawa made this game what it was, just as much as Habu. Let's hope
this title match goes to seven games!
