50th Oi Match Game 7
[Black "Fukaura Koichi, Oi"]
[White "Kimura Kazuki, Challenger"]
[Event "50th Oi-sen, Game 7"]
[Date "September 29th and 30th 2009"]
1.P7g-7f     00:01:00  00:00:00

The furigoma for this final game of the Oi match resulted in 4 pawns, giving Fukaura
the black pieces. His comeback from 3-0 down is amazing, but if he loses this game,
everything will have been for nothing. Less than a year after Watanabe won four
straight games to rally back from 3-0 down, will we see the same thing here?

2.P3c-3d     00:01:00  00:03:00
3.P2g-2f     00:04:00  00:03:00
4.G4a-3b     00:04:00  00:04:00
5.G6i-7h     00:07:00  00:04:00
6.P8c-8d     00:07:00  00:07:00
7.P2f-2e     00:07:00  00:07:00
8.P8d-8e     00:07:00  00:08:00
9.P2e-2d     00:18:00  00:08:00
10.P2cx2d    00:18:00  00:09:00
11.R2hx2d    00:18:00  00:09:00
12.P8e-8f    00:18:00  00:11:00
13.P8gx8f    00:18:00  00:11:00
14.R8bx8f    00:18:00  00:11:00
15.R2dx3d    00:18:00  00:11:00
16.B2b-3c    00:18:00  00:11:00
17.R3d-3f    00:24:00  00:11:00
18.S3a-2b    00:24:00  00:12:00
19.K5i-5h    00:25:00  00:12:00
20.K5a-4a    00:25:00  00:24:00
21.P*8g      00:33:00  00:24:00
22.R8f-8e    00:33:00  00:25:00

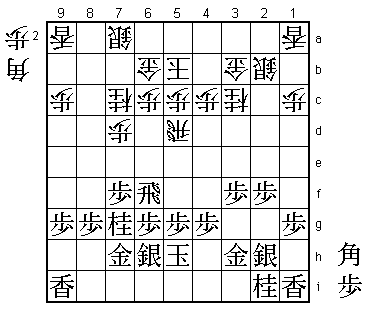
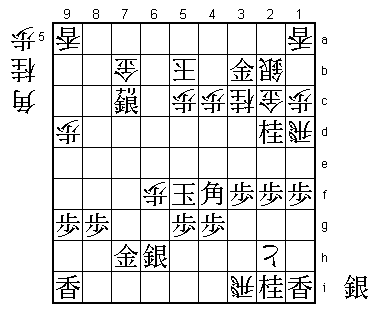
Kimura has picked the R8e variation of the Yokofudori to try and stop the rot in this
match. It was expected that both players would take the first day to develop their
pieces, but the players have other ideas.

23.B8hx3c+   00:35:00  00:25:00
24.N2ax3c    00:35:00  00:26:00
25.N8i-7g    00:35:00  00:26:00
26.R8e-2e    00:35:00  00:58:00
27.P*2f      00:41:00  00:58:00
28.R2e-2d    00:41:00  00:59:00
29.R3f-5f    00:45:00  00:59:00
30.G6a-6b    00:45:00  01:06:00
31.G4i-3h    00:48:00  01:06:00
32.R2d-5d    00:48:00  01:18:00
33.R5f-6f    00:59:00  01:18:00
34.P7c-7d    00:59:00  01:25:00
35.S7i-6h    01:59:00  01:25:00
36.K4a-5b    01:59:00  01:28:00
37.S3i-2h    02:04:00  01:28:00
38.N8a-7c    02:04:00  01:36:00
39.P3g-3f    02:06:00  01:36:00

40.B*5e      02:06:00  02:17:00

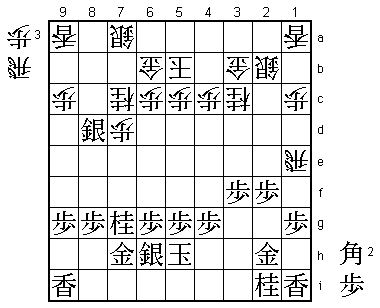
This leads to an exchange of bishop for rook and this unbalance will be the theme
for the middle game.

41.R6f-5f    02:08:00  02:17:00
42.B5ex2h+   02:08:00  02:18:00
43.G3hx2h    02:09:00  02:18:00
44.S*5e      02:09:00  02:19:00
45.R5fx5e    02:33:00  02:19:00
46.R5dx5e    02:33:00  02:20:00

It looks like the players are improvising here, but this variation has actually been
played before in the game between Murayama and Nakahara in the qualification round
for the Oi league on October 3rd 2005. The point here is that white seems to have the
strong threat R*3i next. Because of this, Nakahara played 47.G3h here, but after 48.R5d
B*4f P7e S*6f R*8i white still managed to drop the rook in the black camp and Maruyama
even managed to promote the other rook as well (despite this, he lost the game).
Therefore, it seems like black has problems defending against the rook drop, so no-one
dared to try and play this variation until now.

47.P7f-7e!   02:33:00  02:20:00

This is Fukaura's new idea. He just ignores the threat of R*3i and starts his own attack
on the head of the knight. Fukaura's explanation after the game was simple: "The king
has moved up to 5b, so...". Although he didn't elaborate, it is clear that he meant
that because the king had moved from 4a to 5b, it will now be closer to where the
fighting will be.

48.R5ex7e    02:33:00  02:32:00
49.S*8d      02:49:00  02:32:00
50.R7e-1e?!  02:49:00  03:02:00

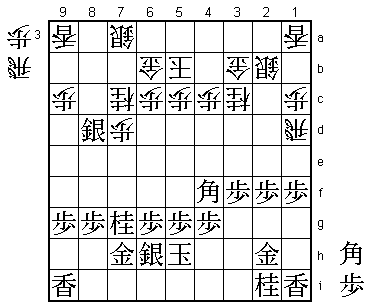
Looks like the obvious move, but after the game Kimura regretted it. He suggested
50.R4e as better, because after 51.N3g R1e, the knight is on 3g instead of on 2i
like in the game. Usually, this is better for black, but here it leaves the lance
unprotected after a rook drop on 3i, so having the knight on 3g is better for white.

51.P1g-1f    03:16:00  03:02:00
52.R1e-1d    03:16:00  03:09:00
53.B*4f      03:16:00  03:09:00

54.P6c-6d    03:16:00  04:26:00

Kimura took 77 minutes before sealing this move, ending play on the first day. The
alternative is 54.R*3i after which Fukaura intended 55.S5i P*2g B*4h which is unclear.
Kimura invites 55.P*7e before playing R*3i. A subtle difference perhaps, but he felt
that white would benefit from this exchange.

55.P*7e      03:25:00  04:26:00
56.R*3i      03:25:00  04:55:00
57.P7ex7d    03:40:00  04:55:00
58.P*2g      03:40:00  04:58:00
59.P7dx7c+   03:51:00  04:58:00
60.P2gx2h+   03:51:00  05:01:00
61.P6g-6f    03:54:00  05:01:00
62.G6b-6a    03:54:00  05:35:00
63.K5h-6g    04:23:00  05:35:00
64.K5b-4b    04:23:00  05:41:00
65.P*7b      04:26:00  05:41:00
66.S7ax7b    04:26:00  05:52:00
67.+P7cx7b   04:38:00  05:52:00
68.G6ax7b    04:38:00  05:53:00
69.N*2d      04:42:00  05:53:00

70.G3b-2c!   04:42:00  06:02:00

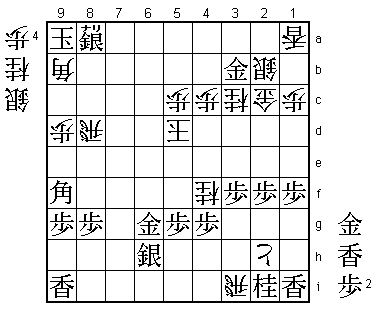
Because this leaves the square 3b open for a drop, this came as a surprise to the
professionals in the press room. However, after some analysis, the mood changed
from the general feeling that black was better to "a typical Kimura move after
which it is unclear who is winning". If white takes the lance here with 70.+Px1i,
then 71.S*5a Kx5a Nx3b+ L*7d seems to close the black escape route, but after B*8d
P*7c the position is unclear.

71.B*8e      05:22:00  06:02:00

The point of 70.G2c is that if black tries to take the rook here with 71.S*1e,
white can answer by 72.Gx2d and after both Sx2d or Sx1d, white has good chances
in the counter attack with the extra knight and silver.

72.G*9d      05:22:00  06:17:00

Some even thought that this was the decisive move. After all, even though 73.S*4a
Gx8e N3b+ K5a Nx8e is a mate threat, white can counter strongly with B*4i and K7g
is answered by Bx8e+ and G*5h by P*3a and white wins in both cases.

73.B8ex9d    06:08:00  06:17:00

This is the only way for black to stay in the game, but it also leads to an endgame
with both kings exposed. Anything can happen then.

74.P9cx9d    06:08:00  06:17:00
75.G*3b      06:08:00  06:17:00
76.K4b-5b    06:08:00  06:23:00
77.N7g-6e    06:18:00  06:23:00
78.P6dx6e    06:18:00  07:21:00
79.S8d-7c+   07:00:00  07:21:00
80.P6ex6f    07:00:00  07:27:00
81.K6g-5f    07:05:00  07:27:00

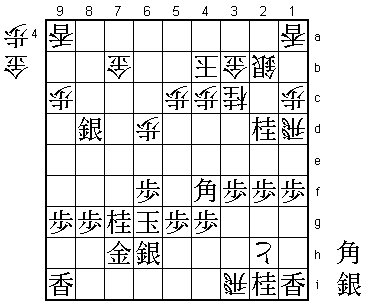
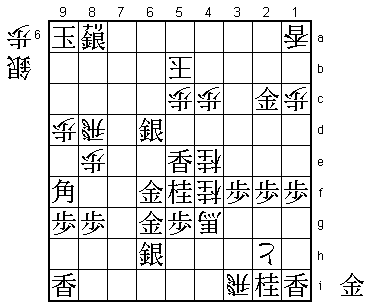
Even though Fukaura has an attack on both sides of the white king, his own king is
in the open and there are a number of pieces white can take at any time he needs
them (the silver on 7c, the knight on 2d, the lance on 1i or 9i). Also, white has a
bishop in hand and both the rook on 3i and 1d seem to be ready to join the attack at
any moment. The gut feeling of a professional here is that the black king will be
mated. However, when one tries to find an actual variation to make this happen, there
doesn't seem to be any. One of those rare cases where the intuition of a professionals
is proven wrong by pure calculation.

82.B*9b      07:05:00  07:40:00

Kimura is also unable to solve the puzzle. 82.Rx3f+ is not a mating threat, so black
can play 83.+Sx7b +R4e Kx6f and win. Another alternative is the knight sacrifice
82.N*6d, but after 83.Bx6d Rx3f+ P4f Rx2d, black can win with S*4a K6a (or K5a Bx5c+)
+Sx7b Kx7b G*7c K6a Bx5c+ etc.

83.K5fx6f    07:12:00  07:40:00
84.N*5d      07:12:00  07:40:00
85.K6f-7e    07:17:00  07:40:00
86.N5dx4f    07:17:00  07:41:00

Kimura's best chance was probably 86.R6i+, but if black plays either 87.G7i or
87.S*4a K6a +Sx7b Kx7b G*7c, no variations were found that were good for white.

87.+S7cx7b   07:18:00  07:41:00

This not only threatens the white king, but also opens up an escape route for the
king up the board.

88.B*9c      07:18:00  07:43:00
89.S*8d      07:29:00  07:43:00
90.B9cx8d    07:29:00  07:43:00
91.K7ex8d    07:29:00  07:43:00
92.R1dx2d    07:29:00  07:43:00
93.K8d-7c    07:32:00  07:43:00
94.R2d-7d    07:32:00  07:43:00
95.K7c-8b    07:32:00  07:43:00
96.P*8a      07:32:00  07:44:00
97.+S7bx8a   07:34:00  07:44:00
98.K5b-6c    07:34:00  07:44:00
99.B*9f      07:36:00  07:44:00
100.K6c-5d   07:36:00  07:48:00
101.G7h-6g   07:37:00  07:48:00
102.R7d-8d   07:37:00  07:57:00
103.K8bx9a   07:37:00  07:57:00

Fukaura must have been quite relieved that he managed to score a touchdown with
the king on 9a. There is no way the black king can be mated now, so black only
needs to be careful about not allowing the white king to enter as well.

104.B9bx4g+  07:37:00  07:57:00
105.L*5f     07:39:00  07:57:00
106.N*5e     07:39:00  07:57:00
107.L5fx5e   07:43:00  07:57:00
108.K5d-4d   07:43:00  07:58:00
109.P*4e     07:46:00  07:58:00
110.N3cx4e   07:46:00  07:59:00
111.N*5f     07:47:00  07:59:00
112.K4dx5e   07:47:00  07:59:00
113.G*6f     07:47:00  07:59:00
114.K5e-5d   07:47:00  07:59:00
115.G3bx2b   07:47:00  07:59:00
116.P*8e     07:47:00  07:59:00
117.G2bx2c   07:48:00  07:59:00
118.L*6a     07:48:00  07:59:00
119.P*6d     07:49:00  07:59:00
120.L6ax6d   07:49:00  07:59:00
121.S*5e     07:50:00  07:59:00
122.K5d-6c   07:50:00  07:59:00
123.S5ex6d   07:50:00  07:59:00
124.K6c-5b   07:50:00  07:59:00
125.L*5e     07:50:00  07:59:00
Resigns      07:50:00  07:59:00

Fukaura has successfully driven the king back and this lance is the final blow. The
simple mating threat is Lx5c+ and even if white defends with 126.S*6b, things are
very easy after 127.Lx5c+ Sx5c G*6c etc. Fukaura wins the final game of the Oi
match to rally back from 3-0 down. What once was considered impossible in professional
shogi has now happened twice within a year. Habu will feel a little relieved that he
is no longer the only one on the receiving end of such a comeback. However, while
Habu has a ton of titles to soften the blow, Kimura will not be in a happy place.
He had two chances to take the Kisei title from Habu and now four chances to take
the Oi title from Fukaura but he failed to convert any of these.
