50th Oi Match Game 6
[Black "Kimura Kazuki, Challenger"]
[White "Fukaura Koichi, Oi"]
[Event "50th Oi-sen, Game 6"]
[Date "September 8th and 9th 2009"]
1.P7g-7f     00:01:00  00:00:00
2.P8c-8d     00:01:00  00:02:00
3.S7i-6h     00:03:00  00:02:00
4.P3c-3d     00:03:00  00:02:00
5.P6g-6f     00:03:00  00:02:00
6.S7a-6b     00:03:00  00:02:00
7.P5g-5f     00:04:00  00:02:00
8.P5c-5d     00:04:00  00:02:00
9.S3i-4h     00:04:00  00:02:00
10.S3a-4b    00:04:00  00:04:00
11.G4i-5h    00:05:00  00:04:00
12.G4a-3b    00:05:00  00:05:00
13.G6i-7h    00:08:00  00:05:00
14.K5a-4a    00:08:00  00:05:00
15.K5i-6i    00:08:00  00:05:00
16.G6a-5b    00:08:00  00:06:00
17.S6h-7g    00:09:00  00:06:00
18.S4b-3c    00:09:00  00:07:00
19.B8h-7i    00:09:00  00:07:00
20.B2b-3a    00:09:00  00:07:00
21.P3g-3f    00:11:00  00:07:00
22.P4c-4d    00:11:00  00:07:00
23.G5h-6g    00:12:00  00:07:00
24.P7c-7d    00:12:00  00:07:00
25.B7i-6h    00:14:00  00:07:00
26.P9c-9d    00:14:00  00:14:00
27.K6i-7i    00:16:00  00:14:00
28.P9d-9e    00:16:00  00:14:00
29.S4h-3g    00:21:00  00:14:00
30.G5b-4c    00:21:00  00:37:00
31.P3f-3e    01:04:00  00:37:00
32.P3dx3e    01:04:00  00:44:00
33.B6hx3e    01:04:00  00:44:00
34.N8a-7c    01:04:00  00:44:00
35.K7i-8h    01:24:00  00:44:00
36.P5d-5e    01:24:00  01:16:00
37.P5fx5e    01:29:00  01:16:00
38.P9e-9f    01:29:00  01:18:00
39.P9gx9f    01:29:00  01:18:00
40.P*9g      01:29:00  01:18:00
41.L9ix9g    01:43:00  01:18:00
42.N7c-8e    01:43:00  01:20:00
43.S7g-8f    01:44:00  01:20:00
44.N8ex9g+   01:44:00  01:20:00
45.S8fx9g    01:45:00  01:20:00
46.L*9c      01:45:00  01:20:00
47.P5e-5d    02:03:00  01:20:00
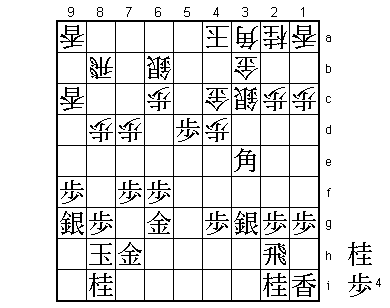
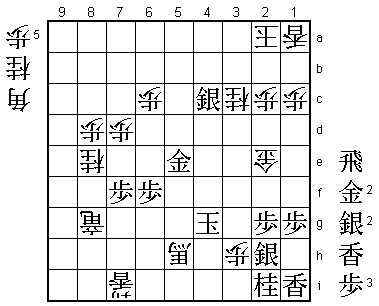
This is the position after the lunch break on the first day and we are already
quite far advanced into the middle game. It seems like both players were familiar
with this position, which has appeared three times before in official games. In
all three games white played 48.Gx5d here. The first time this position was played
was in October 1993 in the Oza tournament game between Hatakeyama Mamoru and Kansaki
and ended in a win for white. However, the position is much more famous from the
game that was played a month later, the 5th game of the Ryu-O title match between
Habu and Sato. This game was a very sharp battle in which white finally won. After
that, the position didn't appear again until 14 years later, when it was played in
the B1 Junisen game between Watanabe and Morishita. There white got a big advantage,
but in the end black won.
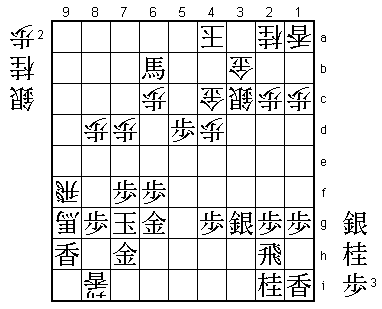
48.L9cx9f 02:03:00 02:19:00
Despite the good results for white with 48.Gx5d, Fukaura decides to change the moves
and play the very sharp 48.Lx9f. This is a very risky move, because without the gold
on 5d, the long bishop diagonal cannot be properly defended. On the other hand, white
gets compensation in attack, so the position is not clear.
49.S9gx9f 03:35:00 02:19:00
50.L9ax9f 03:35:00 02:28:00
51.B3e-4f 03:44:00 02:28:00
52.R8b-9b 03:44:00 03:12:00
Both players have little choice but to put all their eggs in one basket here. Black
explores the bishop's diagonal, white gets compensation by adding the rook to the
edge attack. Who's judgment will be correct?
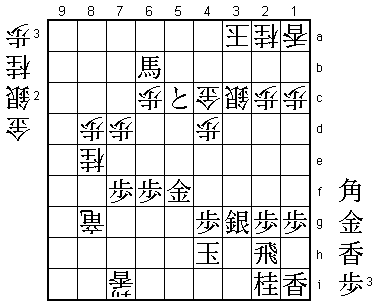
53.P*9c 03:47:00 03:12:00
54.R9bx9c 03:47:00 03:13:00
55.B4f-8b+ 03:48:00 03:13:00
56.L9f-9h+ 03:48:00 03:33:00
The sealed move.
57.K8h-7g 03:49:00 03:33:00
58.R9c-9f 03:49:00 03:34:00
59.+B8b-7b 04:35:00 03:34:00
60.+L9hx8i 04:35:00 03:49:00
61.+B7bx6b 04:36:00 03:49:00
62.B3a-9g+ 04:36:00 03:49:00
63.L*9h! 04:41:00 03:49:00
After the game, Fukaura admitted that he had underestimated the strength of this
move. The point is that white cannot take this lance because of P5c+. In the press
room 64.S*7i was analyzed which looks very strong because it is threatening N*8e
mate, so black has no time to take the bishop on 9g. Also, 65.P6e doesn't work
because of 66.+B7e! and both Px7e and Lx9f are answered by N*8e mate. The problem
for white is that black can play 65.G5f after S*7i and there is no way for white to
continue the attack (of course 66.+Bx9h still fails to P5c+). Although Kimura said
that L*9h was forced in this position, which meant that it was part of his earlier
calculations, he also said that he still wasn't sure about the strength of his position.
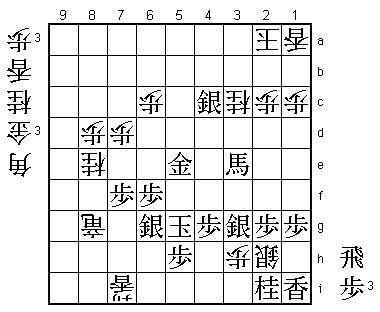
64.N*8e 04:41:00 06:11:00
Fukaura took 142 minutes for this move, a clear indication that L*9h had taken him
by surprise.
65.K7g-6h 04:46:00 06:11:00
66.+B9g-7i 04:46:00 06:11:00
67.G7hx7i 05:06:00 06:11:00
68.R9fx9h+ 05:06:00 06:11:00
69.K6h-5g 05:36:00 06:11:00
70.L*5e 05:36:00 06:11:00
71.N*5f 05:37:00 06:11:00
72.L5ex5f 05:37:00 06:11:00
73.G6gx5f 05:38:00 06:11:00
74.+R9hx8g 05:38:00 06:11:00
75.K5g-4h 05:39:00 06:11:00
76.+L8ix7i 05:39:00 06:11:00

77.S*5b?     06:46:00  06:11:00

Here Kimura got a chance to take his first major title. If he would have played
77.P5c+ here, he probably would have won this game and the match. For example,
78.Gx5c +Bx5c P*5b L*4c N*4b +B5d G*5c Lx4b+ Sx4b +B3f (probably +Bx3b is also
good) and black has forced white to drop most of his pieces in defense before
pulling back the promoted bishop to make his own king safe. This is a way of
playing that Kimura really likes, so it can only be that the pressure of this
game after allowing Fukaura to get back from 0-3 to 2-3 was getting to Kimura
in this position, leading to this overplay.

78.K4a-3a    06:46:00  06:12:00
79.S5bx4c+   06:48:00  06:12:00
80.G3bx4c    06:48:00  06:24:00
81.P5d-5c+   06:48:00  06:24:00
82.S*4i      06:48:00  06:59:00

This is a very strong attack against which black has no proper defense. 83.Kx4i
of course fails to 84.+Rx4g, so black cannot easily get rid of this silver close
to the king. The reason that this move is not getting an exclamation mark, is that
Kimura pointed out after the game that 82.S*6g is winning more quickly. This attacks
the gold on 5f and if the gold moves naturally back into defense with 83.G5g, then
84.G*5h is a vulgar, but very effective move because 85.K3i Gx5g threatens mate with
G*4i Kx4i S5h+ etc.

83.P*5i      07:01:00  06:59:00
84.P*3h      07:01:00  07:33:00
85.B*2e      07:27:00  07:33:00

Defends the vital point 4g and attacks the gold on 4c at the same time, but it is
not enough to turn the tables.

86.+R8g-7h   07:27:00  07:42:00
87.L*5h      07:28:00  07:42:00
88.S4ix5h+   07:28:00  07:42:00
89.P5ix5h    07:28:00  07:42:00
90.S*3i      07:28:00  07:42:00
91.K4h-5g    07:33:00  07:42:00
92.+R7h-8g   07:33:00  07:43:00
93.S*6g      07:35:00  07:43:00
94.S3ix2h=   07:35:00  07:47:00
95.G*3b      07:42:00  07:47:00
96.K3ax3b    07:42:00  07:47:00
97.+P5cx4c   07:44:00  07:47:00
98.K3b-2b    07:44:00  07:47:00
99.G5f-5e    07:44:00  07:47:00
100.R*3e     07:44:00  07:54:00
101.+P4cx3c  07:45:00  07:54:00
102.N2ax3c   07:45:00  07:54:00
103.G*3b     07:45:00  07:54:00
104.K2bx3b   07:45:00  07:54:00
105.B2e-4c+  07:45:00  07:54:00
106.K3bx4c   07:45:00  07:55:00
107.+B6bx4d  07:45:00  07:55:00
108.K4c-3b   07:45:00  07:55:00
109.S*4c     07:45:00  07:55:00
110.K3b-2a   07:45:00  07:55:00
111.+B4dx3e  07:45:00  07:55:00
112.B*8i!    07:45:00  07:59:00

With the silver on 4c, the gold on 5e and promoted bishop on 3e it seems that black
has secured an escape route up the board, but this bishop drop, together with the
ton of pieces that white has in hand, is enough to mate the king.

113.S3gx2h   07:47:00  07:59:00

This threatens mate after S*2b next, but unfortunately for Kimura his king can be
mated from here.

114.B8ix6g+  07:47:00  07:59:00
115.K5g-4f   07:47:00  07:59:00
116.L*4d     07:47:00  07:59:00
117.K4f-3f   07:49:00  07:59:00
118.G*4f     07:49:00  07:59:00
119.+B3ex4f  07:49:00  07:59:00
120.G*2e     07:49:00  07:59:00
121.K3f-3g   07:49:00  07:59:00
122.S*3f     07:49:00  07:59:00
123.+B4fx3f  07:49:00  07:59:00
124.G2ex3f   07:49:00  07:59:00
125.K3gx3f   07:49:00  07:59:00
126.G*2e     07:49:00  07:59:00
127.K3f-3g   07:49:00  07:59:00
128.L4dx4g+  07:49:00  07:59:00
129.K3gx4g   07:49:00  07:59:00
130.+B6gx5h  07:49:00  07:59:00
Resigns      07:49:00  07:59:00
A long and not so easy mating sequence, but from here it is easy. 131.Kx5h B*6i K4i
+R4g; 131.K5f or K4f 132.+B4g and 131.Kx3h +R4g K3i +R4h all lead to mate. A tight
game that could have gone either way, but Fukaura manages to level the match after
being 3-0 down. He now gets a chance to become the second player to come back and
win a seven game title match after dropping the first three games.