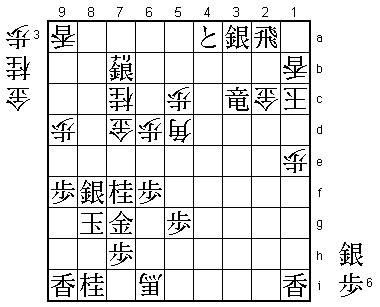
50th Oi Match Game 5
[Black "Fukaura Koichi, Oi"]
[White "Kimura Kazuki, Challenger"]
[Event "50th Oi-sen, Game 5"]
[Date "August 20th and 21st 2009"]
1.P2g-2f     00:00:00  00:00:00
2.P8c-8d     00:00:00  00:02:00
3.P7g-7f     00:01:00  00:02:00
4.G4a-3b     00:01:00  00:03:00
5.G6i-7h     00:01:00  00:03:00
6.P8d-8e     00:01:00  00:07:00
7.B8h-7g     00:01:00  00:07:00
8.P3c-3d     00:01:00  00:07:00
9.S7i-8h     00:01:00  00:07:00
10.S3a-4b    00:01:00  00:07:00
11.B7gx2b+   00:01:00  00:07:00
12.G3bx2b    00:01:00  00:07:00
13.S8h-7g    00:02:00  00:07:00
14.S7a-6b    00:02:00  00:08:00
15.S3i-3h    00:02:00  00:08:00
16.P6c-6d    00:02:00  00:09:00
17.P4g-4f    00:02:00  00:09:00
18.S6b-6c    00:02:00  00:09:00
19.S3h-4g    00:02:00  00:09:00
20.P9c-9d    00:02:00  00:10:00
21.P9g-9f    00:02:00  00:10:00
22.G6a-5b    00:02:00  00:12:00
23.K5i-6h    00:03:00  00:12:00
24.K5a-4a    00:03:00  00:13:00
25.P1g-1f    00:06:00  00:13:00
26.P1c-1d    00:06:00  00:13:00
27.S4g-5f    00:06:00  00:13:00
28.G2b-3b    00:06:00  00:14:00
29.G4i-5h    00:13:00  00:14:00
30.S6c-5d    00:13:00  00:18:00
31.P6g-6f    00:13:00  00:18:00
32.P4c-4d    00:13:00  00:19:00
33.P3g-3f    00:13:00  00:19:00
34.P7c-7d    00:13:00  00:22:00
35.K6h-7i    00:14:00  00:22:00
36.K4a-3a    00:14:00  00:23:00
37.N2i-3g    00:15:00  00:23:00
38.N8a-7c    00:15:00  00:24:00
39.P2f-2e    00:34:00  00:24:00
40.S4b-3c    00:34:00  00:24:00
41.P4f-4e    00:35:00  00:24:00
42.P4dx4e    00:35:00  00:24:00
43.P2e-2d    00:35:00  00:24:00
44.P2cx2d    00:35:00  00:25:00
45.P1f-1e    00:35:00  00:25:00
46.P1dx1e    00:35:00  00:25:00
47.P7f-7e    00:35:00  00:25:00
48.P7dx7e    00:35:00  00:26:00
49.P3f-3e    00:35:00  00:26:00
50.S3c-4d    00:35:00  00:27:00
51.R2hx2d    00:39:00  00:27:00
52.P*2c      00:39:00  00:28:00
53.R2d-2f    00:40:00  00:28:00
54.G5b-6c    00:40:00  00:41:00
55.P*7d      00:42:00  00:41:00
56.G6cx7d    00:42:00  00:43:00
57.P3ex3d    00:42:00  00:43:00
58.P7e-7f    00:42:00  00:54:00
59.S7gx7f    00:49:00  00:54:00
60.P8e-8f    00:49:00  00:56:00
61.P8gx8f    00:52:00  00:56:00
62.P*8h      00:52:00  00:58:00
63.G7hx8h    02:02:00  00:58:00
64.B*4i      02:02:00  02:13:00
65.S5f-6g    02:08:00  02:13:00
66.R8bx8f    02:08:00  02:49:00

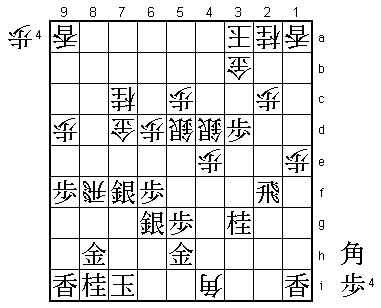
Already 66 moves played, but it is still only around 4 o'clock on the first day of play.
Even without playing through the moves this can only mean one thing: the Kakugawari
Koshikakegin opening. This is the most deeply analyzed opening in shogi, but there is
still no conclusion about who has the better chances. This position has of course been
played before. It appeared in the C1 Junisen game between Maruyama and Katagami that
was played in September last year. There black played 67.P*8g and after 68.Rx7f Sx7f
Bx5h+ G7h P*7g Nx7g P*8h Kx8h +Bx7f R*8a white got two generals for the rook and
Katagami won the game. However, after the game he wrote on his blog that the level
of the game had been pretty bad.

67.G8h-7g    02:42:00  02:49:00

This is the move that Fukaura prepared as an improvement. It gets rid of the wall
gold and attacks the white rook at the same time, but also leaves some important
weaknesses around the black king. Like so many positions in this opening, it is
not clear if 67.G7g is a good move or not.

68.R8f-8a    02:42:00  03:03:00
69.P*8f      02:52:00  03:03:00
70.P*7e      02:52:00  03:26:00
71.S7f-8g    02:56:00  03:26:00
72.P*8e      02:56:00  03:34:00
73.B*7b      03:42:00  03:34:00

The sealed move.

74.R8a-8d    03:42:00  04:16:00
75.P3d-3c+   04:57:00  04:16:00
76.S4dx3c    04:57:00  04:33:00
77.N3gx4e    05:01:00  04:33:00

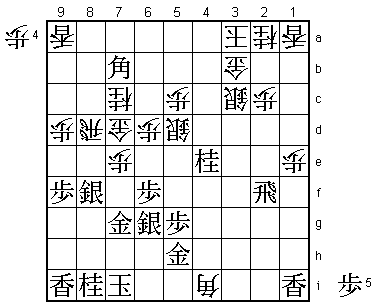
Being able to develop this knight is another plus of the black opening strategy.
Some professionals in the press room already thought that black had the upper hand
here, but Fukaura himself wasn't so sure.

78.P8ex8f    05:01:00  04:47:00
79.S8gx8f    05:12:00  04:47:00

80.P7e-7f!   05:12:00  05:56:00

After this move, the opinion in the press room started to change. Moves like 80.P*8h
were analyzed, but then black can play 81.Nx5c+ and the threat Bx5d+ next is hard to
defend. Also, 80.G8e can be answered by P*8g and the white attack seems too heavy.

81.G7gx7f    05:31:00  05:56:00
82.R8d-8b    05:31:00  06:07:00

The point of 80.P7f. After weakening the black formation (and preparing for drops
like P*7h and P*8g), white puts pressure on the black bishop.

83.N4ex3c=   06:17:00  06:07:00
84.N2ax3c    06:17:00  06:20:00
85.S*8c      06:17:00  06:20:00

Black doesn't want to use the silver here, but there is no alternative. The black
attack with the rook is not necessarily more dangerous than the white attack with
a bishop. The endgame is still too close to call.

86.N*5e      06:17:00  06:30:00
87.G7f-7g    06:18:00  06:30:00
88.N5ex6g+   06:18:00  06:36:00
89.G5hx6g    06:18:00  06:36:00
90.R8bx7b    06:18:00  06:37:00
91.S8cx7b+   06:21:00  06:37:00
92.B4i-5h+   06:21:00  06:39:00

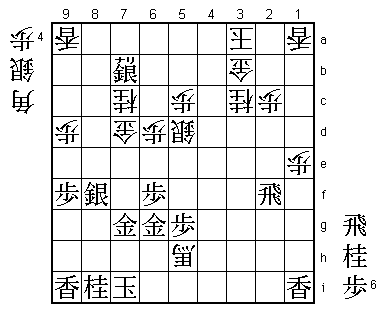
This promoted bishop is very strong because it works both in attack and defense.
Kimura was reasonably happy with his position here.

93.P*4b!     06:54:00  06:39:00

This is a very strong pawn drop and a textbook example of a dangling pawn attack.
This pawn cannot be taken because 94.Gx4b is answered by 95.Rx2c+ and 94.Kx4b by
95.R*6b. Furthermore, black is threatening R*4a K2b N*3d which wins quickly. Kimura
was not surprised by 93.P*4b, but there was nothing he could do about it and he had
prepared a defense. He figured that it would give him just enough time to put a pawn
on 8g to start his own attack...

94.S5d-4c    06:54:00  07:09:00
95.P4b-4a+   07:16:00  07:09:00
96.K3a-2b    07:16:00  07:12:00
97.N*3e      07:16:00  07:12:00
98.S4c-3d    07:16:00  07:22:00

It is hard to call this a mistake, because white is not necessarily losing after
98.S3d, but maybe 98.N2e was better here. For example, 99.G6h S*8h Kx8h +Bx6h S*7i
P*8g Gx8g +Bx7i Kx7i S*6g and the position remains unclear.

99.P*2d      07:17:00  07:22:00
100.P2cx2d   07:17:00  07:23:00
101.R2fx2d   07:19:00  07:23:00
102.P*2c     07:19:00  07:24:00
103.R2dx3d   07:19:00  07:24:00
104.P*8g     07:19:00  07:28:00
105.S*3a     07:31:00  07:28:00
106.K2b-1c   07:31:00  07:30:00
107.P*1d     07:31:00  07:30:00
108.+B5hx1d  07:31:00  07:30:00
109.R*2a     07:31:00  07:30:00

110.S*8h?    07:31:00  07:35:00

This is an important mistake and in an endgame as sharp as this it is not surprising
that it is also the losing move. Correct was 110.P*7h which must be answered by
111.Gx7h because 111.Kx7h B*6i leads to mate. After Gx7h, white has the surprising
112.B*2e! which attacks the rook and threatens mate at the same time. The reason
Kimura did not play this move was that after 113.Rx1a+ white is forced to drop the
silver on 1b with 114.S*1b and Kimura felt that dropping such an important piece here
would be suicidal. However, white is still threatening mate with B6i+, so black must
take the promoted bishop on 1d and after 115.Rx1d Bx1d (still threatening mate on 6i,
this time with the rook) Gx8g R*2i K8h B6i+ the endgame is still unclear, although
it seems that the white king has more room to run than the black king.

111.K7i-6h   07:31:00  07:35:00
112.L1a-1b   07:31:00  07:35:00

Kimura had counted on this defensive tactic, but Fukaura has a strong counter against it.

113.N3ex2c+  07:35:00  07:35:00
114.G3bx2c   07:35:00  07:44:00
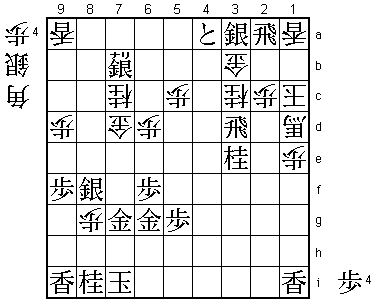
115.R3dx3c+! 07:35:00  07:44:00

White cannot take this rook (Gx3c R2b+ is mate) and suddenly the white king is in a
hisshi position. Kimura tries some desperate checks, but there is no mate against the
black king.

116.S8hx7g+  07:35:00  07:45:00
117.K6hx7g   07:36:00  07:45:00
118.P*7f     07:36:00  07:50:00
119.K7gx8g   07:39:00  07:50:00

Only here Fukaura felt sure that he would win the game.

120.+B1d-6i  07:39:00  07:51:00
121.P*7h     07:40:00  07:51:00
122.P7f-7g+  07:40:00  07:53:00
123.G6gx7g   07:42:00  07:53:00
124.B*5d     07:42:00  07:54:00
125.N*7f     07:43:00  07:54:00
Resigns      07:43:00  07:55:00

White can take the rook on 2a, but this doesn't help. 126.Bx2a Lx1e P*1d (or any other
piece) S2b= is still mate. Also, 126.Gx3c Lx1e followed by R2b+ is still mate, so Kimura
resigned here. Fukaura wins his second game in a row to make the score suddenly look
much more respectable at 3-2. He is still a game down and has the white pieces in the
next game, so there is still a lot of work to do. However, he has some important momentum
now and Kimura may feel the pressure with his comfortable 3-0 lead almost gone. This match
has suddenly gotten very interesting indeed.
