50th Oi Match Game 4
[Black "Kimura Kazuki, Challenger"]
[White "Fukaura Koichi, Oi"]
[Event "50th Oi-sen, Game 4"]
[Date "August 4th and 5th 2009"]
1.P7g-7f     00:01:00  00:00:00

This fourth game was played in Sasebo on the Southern island of Kyushu, which is Fukaura's
hometown. Last year, he beat challenger Habu here to take a 3-1 lead. A very important win,
because he needed seven games to defend his title. This time the situation is completely
different, because he finds himself 3-0 down against this year's challenger Kimura.
Therefore, despite the strong support of the local shogi fans, it is hard to say that
Fukaura was in his comfort zone for this game. Actually, there was probably some extra
pressure because there of the risk that he would lose his only title on his home turf.
On top of that, he has the white pieces in this game.

2.P8c-8d     00:01:00  00:05:00
3.S7i-6h     00:04:00  00:05:00
4.P3c-3d     00:04:00  00:05:00
5.P6g-6f     00:05:00  00:05:00
6.S7a-6b     00:05:00  00:05:00
7.P5g-5f     00:05:00  00:05:00
8.P5c-5d     00:05:00  00:05:00
9.S3i-4h     00:05:00  00:05:00
10.S3a-4b    00:05:00  00:05:00
11.G4i-5h    00:06:00  00:05:00
12.G4a-3b    00:06:00  00:05:00
13.G6i-7h    00:09:00  00:05:00
14.G6a-5b    00:09:00  00:05:00
15.K5i-6i    00:12:00  00:05:00
16.P4c-4d    00:12:00  00:05:00
17.S6h-7g    00:13:00  00:05:00
18.S4b-3c    00:13:00  00:06:00
19.B8h-7i    00:14:00  00:06:00
20.B2b-3a    00:14:00  00:06:00
21.P3g-3f    00:15:00  00:06:00
22.G5b-4c    00:15:00  00:06:00
23.G5h-6g    00:18:00  00:06:00
24.K5a-4a    00:18:00  00:07:00
25.B7i-6h    00:23:00  00:07:00
26.P7c-7d    00:23:00  00:07:00
27.K6i-7i    00:23:00  00:07:00
28.B3a-6d    00:23:00  00:07:00
29.N2i-3g    00:24:00  00:07:00
30.K4a-3a    00:24:00  00:07:00
31.R2h-3h    00:29:00  00:07:00
32.K3a-2b    00:29:00  00:10:00
33.K7i-8h    00:32:00  00:10:00
34.B6d-7c    00:32:00  00:53:00
35.P1g-1f    00:39:00  00:53:00
36.P1c-1d    00:39:00  00:53:00
37.P2g-2f    00:49:00  00:53:00
38.S6b-5c    00:49:00  00:55:00
39.P4g-4f    01:06:00  00:55:00
40.P8d-8e    01:06:00  01:21:00
41.S4h-4g    01:07:00  01:21:00
42.S3c-2d    01:07:00  01:23:00
43.L9i-9h    01:35:00  01:23:00
44.B7c-6d    01:35:00  02:01:00
45.B6h-5g    01:48:00  02:01:00
46.P9c-9d    01:48:00  02:13:00
47.P2f-2e    01:58:00  02:13:00
48.S2d-1c    01:58:00  02:21:00
49.B5g-3i    02:01:00  02:21:00
50.B6d-7c    02:01:00  02:57:00
51.B3i-1g    02:10:00  02:57:00

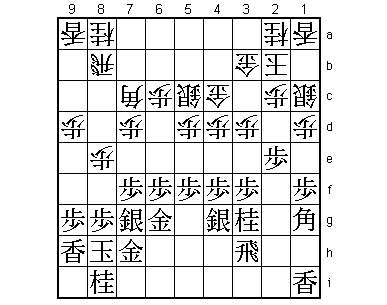
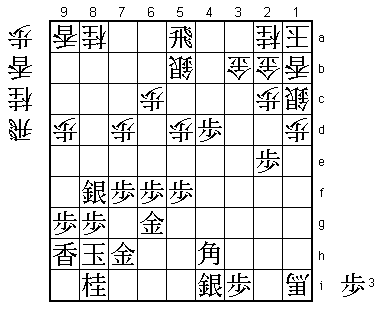
A very difficult Yagura opening. Fukaura has answered Kimura's Morishita System with
the four general defense. This is hard to break down and black often takes time to
strengthen his Yagura castle by moving into an Anaguma. Kimura also intends to do
this by playing 43.L9h, but Fukaura threatens a strong edge attack with 44.B6d
followed by P9d and P9e, so it is hard for Kimura to move his king in the corner.
Instead, Kimura plays the bishop maneuver B6h-5g-3i-1g to move the bishop into an
attacking position. It is impossible to say if this is a good plan or not, but
Fukaura has a surprising strategy to counter the black attacking threats.

52.L1a-1b!?  02:10:00  03:04:00

Fukaura is also going for the Anaguma castle. This looks like a very risky strategy
here.

53.P3f-3e    02:22:00  03:04:00
54.P3dx3e    02:22:00  03:04:00
55.B1gx3e    02:22:00  03:04:00
56.K2b-1a    02:22:00  03:04:00
57.B3e-2f    03:06:00  03:04:00
58.G3b-2b    03:06:00  03:14:00

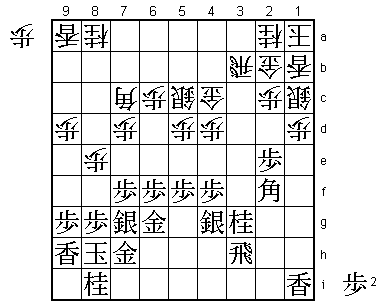
The Anaguma is supposed to be strongest castle in shogi, but the white formation looks
like it will break down very easily. The silver on 1c and 2b both look out of place
and the silver on 5c and the gold on 4c will become a target for attack if black pushes
up the pawn on the 4th file. Furthermore, there is always the threat that the knight
on 3g jumps to 4e to open the file for the rook. However, Fukaura has looked deeper.

59.P1f-1e    03:16:00  03:14:00
60.P1dx1e    03:16:00  03:14:00
61.B2fx1e    03:17:00  03:14:00
62.P*1d      03:17:00  03:23:00
63.B1e-2f    03:17:00  03:23:00
64.R8b-3b!   03:17:00  03:23:00

This was what white was aiming for. The immediate threat is P*3f and black can stop
this by dropping a pawn on 3f or 3e. This stops any immediate threats, but there isn't
a professional who will play this move. After the pawn drop on 3f or 3e, white can
just move the rook back to 8b which is good because black has killed his attacking
potential with the pawn drop on the third file.

65.N3g-4e    04:14:00  03:23:00

The sealed move. It seems Kimura sealed this with a "Let's go for it" attitude, but
after the game admitted that he may have blown up his own position here. After the
game, Fukaura said he thought this was a possible answer to 64.R3b, but didn't expect
Kimura to play it because 65.N4e is very risky. Therefore, he used more than an hour
for his reply because he wanted to check again all the variations he had read the
previous day. Still, it is not easy to find a better move than 65.N4e and it seems
that the position is still unclear here.

66.R3bx3h+?! 04:14:00  04:29:00

It is not so clear if this is the right move. The simple 66.Px4e looks dangerous after
Rx3b+ Gx3b P*3c, but after G3bx3c Lx1d Sx1d Bx5c+ Gx5c R*4b B*1c it seems that white
can hold his position together.

67.S4gx3h    04:14:00  04:29:00
68.S5c-4b    04:14:00  04:29:00
69.P*1e      04:28:00  04:29:00
70.P1dx1e    04:28:00  04:30:00
71.R*4a      04:32:00  04:30:00
72.P4dx4e    04:32:00  04:44:00
73.P4fx4e?   04:38:00  04:44:00

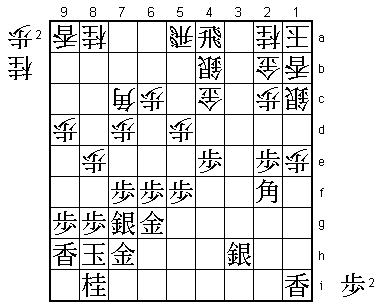
This is a mistake. Correct was 73.Bx1e and after 74.P*3c Px4e P8f Sx8f R*5a (R*3a is
answered by Rx3a+ Sx3a R*4a S3b Rx8a+ and black strongly threatens N*4d next) Rx5a+
Sx5a B3g and white has a lot of things to deal with. This is clearly much better than
what happened in the game. Of course, the reason why Kimura played 73.Px4e is obvious,
because black now strongly threatens P4d next. However, Kimura has underestimated the
white reply.

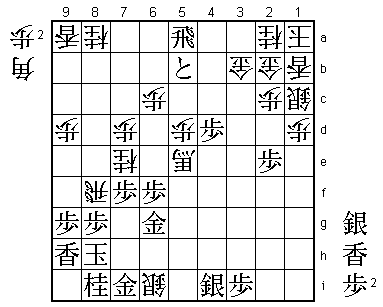
74.R*5a!     04:38:00  04:55:00

This move is easy to overlook, because after 74.Rx5a+ Sx5a the silver is moving away
from the king. However, the important point is that the silver on 5a is protected by
the bishop, so there is no good rook drop for black. On the other hand, defending
with 74.R*3a seems more natural because after Rx3a+ Sx3a the silver has moved towards
the king with tempo, but this silver is now undefended, so black can drop a rook to
attack it.

75.R4ax5a+   04:41:00  04:55:00
76.S4bx5a    04:41:00  04:57:00
77.P*3i      04:51:00  04:57:00

Even for a defensive minded player like Kimura this must have been a painful move.
This pawn defends the out of play silver on 3g, but the whole point of exchanging
the pawn on 3e in the first place was to be able to use the pawn in attack on 3c or
3b, which is now no longer possible.

78.P8e-8f    04:51:00  05:09:00
79.S7gx8f    05:04:00  05:09:00
80.R*6i      05:04:00  05:19:00
81.P4e-4d    05:19:00  05:19:00
82.G4c-4b    05:19:00  05:21:00

The second point of dropping the rook on 5a. Because the silver has moved away from
4b, this square is now available for the gold.

83.R*4e      05:42:00  05:21:00

84.S5a-5b!   05:42:00  06:21:00

Also good enough seems 84.Rx3i+ P4c+ +Rx3h, because the Yagura formation with the
lance on 9h is very weak from the side. Fukaura instead takes the time to make sure
that his position is too strong to attack.

85.B2fx1e    06:03:00  06:21:00
86.G4b-3b    06:03:00  06:21:00

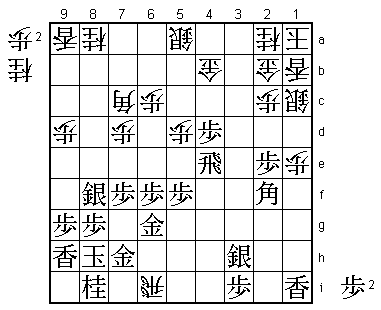
The white Anaguma, which looked like it would collapse on its own has now turned into
a rock hard defense. It will take black a long time to break down this formation without
being able to drop a pawn on 3c and the black Yagura has so many weaknesses that black
never gets around to attacking.

87.R4e-4i    06:18:00  06:21:00
88.R6ix4i+   06:18:00  06:23:00
89.S3hx4i    06:18:00  06:23:00
90.P*1d      06:18:00  06:23:00
91.B1e-4h    06:19:00  06:23:00
92.B7cx1i+   06:19:00  06:31:00
93.R*5a      06:45:00  06:31:00

The last desperate try. Of course, white cannot give up this silver for free, and it
seems that black has managed to cover the weakness on the side of the Yagura. Again,
Fukaura has looked deeper.

94.R*8b!     06:45:00  06:36:00

This second rook drop in white's own camp decides the game. This rook protects the
silver and white also sets up a decisive attack at the head of the black king.

95.P5f-5e    06:54:00  06:36:00
96.L*8c      06:54:00  06:39:00

A textbook double rocket aimed at the head of the king.

97.B4h-5i    06:56:00  06:39:00
98.+B1ix5e   06:56:00  06:49:00

Now all white attacking pieces are aimed at the black king. There is no defense.

99.P*5c      06:57:00  06:49:00

Kimura throws the towel.

100.L8cx8f   06:57:00  06:51:00
101.B5ix8f   06:57:00  06:51:00
102.R8bx8f   06:57:00  06:56:00
103.P5cx5b+  06:57:00  06:56:00
104.S*6i     06:57:00  07:07:00
105.G7h-7i   07:08:00  07:07:00
106.N*7e     07:08:00  07:10:00
Resigns      07:10:00  07:10:00

The white king is still nowhere to near mate and the black position is without defense.
For example, 107.Px7e is answered by 108.Rx6f Gx6f +Bx6f and 107.Px8f by 108.P*8g.
Kimura took two minutes to make sure there wasn't anything he could do and then
resigned. Fukaura takes this home game to finally get on the scoreboard in this
Oi match. He is still 3-1 down and in a deep hole, but at least has some hope to
put a little pressure on Kimura if he can win the fifth game with the black pieces.
