50th Oi Match Game 2
[Black "Kimura Kazuki, Challenger"]
[White "Fukaura Koichi, Oi"]
[Event "50th Oi-sen, Game 2"]
[Date "July 22nd and 23rd 2009"]
1.P2g-2f     00:01:00  00:00:00
2.P8c-8d     00:01:00  00:03:00
3.P2f-2e     00:02:00  00:03:00
4.P8d-8e     00:02:00  00:03:00
5.G6i-7h     00:03:00  00:03:00
6.G4a-3b     00:03:00  00:03:00
7.P2e-2d     00:04:00  00:03:00
8.P2cx2d     00:04:00  00:04:00
9.R2hx2d     00:04:00  00:04:00
10.P*2c      00:04:00  00:04:00
11.R2d-2h    00:05:00  00:04:00

The Aigakari opening with the rook pulled back to 2h. This continues to be a popular
opening among professionals, so no surprises here.

12.P3c-3d    00:05:00  00:09:00
13.S3i-3h    00:10:00  00:09:00
14.P8e-8f    00:10:00  00:14:00
15.P8gx8f    00:10:00  00:14:00
16.R8bx8f    00:10:00  00:14:00
17.P*8g      00:10:00  00:14:00
18.R8f-8d    00:10:00  00:14:00
19.P9g-9f    00:18:00  00:14:00
20.S7a-6b    00:18:00  00:24:00
21.P1g-1f    00:22:00  00:24:00
22.P1c-1d    00:22:00  00:24:00
23.P7g-7f    00:24:00  00:24:00
24.P9c-9d    00:24:00  00:39:00
25.P4g-4f    00:52:00  00:39:00
26.P6c-6d    00:52:00  00:40:00
27.P*2d      01:08:00  00:40:00
28.P2cx2d    01:08:00  01:11:00
29.R2hx2d    01:08:00  01:11:00
30.P6d-6e    01:08:00  01:11:00

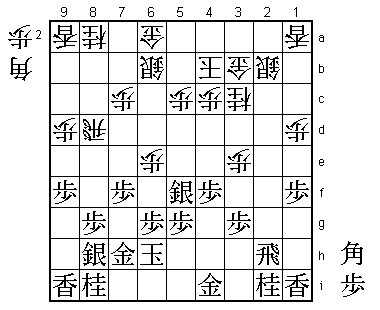
This a classic way of defending the side pawn on 3d by opening the rank of the rook
and at the same time putting some pressure on the black king with the vanguard pawn
on 6e. However, this pawn can become a target because it cannot be easily defended.
Black can go and try to take this pawn with S4g followed by S5f as we will see in
this game.

31.S3h-4g    01:21:00  01:11:00
32.K5a-4b    01:21:00  01:22:00
33.R2d-2h    02:05:00  01:22:00
34.B2bx8h+   02:05:00  01:26:00
35.S7ix8h    02:07:00  01:26:00
36.S3a-2b    02:07:00  01:26:00
37.S4g-5f    02:29:00  01:26:00
38.N2a-3c    02:29:00  02:09:00
39.K5i-6h    02:53:00  02:09:00
40.P3d-3e    02:53:00  02:23:00

It looks like white is doing well, as this is another vanguard pawn that indirectly
defends the pawn on 6e. Black cannot take this pawn because after 41.Sx6e P3f Px3f
B*4g white can make a promoted bishop which defends the weak second file at the
same time.

41.G4i-3h    02:56:00  02:23:00

Now black threatens to take the pawn on 6e again. If black can take this pawn for
nothing, white will be in trouble, so Fukuara takes more drastic measures.

42.P6e-6f    02:56:00  03:45:00
43.P6gx6f    03:01:00  03:45:00
44.B*4i      03:01:00  03:45:00

It looks like 44.P*2f is a good alternative here, because 45.Rx2f is answered by
46.B*4i and white can make a promoted bishop. However, if black just plays 45.B*5h
to defend against the bishop drop, the pawn on 2f is very vulnerable and white might
have overstretched his position.

45.B*5h      03:05:00  03:45:00
46.B4ix3h+?! 03:05:00  03:46:00

This game seems to indicate that this is an overplay. Kondo (6-dan) suggested to
pull the black king to the center with 46.Bx5h+ Kx5h and then start an attack with
P1e.

47.R2hx3h    03:05:00  03:46:00
48.G*2g      03:05:00  03:46:00
49.R3h-3i    03:56:00  03:46:00
50.G2g-2h    03:56:00  03:48:00
51.R3i-6i    04:03:00  03:48:00
52.G2hx1i    04:03:00  03:48:00

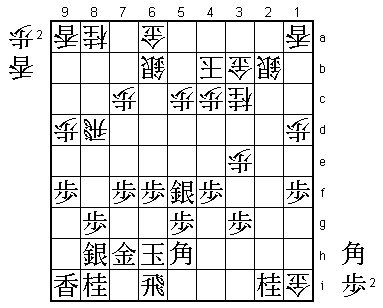
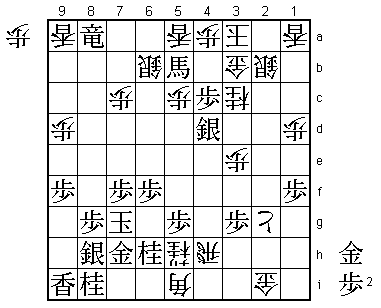
White has taken the lance and now has a gold and lance for the bishop, so there is
not much material difference. The point of the game will be the gold on 1i. If white
is given the time to activate it, he will get the upper hand. If black manages to
find a way to start the attack with the gold still far away from the king, black will
be better. It seems like Fukaura judged that black cannot easily attack, because the
bishop and rook are in a very awkward position and the black king will also be in a
lot of danger with the wall silver on 8h if the position is opened up. He was therefore
counting on getting the time to activate the gold, but Kimura finds a way to avoid that.

53.P4f-4e    04:07:00  03:48:00
54.P*2f      04:07:00  03:53:00
55.S5f-5e    04:52:00  03:53:00
56.P2f-2g+   04:52:00  04:50:00
57.P4e-4d    04:53:00  04:50:00
58.P4cx4d    04:53:00  04:52:00
59.R6i-4i!   04:55:00  04:52:00

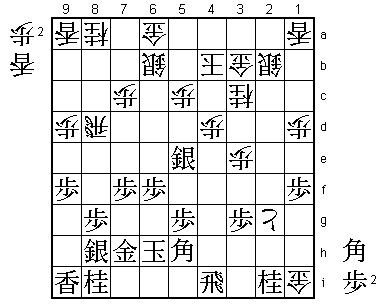
This was Kimura's plan. It looks very dangerous to exchange the rooks with the king and
bishop on the same rank and no escape route with the silver on 8h, but Kimura has seen
that it is more important to activate the rook on 6i.

60.G6a-5b?   04:55:00  05:47:00

After the game this was the move that Fukaura regretted most. With reason, because it
seems there were a number of alternatives here that were better. First of all, defend
against the rook exchange with 60.G4c. For example, 61.P*4e Nx4e N1g G1h Rx4e Px4e P*4d
looks like a strong attack, but black has given up some serious material, so it is
unclear if it will be strong enough. Also better than 60.G5b is 60.G5a. We will see a
little later why this was better.

61.R4ix4d    05:22:00  05:47:00
62.R8dx4d    05:22:00  05:47:00
63.S5ex4d    05:22:00  05:47:00
64.R*4h      05:22:00  05:47:00
65.P*4c      05:27:00  05:47:00
66.K4b-3a    05:27:00  05:50:00
67.R*6a      05:49:00  05:50:00

This rook drop is even stronger than the white rook drop on 4h. If white would have
played 60.G5a instead of 60.G5b, this drop would not have been possible. Even if
black tries to force the issue with B*4b in that case, the white king can simply
escape with K2a and the black attack seems to be running out of steam.

68.L*5a      05:49:00  05:52:00

It looks like the formation with gold, silver and lance is a strong defense, but
the gold on 5b is an important weakness as will be shown next.

69.R6ax8a+   05:52:00  05:52:00

Coolly played. Kimura realizes that the best way to break down the white defense
is to drop a bishop on 6a.

70.G1ix2i    05:52:00  06:20:00

Also, 70.Rx4d+ B*6a P*4a +Rx9a is good for black, because the lance can be used
on the 4th file next.

71.B*6a      06:07:00  06:20:00
72.N*4f      06:07:00  06:36:00

This looks very scary, but...

73.B6ax5b+   06:15:00  06:36:00

Kimura doesn't budge. Shogi is not a game for the weak of heart.

74.N4fx5h+   06:15:00  06:36:00
75.K6h-7g    06:15:00  06:36:00
76.B*5i      06:15:00  06:55:00
77.N*6h      06:16:00  06:55:00
78.P*4a      06:16:00  06:55:00

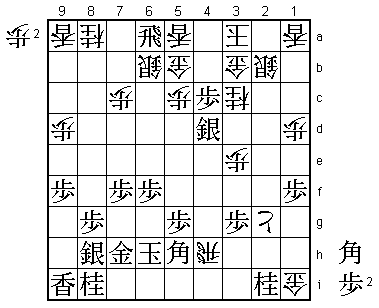
It seems like white has survived. This pawn defends against the mating threat P4b+
and 79.+Bx6b is not a mating threat so white wins after 80.+Nx6h.

79.S8h-7i!   06:23:00  06:55:00

This wall silver was always the problem of the black position, but Kimura has found
a perfect moment to get rid of it. This silver not only defends the knight on 6h, but
the king now suddenly has a lot more running space. This gives black just enough
breathing room.

80.R4hx4d+   06:23:00  07:01:00

Or 80.Lx5b G*4b and black wins.

81.+B5bx6b   06:24:00  07:01:00
82.S2b-2c    06:24:00  07:01:00
83.+R8ax5a   06:28:00  07:01:00

Now the white defense has broken down and there is no way to stop the black attack.
Fukaura desperately tries to invite a Kimura mistake from here, but it is all in vain.

84.K3a-2b    06:28:00  07:01:00
85.+B6bx5c   06:31:00  07:01:00
86.+R4d-4h   06:31:00  07:05:00
87.P*2d      06:41:00  07:05:00
88.S2cx2d    06:41:00  07:06:00
89.P4c-4b+   06:43:00  07:06:00
90.P4ax4b    06:43:00  07:22:00
91.G*3d      07:12:00  07:22:00
92.S*2c      07:12:00  07:24:00
93.G3dx2d    07:12:00  07:24:00
94.S2cx2d    07:12:00  07:25:00
95.S*3d      07:13:00  07:25:00
96.+N5hx6h   07:13:00  07:43:00
97.S7ix6h    07:22:00  07:43:00
98.+R4hx5g   07:22:00  07:43:00
99.L*6g      07:27:00  07:43:00
100.N*8e     07:27:00  07:47:00
101.K7g-8f   07:27:00  07:47:00
102.+R5gx6h  07:27:00  07:48:00
103.G7hx6h   07:32:00  07:48:00
104.B5ix6h+  07:32:00  07:48:00
105.N*7g     07:35:00  07:48:00
106.K2b-1c   07:35:00  07:52:00
107.+R5ax1a  07:39:00  07:52:00
108.G*1b     07:39:00  07:52:00
109.S*2a     07:41:00  07:52:00
110.G*2b     07:41:00  07:52:00
111.+R1ax1b  07:42:00  07:52:00
112.G2bx1b   07:42:00  07:52:00
113.S2ax3b=  07:42:00  07:52:00
114.S*2b     07:42:00  07:53:00
115.R*1a     07:43:00  07:53:00
Resigns      07:43:00  07:55:00

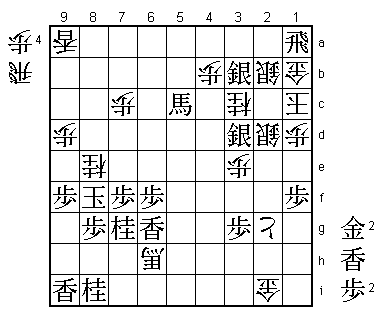
Black threatens mate after G*2c and there is no proper defense. 116.Gx1a or 116.Sx1a is
of course met with 117.G*2c and 116.P*2c also leads to mate after 117.Rx1b+ Kx1b G*1a etc.
After two minutes Fukaura resigned here and Kimura takes a 2-0 lead in the match with
another strong performance. The gold on 2i in the final position shows that he has been
extremely successful in avoiding the activation of this vital piece. Things now are looking
bleak for Fukaura, but he has the black pieces in the next game and the fourth game will be
played in his hometown of Sasebo, where he will have all the support he can ask for. It is
not too late to turn around this match, but he must win the third game to have a chance.
