50th Oi Match Game 1 (Replay)
[Black "Kimura Kazuki, Challenger"]
[White "Fukaura Koichi, Oi"]
[Event "50th Oi-sen, Replay Game 1"]
[Date "July 14th 2009"]
1.P7g-7f     03:40:00  00:00:00
2.P8c-8d     03:40:00  04:00:00
3.S7i-6h     03:41:00  04:00:00
4.P3c-3d     03:41:00  04:00:00
5.P6g-6f     03:41:00  04:00:00
6.S7a-6b     03:41:00  04:00:00
7.P5g-5f     03:41:00  04:00:00
8.P5c-5d     03:41:00  04:00:00
9.S3i-4h     03:41:00  04:00:00
10.S3a-4b    03:41:00  04:00:00
11.G4i-5h    03:41:00  04:00:00
12.G4a-3b    03:41:00  04:00:00
13.G6i-7h    03:45:00  04:00:00
14.K5a-4a    03:45:00  04:01:00
15.K5i-6i    03:45:00  04:01:00

In a sennichite replay players usually fall back on their preferred opening because
experimenting with limited thinking time is risky. This game is no exception as both
players opt for the yagura opening.

16.G6a-5b    03:45:00  04:01:00
17.S6h-7g    03:47:00  04:01:00
18.S4b-3c    03:47:00  04:01:00
19.B8h-7i    03:47:00  04:01:00
20.B2b-3a    03:47:00  04:01:00
21.P3g-3f    03:47:00  04:01:00
22.P4c-4d    03:47:00  04:01:00
23.G5h-6g    03:48:00  04:01:00
24.P7c-7d    03:48:00  04:01:00
25.B7i-6h    03:54:00  04:01:00
26.G5b-4c    03:54:00  04:08:00
27.K6i-7i    03:54:00  04:08:00
28.P9c-9d    03:54:00  04:08:00
29.K7i-8h    03:56:00  04:08:00
30.P9d-9e    03:56:00  04:09:00
31.P1g-1f    03:59:00  04:09:00
32.N8a-7c    03:59:00  04:12:00
33.S4h-3g    04:04:00  04:12:00
34.S6b-5c    04:04:00  04:52:00
35.P3f-3e    04:12:00  04:52:00
36.P3dx3e    04:12:00  05:03:00
37.B6hx3e    04:12:00  05:03:00
38.S5c-6d    04:12:00  05:03:00
39.S7g-8f    04:22:00  05:03:00
40.N7c-8e?!  04:22:00  05:10:00

This a new move and quite like Fukaura, who likes to play moves that are not strictly
powerful themselves, but will be powerful if the opponent hesitates only slightly.
However, in this position it is probably not good and the alternatives 40.P5e or 40.B4b
followed by P5e seem to be better.

41.P6f-6e    04:33:00  05:10:00
42.S6d-7c    04:33:00  05:17:00
43.B3e-4f    04:34:00  05:17:00
44.P6c-6d    04:34:00  05:17:00
45.S3g-3f    04:38:00  05:17:00

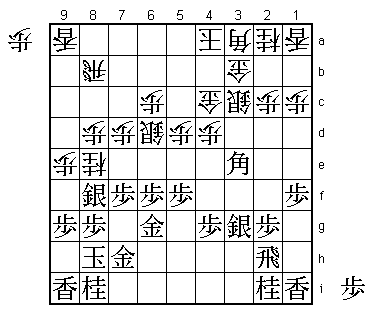
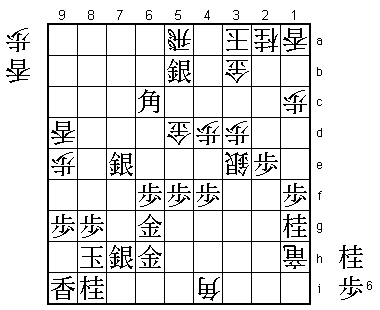
The problem. While black has moved up the silver to the perfect square 3f, the white
silver has been forced back to 7c and it will be hard for this pieces to join the
attack again.

46.R8b-6b    04:38:00  05:25:00
47.R2h-3h    04:48:00  05:25:00
48.R6b-6c?!  04:48:00  05:37:00

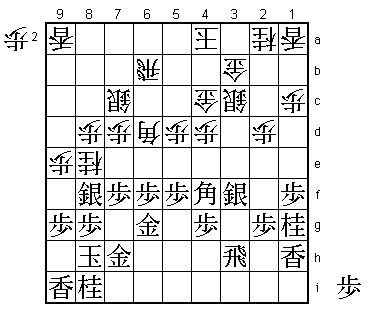
Defends the silver on 7c, so the pawn can move to 6e, but this is definitely not a
square where you want to put the rook. It seems that white is more or less forced
into this awkward position, but Kimura actually feared 48.P5e here. After 49.Bx5e,
white plays 50.R6c and the difference is that after 51.Px6d Sx6d the bishop is
attacked so B2h P*5e is more than playable for white. Also, pulling back the bishop
first with 51.B2h is answered by 52.Px6e Sx8e P*5e (to stop N*5e) and again the
white position doesn't look worse.

49.P6ex6d    04:55:00  05:37:00
50.B3ax6d    04:55:00  05:37:00
51.P*6f      04:55:00  05:37:00
52.R6c-6b    04:55:00  05:50:00
53.N2i-1g    04:59:00  05:50:00
54.P2c-2d    04:59:00  05:55:00
55.L1i-1h!   05:35:00  05:55:00

Although Kimura was not convinced about the strength of this move, he felt that
he had no choice. Black wants to play 55.P2f, but 56.Bx4f Px4f P*3e is good for
white because Sx3e is answered by P*3d. The reason why 55.L1h deserves an exclamation
mark is that it shows patient and accurate play by Kimura and also because it invites
the following mistake.

56.K4a-3a?   05:35:00  06:05:00

This is the most natural move on the board and Fukaura couldn't really believe
that this could be the reason for his troubles, but during the post-mortem analysis
he had no choice but to admit that 56.P1d, the move that Kimura feared, was better
than 56.K3a.

57.P2g-2f    05:39:00  06:05:00
58.B6dx4f    05:39:00  06:23:00
59.P4gx4f    05:39:00  06:23:00
60.B*4i      05:39:00  06:23:00

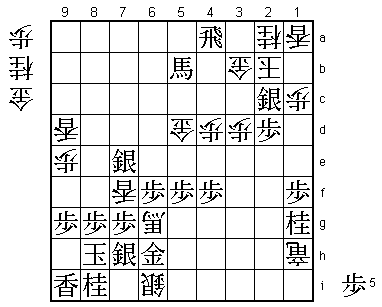
The reason why 56.K3a is not good is that white can no longer play 60.P*3e here because
of 61.Sx2d Sx2d B*5a. This fork was not possible with the king still on 4a.

61.R3h-6h    05:58:00  06:23:00
62.P7d-7e    05:58:00  06:27:00
63.P2f-2e    06:07:00  06:27:00
64.P*3e      06:07:00  06:53:00
65.S3fx3e    06:15:00  06:53:00
66.P*3d      06:15:00  06:53:00
67.S3ex2d    06:19:00  06:53:00
68.P7ex7f    06:19:00  06:53:00
69.P*7d      06:38:00  06:53:00
70.S7c-6d    06:38:00  07:00:00
71.B*5a      06:47:00  07:00:00
72.R6b-6a    06:47:00  07:08:00
73.B5ax8d+   06:47:00  07:08:00

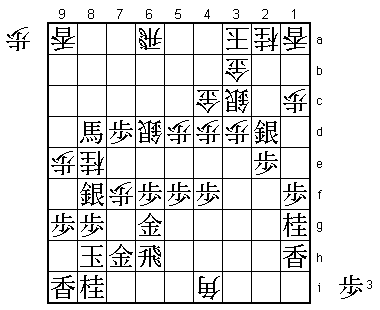
This bishop is very strong defending the head of the king and it looks like black
has a big advantage here. However, Kimura had some stressful minutes waiting for
Fukaura's move in this position because he had seen something he didn't like.

74.S3cx2d?   06:47:00  07:19:00

This must have been a big relief for Kimura. He had feared 74.N7g+ Nx7g R8a! and
after +B6b Px7g+ white can take the silver on 2d at any time he needs this piece
in attack, so the white attack is not easily stopped. Therefore, black has to
answer R8a with N*8c, but after Px7g+ G7hx7g P*7f G7h it seems that the position
is unclear because the black king has no easy escape route up the board, so the
white attack is much more likely to succeed than in the game.

75.S8fx8e    06:52:00  07:19:00
76.S2d-3e    06:52:00  07:24:00
77.P7d-7c+   06:54:00  07:24:00

This promoted pawn is a huge defender on the head of the king.

78.R6a-8a    06:54:00  07:24:00
79.+P7c-7d   07:00:00  07:24:00

It is important to remember that this tokin should not be rushed into the attack
with +P6c, but pulled back to the own king before moving sideways.

80.S*5h      07:00:00  07:30:00
81.+P7dx6d   07:08:00  07:30:00
82.S5hx6g+   07:08:00  07:30:00
83.G7hx6g    07:08:00  07:30:00
84.G*9d      07:08:00  07:30:00
85.+B8dx9d   07:10:00  07:30:00
86.L9ax9d    07:10:00  07:30:00
87.S8ex7f    07:10:00  07:30:00
88.B*5i      07:10:00  07:31:00
89.G*7h      07:20:00  07:31:00
90.B5ix6h+   07:20:00  07:37:00
91.G7hx6h    07:20:00  07:37:00
92.R*2h      07:20:00  07:37:00
93.S*7h      07:24:00  07:37:00

94.P*7e      07:24:00  07:40:00

Here white can get two generals for the rook after 94.Rx6h+ Gx6h Bx7f+, but after
R*7b the white king is too exposed to be properly defended.

95.S7fx7e    07:26:00  07:40:00
96.R2hx1h+   07:26:00  07:41:00

Fukaura tries to clear a path up the board himself, but he needs too many moves.

97.+P6dx5d   07:30:00  07:41:00
98.G4cx5d    07:30:00  07:42:00
99.B*6c      07:32:00  07:42:00
100.R8a-5a   07:32:00  07:42:00
101.S*5b     07:34:00  07:42:00

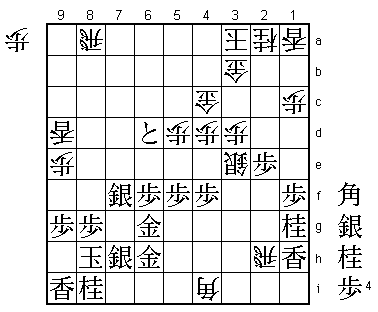
The decisive move, because black now gets a rook in hand after which the attack
is too strong. Still, Kimura wasn't completely sure he would win this game yet.

102.L*7f     07:34:00  07:42:00
103.P*7g     07:35:00  07:42:00
104.R5ax5b   07:35:00  07:55:00
105.B6cx5b+  07:35:00  07:55:00
106.S*6i     07:35:00  07:55:00
107.N*2d     07:39:00  07:55:00

This is a mating threat and there is no proper defense. Only here Kimura felt
confident that he would win the game.

108.S3ex2d   07:39:00  07:57:00
109.P2ex2d   07:40:00  07:57:00
110.B4ix6g+  07:40:00  07:57:00
111.R*4a     07:41:00  07:57:00
112.K3a-2b   07:41:00  07:57:00
113.S*2c     07:41:00  07:57:00
Resigns      07:41:00  07:57:00

Mate after 114.Gx2c Px2c+ Kx2c Rx2a+ P*2b +B4a K2d G*2e. The knight on 1g is just
able to stay on the board long enough to support the final mate. A strong performance
by Kimura, who seemed to be dominating both the sennichite game and the replay. There
was an interesting observation by Sugimoto (7-dan), who said that he was surprised
that two players whose playing style seemed so similar actually looked at completely
different variations very often. This is a worrying sign for Fukaura, who may have
sucked up a little too much of Habu's style for his own good. We will see if he recovers
in the second game, but because of this sennichite result, he will have to do it with
the white pieces again.
