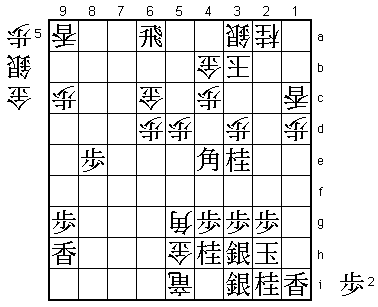
49th Oza Match Game 4
Black: Kubo Toshiaki, Challenger
White: Habu Yoshiharu, Oza
49th Oza-sen, Game 4, October 11th 2001
1.P7g-7f     00:00:00  00:00:00

Kubo looked quite confident at the start of this game. He even played
the first move two times in a row as a service to the photographers.
The sign of a title match veteran. Winning the third game seemed to
have done wonders for Kubo's fighting spirit. For Habu this is a game
he really wants to win. Ending the match before starting the fight
against Fujii in the Ryu-O would make it much easier to focus.
Furthermore, he not only lost the third game of this match, he also
lost in the A class Junisen. Time to win before losing becomes a pattern.

2.P3c-3d     00:00:00  00:00:00
3.P6g-6f     00:02:00  00:00:00
4.P8c-8d     00:02:00  00:02:00
5.R2h-6h     00:04:00  00:02:00
6.S7a-6b     00:04:00  00:04:00
7.P1g-1f     00:07:00  00:04:00
8.K5a-4b     00:07:00  00:06:00
9.S3i-3h     00:09:00  00:06:00
10.K4b-3b    00:09:00  00:07:00
11.S7i-7h    00:09:00  00:07:00
12.P5c-5d    00:09:00  00:13:00
13.S7h-6g    00:10:00  00:13:00
14.S6b-5c    00:10:00  00:16:00
15.P1f-1e    00:16:00  00:16:00
16.P7c-7d    00:16:00  00:18:00
17.G6i-5h    00:26:00  00:18:00

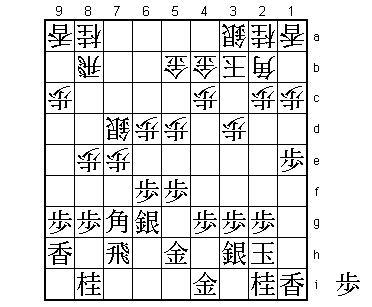
A sign of Kubo's positive state of mind. Instead of moving the king
to safety early, he is inviting Habu to play the quick attack, confident
that he will be able to counter it. One of his future options for this
counter is an attack on the edge.

18.P8d-8e    00:26:00  00:52:00
19.B8h-7g    00:26:00  00:52:00
20.S5c-6d    00:26:00  00:52:00
21.K5i-4h    00:39:00  00:52:00
22.P7d-7e    00:39:00  00:53:00
23.K4h-3i    00:39:00  00:53:00
24.P7ex7f    00:39:00  01:05:00
25.S6gx7f    00:39:00  01:05:00
26.P*7e      00:39:00  01:05:00
27.S7f-6g    00:43:00  01:05:00
28.S6d-7c    00:43:00  01:06:00
29.R6h-7h    00:54:00  01:06:00
30.S7c-7d    00:54:00  01:07:00
31.L9i-9h    01:05:00  01:07:00
32.G6a-5b    01:05:00  01:24:00
33.K3i-2h    01:05:00  01:24:00
34.P6c-6d    01:05:00  01:24:00
35.P5g-5f    01:09:00  01:24:00
36.G4a-4b!?  01:09:00  01:39:00

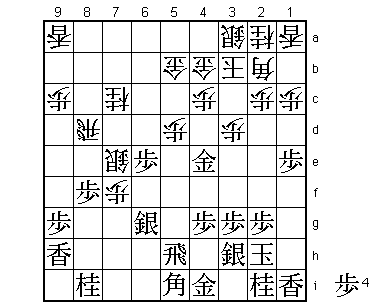
For this type of move a deep understanding of shogi is needed. Of course
the usual move is to play 36.S4b, followed by S5c~G4a-4b or S3c. However,
Habu didn't like black's high edge pawn. By keeping the silver on 3a,
there is the option of defending against a future edge attack by moving
the silver to 2b at some point. Also, escape with the king to the other
side of the board is now easier.

37.G5h-5g!   02:10:00  01:39:00

Kubo shows deep positional understanding of his own. The usual plan is
37.P4f followed by G4g, but Kubo wants to keep the 4f square empty for
a possible bishop drop there. Also, he plans to use this gold to attack
Habu's king from the front.

38.P6d-6e    02:10:00  01:46:00
39.P5f-5e    02:29:00  01:46:00
40.P8e-8f    02:29:00  02:17:00
41.P8gx8f    02:37:00  02:17:00
42.P5dx5e    02:37:00  02:29:00
43.R7h-5h    02:55:00  02:29:00
44.N8a-7c    02:55:00  02:44:00
45.G5g-4f    03:02:00  02:44:00
46.P7e-7f    03:02:00  02:59:00
47.B7g-5i    03:03:00  02:59:00

This bishop is threatening to come into play through 4h at any time.

48.R8b-8d    03:03:00  02:59:00
49.P6fx6e    03:08:00  02:59:00
50.S7d-7e    03:08:00  03:13:00
51.G4fx5e    03:24:00  03:13:00
52.P*5d      03:24:00  03:18:00
53.G5e-4e!   03:37:00  03:18:00

This gold looks to be in an awkward position, but it is actually
positioned very well. For the attack, it keeps the option of exchanging
rooks by Rx5d whenever this is strongest. Also, it keeps pressure on
the head of the enemy king. For defense, it gives the king support if
the king needs to escape up the board via 1g. The general opinion here
was that Kubo had the better position.

54.N7cx6e    03:37:00  03:22:00
55.P*6f      03:48:00  03:22:00
56.S7ex6f    03:48:00  03:42:00

No choice. After 56.P7g+ Nx7g Nx7g+ Bx7g, white has been forced to
exchange a knight that moved twice against a knight that didn't move
at all. This type of exchange is usually bad.

57.S6gx6f    03:48:00  03:42:00
58.B2bx6f    03:48:00  03:42:00
59.R5h-6h    03:49:00  03:42:00

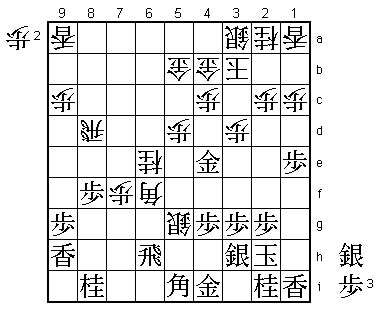
Here white looks in trouble. The obvious 60.Bx9i+ Rx6e +Bx8i G4f doesn't
work out well and neither does 60.B5g+ Rx6e +B5f R7e. Time for Habu to
show why he wins all those titles:

60.S*5g!     03:49:00  03:42:00

At first glance a terrible move. Using this silver just to defend a
bishop looks like a terrible waste. Furthermore, the position of bishop,
silver and knight is extremely awkward. A move for amateurs that most
professionals would find almost impossible to play. However, Habu has
found his only chance to stay in this game.

61.R6h-6g    04:11:00  03:42:00
62.P*6d!     04:11:00  03:43:00

It's the double punch that makes this work. Now that the knight is
defended, white suddenly threatens Bx9i+, forcing black to exchange
the rook for the bishop.

63.R6gx6f    04:25:00  03:43:00
64.S5gx6f=   04:25:00  03:43:00
65.P*5h?!    04:26:00  03:43:00

A better alternative seems 65.P3f to give the bishop a way out. It is
strange that Kubo spent only one minute on 65.P*5h. This move indicates
a switch from attack to defense and contrasts sharply with the positive
attitude he showed in this game so far.

66.P7f-7g+   04:26:00  03:45:00

Suddenly white is holding all the cards. After this move it becomes
almost impossible to defend against promotion of the white rook.

67.N8ix7g    04:27:00  03:45:00
68.N6ex7g+   04:27:00  03:46:00
69.P*6c      04:28:00  03:46:00
70.G5bx6c    04:28:00  03:52:00
71.P8f-8e    04:32:00  03:52:00
72.R8d-7d    04:32:00  04:20:00

Of course, 72.Rx8e fails to B*9f and 72.R8b to P6e Px6e P*6d and S*7c
(or S*7a in case of G6b). Kubo has bought himself some time, but the
rook will promote anyway.

73.P1e-1d    04:38:00  04:20:00
74.P1cx1d    04:38:00  04:21:00
75.P*1c      04:38:00  04:21:00
76.+N7g-6g   04:38:00  04:28:00
77.P*6h      04:40:00  04:28:00
78.+N6gx5h   04:40:00  04:31:00
79.G4ix5h    04:40:00  04:31:00
80.R*5f      04:40:00  04:31:00

Here Habu realized he would win. Black has used his final pawn on the
edge, so it is very difficult to defend the gold on 4h.

81.B5i-4h    04:46:00  04:31:00

No choice, but it's not enough. Habu is playing a perfect endgame again.

82.R5fx5h+   04:46:00  04:32:00
83.B4hx6f    04:46:00  04:32:00
84.R7d-7i+   04:46:00  04:32:00
85.S*3i      04:49:00  04:32:00
86.N*5e      04:49:00  04:40:00
87.B*3f      04:53:00  04:40:00
88.L1ax1c    04:53:00  04:50:00
89.G4ex5e    04:56:00  04:50:00
90.+R7ix6h   04:56:00  04:50:00
91.S*5g      04:59:00  04:50:00
92.+R6hx5g   04:59:00  04:50:00
93.B6fx5g    04:59:00  04:50:00
94.+R5hx5g   04:59:00  04:50:00
95.G5e-4e    04:59:00  04:50:00
96.+R5g-5i   04:59:00  04:54:00
97.G4ex3d    04:59:00  04:54:00
98.P*3c      04:59:00  04:55:00
99.G3dx2c    04:59:00  04:55:00
100.K3bx2c   04:59:00  04:55:00
101.R*6a     04:59:00  04:55:00
102.B*5g     04:59:00  04:55:00
103.N*4h     04:59:00  04:55:00
104.G*5h     04:59:00  04:56:00
105.B3f-4e   04:59:00  04:56:00
106.P3c-3d   04:59:00  04:56:00
107.N*3e     04:59:00  04:56:00
108.K2c-3b   04:59:00  04:56:00
Resigns      04:59:00  04:56:00

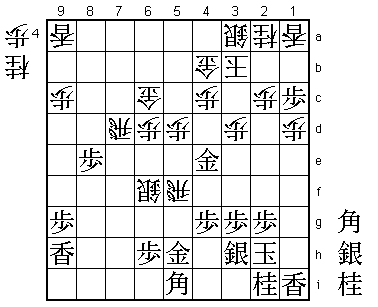
Black has no mate and no defense against the mating threat 108.+Rx3i Kx3i
Gx4h etc. A game that gives some important insight in why Habu is so much
stronger than all the other professionals. Kubo played all the nice looking
moves, but lost. Habu played some terrible looking moves and won. There is
clearly a difference between playing nice looking shogi and winning games.
Habu is in a league of his own in the latter category. For Kubo this has
been a frustrating match like so many other players have experienced against
Habu. Despite playing at their top level and having chances, it is almost
always Habu who ends up with the title.
