49th Oza Match Game 1
Black: Habu Yoshiharu, Oza
White: Kubo Toshiaki, Challenger
49th Oza-sen, Game 1, September 5th 2001
1.P2g-2f     00:00:00  00:00:00

An important game for Habu. Just four days earlier he lost the first
game of the challenger match for the Ryu-O title against Kimura because
of an unbelievable blunder (he let himself be mated in one move in a
won position). Habu is probably the toughest player in the game, but
that must have had some considerable psychological impact. Furthermore,
his opponent Kubo now makes an appearance in a title match for the second
time after the Kio match six months earlier. It was expected that it
would be tougher for Habu this time, as Kubo now has gotten used to
the special atmosphere of a title match and might be able to play his
usual game more than in the Kio match.

2.P3c-3d     00:00:00  00:01:00
3.P7g-7f     00:01:00  00:01:00
4.P4c-4d     00:01:00  00:02:00
5.S3i-4h     00:02:00  00:02:00
6.R8b-4b     00:02:00  00:03:00

Of course Kubo plays the Shikenbisha. This is not going to be a title
match in which we will see a number of different opening strategies.

7.P5g-5f     00:02:00  00:03:00
8.S7a-7b     00:02:00  00:04:00
9.K5i-6h     00:03:00  00:04:00
10.S3a-3b    00:03:00  00:04:00
11.K6h-7h    00:04:00  00:04:00
12.P9c-9d    00:04:00  00:07:00
13.P9g-9f    00:06:00  00:07:00
14.K5a-6b    00:06:00  00:08:00
15.G4i-5h    00:07:00  00:08:00
16.G4a-5b    00:07:00  00:13:00
17.S4h-5g    00:14:00  00:13:00
18.K6b-7a    00:14:00  00:23:00
19.B8h-7g    00:17:00  00:23:00
20.P6c-6d    00:17:00  00:42:00
21.K7h-8h    00:22:00  00:42:00
22.B2b-3c    00:22:00  00:42:00
23.P2f-2e    00:29:00  00:42:00
24.P4d-4e    00:29:00  00:58:00
25.P6g-6f    00:36:00  00:58:00
26.P3d-3e    00:36:00  01:03:00
27.R2h-3h    01:08:00  01:03:00
28.S3b-4c    01:08:00  01:05:00
29.G6i-7h    01:08:00  01:05:00
30.K7a-8b    01:08:00  01:09:00
31.G5h-6g    01:11:00  01:09:00
32.R4b-3b    01:11:00  01:20:00
33.R3h-2h    01:14:00  01:20:00

Moving the rook back and forth is quite subtle. White wants to make
an Ishida position by moving the rook to 3d and black is trying to
make that as difficult as possible, gaining time to strengthen his
castle. 27.R3h is important for that, as it prevents 28.R4d because
of the counter punch 29.P3f. With the silver on 4c, white now needs
more moves to end up with the rook on 3d. Black can't prevent that,
so moving the rook back to 2h is important, as the second file must
be defended against a later P2d.

34.S4c-4d    01:14:00  01:41:00
35.P1g-1f    01:18:00  01:41:00
36.P1c-1d    01:18:00  01:41:00
37.R2h-2f    01:47:00  01:41:00
38.P5c-5d    01:47:00  02:02:00
39.L9i-9h    01:52:00  02:02:00
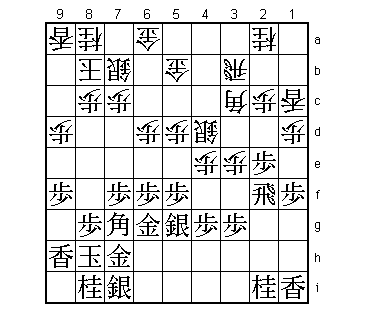
40.L1a-1c?   01:52:00  02:20:00

Sometimes small things make a huge difference. For the Ishida shape,
it is important for white to move the knight to 3c. However, if white
does so, the lance on 1c is no longer defended and becomes a target
for attack.

41.B7g-8f    02:11:00  02:20:00
42.B3c-4b    02:11:00  02:26:00
43.K8h-9i    02:14:00  02:26:00
44.R3b-3d    02:14:00  02:26:00
45.P6f-6e    02:24:00  02:26:00
46.S4d-5c    02:24:00  02:35:00
47.P6ex6d    02:25:00  02:35:00
48.S5cx6d    02:25:00  02:35:00
49.S7i-8h    02:25:00  02:35:00

50.N2a-3c?!  02:25:00  02:47:00

Kubo might have realized that there is a problem here. However, if
50.B5c then after 51.R2h P3f Px3f Rx3f P*3g R3d S6f P*6e S7e Sx7e
Px7e black also has the advantage. Still, the actual game is worse,
so Kubo should probably have settled for this variation instead of
playing the natural 50.N3c.

51.S5g-6h    02:36:00  02:47:00

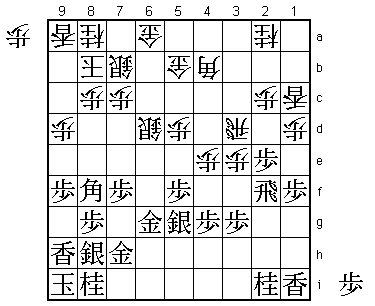
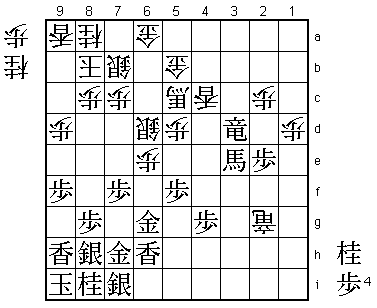
A surprise. Very tempting is 51.P*6e. If then 52.Sx6e, then 53.Bx4b+
54.Gx4b 55.B*3a is a double attack on gold and lance. After 56.B*5c
Bx1c+ P3f +Bx2c Bx2f +Bx3d black seems to hold all the cards: a promoted
bishop, material profit of a lance and a strong anaguma castle. Therefore,
it seems white has to play 52.S5c after which 53.S6f gives black a great
position. When asked after the game why he didn't play this, Habu said
that he didn't think it was all that great after 56.B*5c. It is hard to
call this a mistake, as Habu knows exactly what he is aiming for here
and that is also getting the job done. Still, 51.P*6e seems to be the
easier option to get the advantage.

52.P*6e      02:36:00  02:56:00
53.S6h-7i    02:45:00  02:56:00
54.B4b-5c    02:45:00  02:57:00
55.B8f-6h!   02:51:00  02:57:00
56.P3e-3f    02:51:00  03:22:00

Opens the diagonal to the undefended lance, but white has no choice.
If he just waits by playing something like 56.G6c or 56.P7d, then
black can strongly attack with 57.P3f Px3f P*3e Bx3e Rx3f Bx6h+ Rx3d
and white can't save both the promoted bishop and the knight.

57.R2f-2g    02:54:00  03:22:00
58.P4e-4f    02:54:00  03:22:00
59.B6hx4f    02:55:00  03:22:00
60.N3c-4e    02:55:00  03:23:00
61.P3gx3f    03:00:00  03:23:00
62.R3dx3f    03:00:00  03:25:00

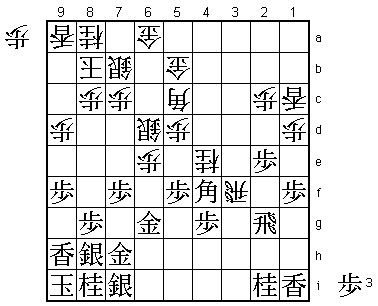
63.N2i-3g!   03:00:00  03:25:00

Another good move by Habu. Kubo seems to be developing his pieces
smoothly, but after this knight move it is clear that it is actually
black who can fully develop his pieces. This, combined with the anaguma,
is enough to give black a considerable advantage.

64.N4ex3g+   03:00:00  03:52:00
65.R2gx3g    03:00:00  03:52:00
66.R3fx3g+   03:00:00  03:52:00
67.B4fx3g    03:00:00  03:52:00
68.R*3i      03:00:00  04:06:00
69.B3g-4f    03:02:00  04:06:00
70.P*4e      03:02:00  04:06:00
71.B4fx1c+   03:02:00  04:06:00
72.R3ix1i+   03:02:00  04:06:00
73.+B1c-5g   03:02:00  04:06:00
74.B5c-1g+   03:02:00  04:08:00
75.R*4a      03:26:00  04:08:00
76.+B1g-5c   03:26:00  04:08:00
77.R4ax4e+   03:26:00  04:08:00
78.+R1ix1f   03:26:00  04:09:00
79.L*6h!     03:36:00  04:09:00

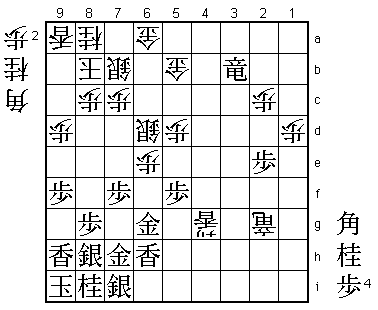
Brilliant. This lance makes the black defense rock solid. Furthermore,
it will help in the future to attack the white mino. White has no good
moves left. Every move seems to weaken his position.

80.+R1f-2g   03:36:00  04:15:00
81.+R4e-3d   03:42:00  04:15:00
82.L*4c?!    03:42:00  04:23:00

White is stuck for moves. This lance drop will work against him, but
it is hard to point to an alternative.

83.+B5g-3e!  03:44:00  04:23:00

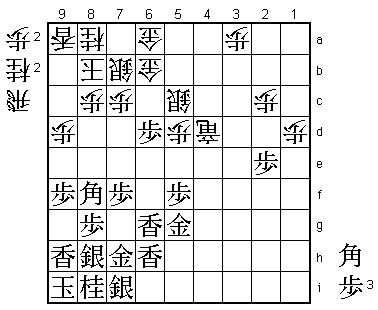
Another blow. This is a hard move to play, as this bishop seems to be
well positioned (defense and attack on 9c) and black has taken a lot
of trouble to promote it. Now black is offering to exchange it for the
bishop on 5c, which doesn't seem so good. However, Habu has correctly
judged that this bishop is what holds the white position together.
Without it, attack will become much easier.

84.+B5cx3e   03:44:00  04:26:00
85.+R3dx3e   03:44:00  04:26:00
86.L4cx4g+   03:44:00  04:29:00
87.+R3e-3b!  03:46:00  04:29:00

Looks simple, but is very strong. If white now plays the natural 88.+L5g,
then Gx5g +Rx5g P*6b is very painful. After this G5bx6b (G6ax6b P*6c)
+Rx6b Gx6b B*3e wins.

88.P*3a      03:46:00  04:37:00
89.+R3b-4a   03:47:00  04:37:00
90.+R2g-3h   03:47:00  04:42:00
91.P*6c      03:54:00  04:42:00
92.B*7a      03:54:00  04:51:00

It is painful to have to drop the bishop here, but black threatened +Rx5b
Gx5b G*6b.

93.B*8f      04:07:00  04:51:00
94.G5bx6c    04:07:00  04:53:00
95.N*4d      04:07:00  04:53:00
96.+L4g-5g   04:07:00  04:55:00
97.G6gx5g    04:09:00  04:55:00
98.+R3h-4h   04:09:00  04:55:00
99.P*6f      04:10:00  04:55:00
100.B7ax4d   04:10:00  04:55:00
101.+R4ax4d  04:15:00  04:55:00
102.+R4hx4d  04:15:00  04:55:00
103.P6fx6e   04:15:00  04:55:00
104.S6d-5c   04:15:00  04:55:00
105.P6e-6d   04:15:00  04:55:00
106.G6c-6b   04:15:00  04:55:00
107.L*6g     04:19:00  04:55:00

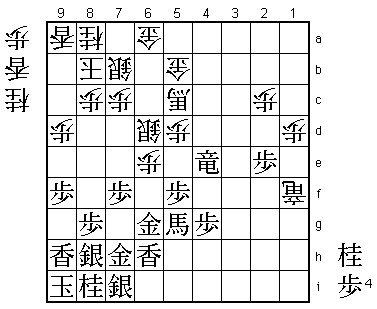
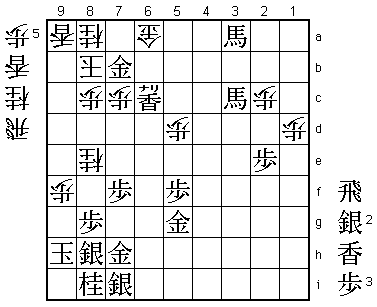
Game over. The two lances on the 6th file are going to have a feast with
the mino generals. White can do nothing to prevent this.

108.S5cx6d   04:19:00  04:57:00
109.P*6c     04:20:00  04:57:00
110.S7bx6c   04:20:00  04:57:00
111.B8fx6d   04:20:00  04:57:00
112.P9d-9e   04:20:00  04:59:00
113.B6dx3a+  04:23:00  04:59:00
114.P*6d     04:23:00  04:59:00
115.L6gx6d   04:23:00  04:59:00
116.S6cx6d   04:23:00  04:59:00
117.P*6c     04:23:00  04:59:00
118.G6bx6c   04:23:00  04:59:00
119.L6hx6d   04:24:00  04:59:00
120.+R4d-3c  04:24:00  04:59:00
121.B*4b     04:25:00  04:59:00

A model attack by Habu. All Kubo can do is make the final position look a
little more bearable.

122.P9ex9f   04:25:00  04:59:00
123.B4bx3c+  04:25:00  04:59:00
124.L*9g     04:25:00  04:59:00
125.L6dx6c+  04:27:00  04:59:00
126.L9gx9h+  04:27:00  04:59:00
127.K9ix9h   04:27:00  04:59:00
128.N*8e     04:27:00  04:59:00
129.G*7b     04:27:00  04:59:00
Resigns      04:27:00  04:59:00

Mate after 130.Gx7b +Lx7b Kx7b S*6c K8b (Kx6c L*6d) R*7b K9c P*9d Kx9d
P*9e etc. A complete victory by Habu. More than shocked by his loss
against Kimura, it seems that he was very angry with himself and decided
to take his game to the next level. First victim of this anger is poor
Kubo, who looked confident at the start of the game, but completely
crushed at the end of it. Let's see if Habu can stay angry a little
longer or if Kubo can get back into the match. Winning the next game
is vital in this short best-of-five title match.
