49th Osho Match Game 3
Black: Sato Yasumitsu, Challenger
White: Habu Yoshiharu, Osho
49th Osho-sen, Game 3, January 26th and 27th 2000
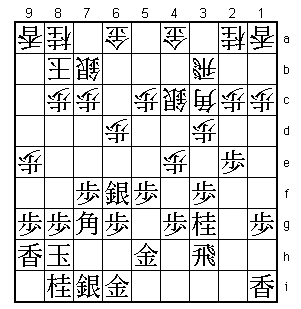
1.P7g-7f 2/2 0/0
2.P3c-3d 0/2 3/3
3.P2g-2f 0/2 0/3
4.P4c-4d 0/2 1/4
5.P2f-2e 2/4 0/4
6.B2b-3c 0/4 0/4
7.S3i-4h 0/4 0/4
8.P9c-9d 0/4 2/6
9.G4i-5h 8/12 0/6
10.P9d-9e 0/12 15/21
11.K5i-6h 2/14 0/21
12.R8b-4b 0/14 3/24
13.K6h-7h 4/18 0/24
14.S3a-3b 0/18 2/26
15.P5g-5f 8/26 0/26
16.S7a-7b 0/26 10/36
17.S4h-5g 26/52 0/36
18.S3b-4c 0/52 13/49
19.P3g-3f 4/56 0/49
20.K5a-6b 0/56 12/61
21.B8h-7g 3/59 0/61
22.K6b-7a 0/59 19/80
23.K7h-8h 1/60 0/80
24.K7a-8b 0/60 0/80
25.L9i-9h 12/72 0/80
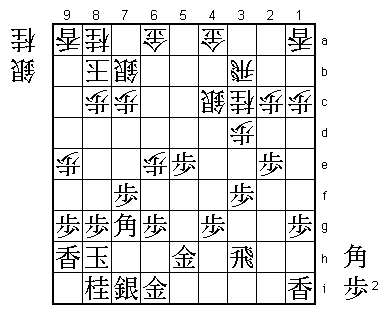
Habu shows his confidence by playing the Shikenbisha against Sato (or maybe
he is just bluffing). Sato is an expert in the Ibisha Anaguma and he has
had some very good results recently, for example against Shikenbisha
specialist Fujii. Commentators speculated that from this opening, Sato's
chances of beating Habu would be higher than in any other opening.
26.R4b-3b 0/72 47/127
27.S5g-6f 11/83 0/127
28.P4d-4e 0/83 12/139
29.R2h-3h 13/96 0/139
The best move here. If black moves his king in the anaguma immediately, white
can get a good position after 29.K9i P3e Px3e B4d.
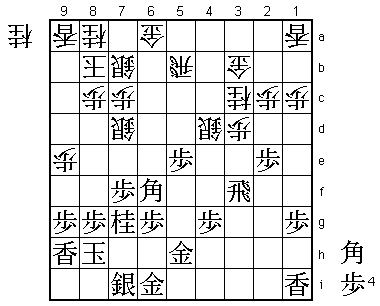
30.P6c-6d 0/96 74/213
31.N2i-3g 69/165 0/213
This move looks unnatural because this knight is blocking the rook. However,
this knight will not stay here very long. Another possibility is 31.B8f
S5d (P6e S7g does not give white much) Bx6d S6e Bx5c+ Sx6f Px6f S*4i R3g,
which is unclear. Sato chooses the sharpest way to play this position.

32.P6d-6e          0/165        30/243
33.S6f-5e          6/171        0/243
34.P5c-5d          0/171        19/262
35.N3gx4e          12/183       0/262
36.P5dx5e          0/183        1/263
37.N4ex3c+         2/185        0/263
38.N2ax3c          0/185        1/264
39.P5fx5e          16/201       0/264
A difficult decision for the sealed move. Most people in the press room
expected 39.Bx5e. After 40.S5d B4d G4b B*2a S4c Bx3b+ Sx3b K9i the position
is very hard to judge and both players did not seem sure what to think of
it. "I did not really want to take the rook on 3b" (Sato). "I also do not
have a good way to continue, but the game variation is also difficult" (Habu).
40.P6e-6f 0/201 23/287
41.B7gx6f 21/222 0/287
42.S*6e 0/222 10/297
43.B6f-7e 52/274 0/297
44.R3b-5b 0/274 2/299
White has managed to activate most of his pieces, so the Furibisha side
does not have a bad position here. However, it is impossible to say if
this means that white has the advantage here.
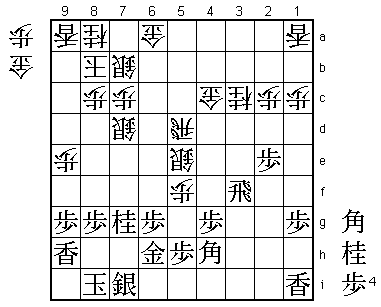
45.P3f-3e 0/274 0/299
46.P3dx3e 0/274 0/299
47.R3hx3e 1/275 0/299
48.P*3d 0/275 0/299
49.R3e-3f 0/275 0/299
50.G4a-3b 0/275 0/299
51.N8i-7g 15/290 0/299
52.S6e-7d 0/290 8/307
53.B7e-6f 0/290 0/307
54.S4c-4d! 0/290 26/333
55.R3fx3d?!        18/308       0/333

This might have been the wrong response to Habu's activation of the silver.
The expected move was 55.B*4a R4b Bx3b+ Rx3b Rx3d S4e R4d and even though
black looks to have the advantage because of the rook promotion, the future
white counter attack N*8d is very nasty. "I did not spend a second thinking
about B*4a" (Sato).

56.G3b-4c          0/308        2/335
57.R3d-3f          1/309        0/335
58.S4dx5e          0/309        3/338
59.B6f-4h          2/311        0/338
60.P*5f            0/311        13/351
61.G5h-6h          16/327       0/351
62.N*6d            0/327        6/357
63.P*5h            3/330        0/357
64.N6dx7f          0/330        0/357
65.K8h-8i          0/330        0/357
66.N7fx6h+         0/330        23/380
67.G6ix6h          0/330        0/380
68.R5b-5d          0/330        1/381
Now white clearly seems to have the advantage. The exchange of knight for
gold and the activation of this rook are often enough. "I did not expect
that I would have to work that hard". (Habu)

69.P*3d!           50/380       0/381

Long thought, but well spend. Sato finds the best way to complicate the
position. Things are still far from clear.

70.R5dx3d          0/380        18/399

If 70.R4d then the rook sacrifice 71.Px3c+ Rx4g+ +Px4c +Rx3f N*8f is
good for black.

71.R3fx3d          0/380        0/399
72.G4cx3d          0/380        0/399
73.R*3a            24/404       0/399
74.R*4i            0/404        5/404
75.B4h-2f          1/405        0/404

With black's major pieces fully participating in the attack, it seems Sato
has managed to get out of trouble. A tight endgame race is the result.

76.G3d-4d          0/405        8/412
77.R3ax1a+         15/420       0/412
78.P*6f            0/420        16/428
79.L*6b?           21/441       0/428

The only real mistake by Sato and unfortunately for him the game is so
close that it is also the deciding one. Correct was 79.L*6d G*6i N*5i
Gx7i Kx7i Sx6d Bx4d S*5c and it is still very much in doubt who will win.
Sato thought long and hard about both L*6d and L*6b, but in the end could
not reach a conclusion and picked the wrong one.

80.G*9i!           0/441        14/442

Again Habu shows why he is the guy holding all the records. Simple 80.G7a
loses to B*5c and +Rx7a followed by L6a+ next is a standard combination
against which defence is impossible. The point of 80.G*9i will become
clear soon.

81.K8i-7h          0/441        0/442
82.P6fx6g+!        0/441        1/443
83.G6hx6g          0/441        0/443
84.G6a-7a          0/441        0/443

And now 85.B*5c fails to 86.P*6a! and black has no continuation.

85.P*6f            38/479       0/443
86.G9ix9h          0/479        7/450
87.N*6d            0/479        0/450
88.R4ix4g+!        0/479        5/455
Another Habu special. This move is not threatening mate, and white's king
looks quite dangerous. However, black does not have enough pieces to give
his attack enough power.

89.P*4h            0/479        0/455
90.+R4gx5h         0/479        6/461
91.G6g-6h          0/479        0/461
92.+R5h-5i         0/479        0/461
93.G6h-6i          0/479        0/461
94.+R5i-2i         0/479        4/465
95.+R1ax7a         0/479        0/465
96.K8bx7a          0/479        0/465
97.B*5c            0/479        0/465
98.K7a-8b          0/479        4/469
99.N6dx7b+         0/479        0/469
100.K8bx7b         0/479        0/469
101.L6b-6a+        0/479        0/469
102.R*8h           0/479        0/469
Resigns            0/479        0/469
Time:              07:59:00     07:49:00
Mate after 103.Sx8h Gx8h Kx8h N*7f. So, after three games a surprising 3-0
lead for Osho Habu. Sato must feel very bad about the development in this
match. It is tough to be 3-0 behind, but worse must be the feeling that he
is playing close to the peak of his ability, but that Habu's endgame skills
are just too much for him.