49th Osho Match Game 2
Black: Habu Yoshiharu, Osho
White: Sato Yasumitsu, Challenger
49th Osho-sen, Game 2, January 17th and 18th 2000
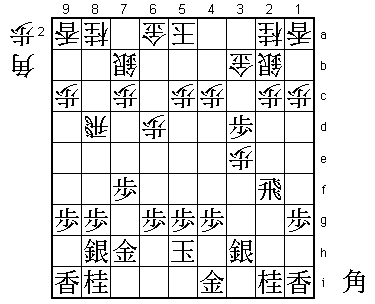
1.P2g-2f 1/1 0/0
2.P8c-8d 0/1 3/3
3.P2f-2e 4/5 0/3
4.P8d-8e 0/5 2/5
5.G6i-7h 3/8 0/5
6.G4a-3b 0/8 0/5
7.P2e-2d 7/15 0/5
8.P2cx2d 0/15 0/5
9.R2hx2d 0/15 0/5
10.P*2c 0/15 0/5
11.R2d-2f 0/15 0/5
It is a bit strange to see a game without the R8e Yokofudori these days.
Habu probably looked at the statistics and decides to play an opening that
promises better winning chances for black: the good old Aigakari.
12.S7a-7b 0/15 3/8
13.S3i-3h 14/29 0/8
14.P6c-6d 0/29 9/17
15.P7g-7f 6/35 0/17
16.P8e-8f 0/35 3/20
17.P8gx8f 2/37 0/20
18.R8bx8f 0/37 0/20
19.P*8g 1/38 0/20
20.R8f-8b 0/38 8/28
21.P3g-3f 22/60 0/28
22.P3c-3d 0/60 4/32
23.K5i-5h 1/61 0/32
24.B2bx8h+ 0/61 46/78
25.S7ix8h 1/62 0/78
26.S3a-2b 0/62 0/78
27.P3f-3e 15/77 0/78
28.P3dx3e 0/77 0/78
29.P*3d 1/78 0/78
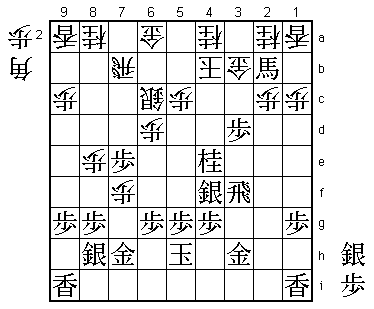
30.R8b-8d!? 0/78 135/213
The first long pause of the game. Sato did not like 30.S6c S3g S5d S4f and
decides to play a more positive plan, aiming for the black pawn on 3d after
P6e next.

31.N8i-7g?         175/253      0/213

Now it is Habu's turn to take a lot of time for his move. This knight move
makes white's intended plan impossible, because after P6e Nx6e the black
knight also attacks the focal point 5c. However, the head of the knight
becomes too weak, so this is not a good move. Habu thought long and hard
about 31.S3g P6e G3h Rx3d B*8b L9b B9a+ B*8c. This is what he should have
played.

32.K5a-4b          0/253        18/231
33.S3h-3g          11/264       0/231
34.P7c-7d!         0/264        68/299

Aiming for the weak spot 7f. 32.K4b was a necessary preparation move to avoid
B*9e.

35.B*6f            45/309       0/299
36.P7d-7e          0/309        9/308
37.S3g-4f          53/362       0/308

This is good play. The combination B*6f~S4f is setting up a counter attack
with P*2d Px2d P*2c if black gets two pawns in hand.

38.P3e-3f          0/362        58/366
39.G4i-3h          15/377       0/366

Of course, 39.Rx3f fails to B*2g.

40.B*4d            0/377        14/380
41.B6fx4d          10/387       0/380
42.P4cx4d          0/387        0/380
43.B*6f            0/387        0/380
44.R8d-7d          0/387        26/406
45.R2fx3f          35/422       0/406
46.P7ex7f          0/422        2/408
47.N7g-8e          0/422        0/408
48.S7b-6c          0/422        8/416
49.N2i-3g          2/424        0/416
50.P*8d            0/424        5/421
51.P*7e            1/425        0/421
52.R7d-7b          0/425        0/421
53.B6fx4d          0/425        0/421
54.P8dx8e          0/425        2/423
55.N3g-4e          0/425        0/423
56.N*4a            0/425        0/423
57.B4dx2b+         2/427        0/423
58.G3bx2b 0/427 0/423
59.S*3c 0/427 0/423
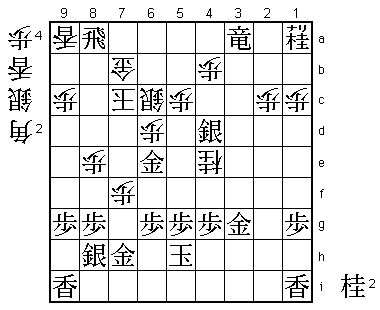
There are no more moves to improve the position and Habu is a knight down.
He has to attack to keep some chance of winning. Objectively, his attack
is too weak to succeed and everyone in the press room agreed that Sato
had the better position. Defending is more difficult than attacking, though,,,
60.N2ax3c 0/427 18/441
Very tempting is to run away with 60.K5a. However, after 61.Sx2b= P*3e Sx3e
Rx2b P3c+ N2ax3c Nx3c+ Nx3c S4d black has gained the upper hand. Sato's
judgement is perfect here.
61.P3dx3c+ 0/427 0/441
62.N4ax3c 0/427 0/441
63.N*3d 0/427 0/441
64.K4b-5b 0/427 0/441
65.N3dx2b+ 1/428 0/441
66.N3cx4e 0/428 1/442
67.R3f-3b+ 8/436 0/442
68.P*4b 0/436 0/442
69.S4fx4e 0/436 0/442
70.R7bx7e 0/436 6/448
71.S4e-4d 1/437 0/448
72.P*3g 0/437 4/452
73.G3hx3g 6/443 0/452
74.K5b-6b 0/443 0/452
75.G*6f! 13/456 0/452

Not the move one wants to play if the attack needs all the power it can get.
However, after the simple 75.P*7d Sx7d N*6f K7c Nx7d N*4e S*6f Rx7d P*7e
R9d +Nx1a Nx3g+ +Rx3g B*1e white is better. Not having a pawn to drop on
2f is very painful.

76.R7e-7b          0/456        12/464
77.P*7c            5/461        0/464
78.K6bx7c          0/461        1/465
79.+N2bx1a         0/461        0/465
80.N*4e            0/461        1/466
81.L*7e            11/472       0/466
82.K7c-8b          0/472        1/467
83.L7ex7b+         2/474        0/467

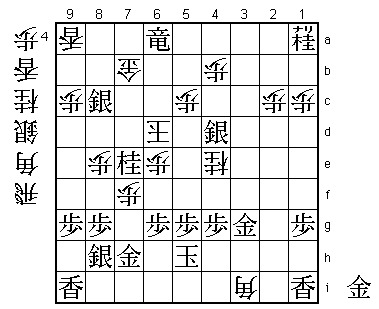
84.G6ax7b?         0/474        0/467

So far, Sato has played a perfect game and his position is very good. With
13 minutes left, it becomes difficult to calculate the defence correctly.
Here 84.Sx7b was the right move. After 85.N*7d K7c G4f B*2f white keeps
his big advantage. Sato did not like the check of the knight on 7d and
chose Gx7b.

85.P*7c            0/474        0/467
86.N8ax7c          0/474        8/475
87.+R3b-3a         0/474        0/475
88.N7c-6e          0/474        0/475
89.R*8a            0/474        0/475
90.K8b-7c          0/474        0/475
91.G6fx6e          0/474        0/475
92.P6dx6e?         0/474        0/475

This recapture without thinking about other moves costs Sato his advantage.
He had a good winning chance here with 92.B*3i N*4h Px6e G3h B*7e N*6i
L*5d G6h Nx5g+ Nx5g Lx5g+ Gx5g N*4e K4i P*3g Kx3i Px3h+ Kx3h Bx5g+. There is
no mate against the white king, while the black king can not be defended.

93.N*7e            0/474        0/475
94.B*3i?           0/474        4/479

The irony of this move is that it was winning on the previous move, but it is
losing now. Despite taking all of his remaining time, Sato either did not
see that 93.N*7e was a mating threat or he did not see a way to escape from
it. If he would have played 94.Nx5g+ Kx5g B*8d Rx8d+ Kx8d Nx6c+ R*5i things
would not have been clear yet.

95.N7ex6c+         1/475        0/479
96.K7cx6c          0/475        0/479
97.+R3a-6a         2/477        0/479
98.G*6b            0/477        0/479
99.N*7e            0/477        0/479
100.K6c-7d         0/477        0/479
101.+R6ax7b        0/477        0/479
102.G6bx7b         0/477        0/479
103.S*8c           0/477        0/479
104.K7d-6d         0/477        0/479
105.R8a-6a+        0/477        0/479
Resigns            0/477        0/479
Time:              07:57:00     07:59:00

Mate after both 106.B*6c Nx6c+ Gx6c B*5e Kx7e G*7d Gx7d Sx7d+ Kx7d +R7b K8d
B7c+ K9d +R8c and 106.N*6b +Rx6b Gx6b N*5f Kx7d G*7d.
After the game no smiles from either player. Habu because his playing level
is not at the high standard that he sets himself and Sato because he takes
the responsibility of his meijin title very seriously and now has played
two games in a row where Sato was not able to carry a good position
over the finish line. Game 3 will show how this has affected his confidence.