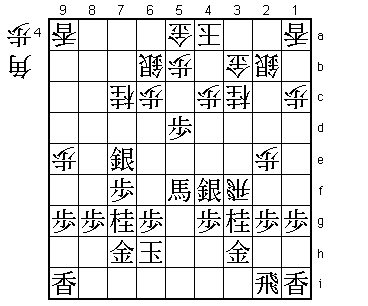
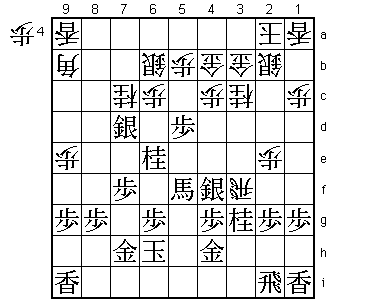
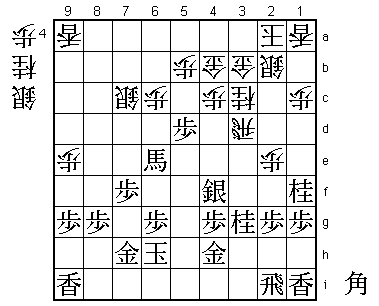
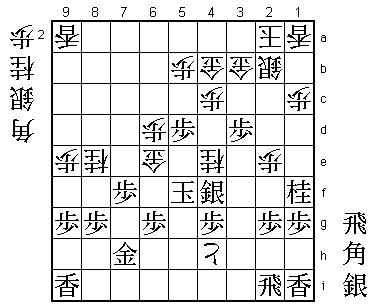
49th Osho Match Game 1
Black: Sato Yasumitsu, Challenger
White: Habu Yoshiharu, Osho
49th Osho-sen, Game 1, January 8th and 9th 2000
1.P7g-7f           2/2          0/0

The first title match game of the year 2000 is an encounter between Habu
(who else?) and Meijin Sato. Sato needs a good start to forget the seven
previous matches he played and lost against Habu. Normally starting with
black would be a good thing, but data of professional games in 1999 showed
a remarkable 51.2% winning percentage for white. In the Yokofudori, the
opening Habu was likely to choose, the winning percentage is even 55.5%.
Sato will not have been to worried about the data. He is known as one
of the few experts in fighting the R8e-Yokofudori variation. Recently he
beat Maruyama twice in a row with black in this opening.

2.P3c-3d           0/2          2/2
3.P2g-2f           1/3          0/2
4.P8c-8d           0/3          3/5
5.P2f-2e           4/7          0/5
6.P8d-8e           0/7          5/10
7.G6i-7h           0/7          0/10
8.G4a-3b           0/7          4/14
9.P2e-2d           0/7          0/14
10.P2cx2d          0/7          1/15
11.R2hx2d          0/7          0/15
12.P8e-8f          0/7          4/19
13.P8gx8f          0/7          0/19
14.R8bx8f          0/7          0/19
15.R2dx3d          0/7          0/19
16.B2b-3c          0/7          7/26
17.R3d-3f          15/22        0/26
18.S3a-2b          0/22         6/32
19.P*8g            8/30         0/32
20.R8f-8e          0/30         13/45

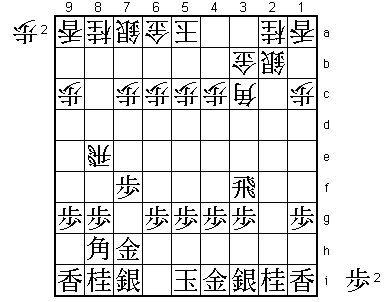
The R8e-Yokofuddori as expected. This is going to be a long theoretical battle.

21.R3f-2f          4/34         0/45
22.K5a-4a          0/34         6/51
23.K5i-5h          41/75        0/51
24.S7a-6b          0/75         13/64
25.G4i-3h          2/77         0/64
26.G6a-5a          0/77         19/83
27.S3i-4h          12/89        0/83
28.P7c-7d          0/89         23/106
29.P3g-3f          20/109       0/106
30.P*2e            0/109        65/171
31.R2f-2h          11/120       0/171
32.P*8f            0/120        0/171
33.P8gx8f          26/146       0/171
34.R8ex8f          0/146        0/171
35.S4h-3g          6/152        0/171
36.R8fx7f          0/152        10/181
37.P*7g            18/170       0/181

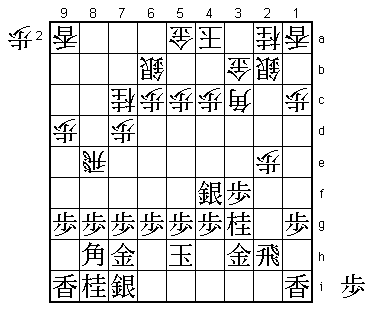
This strange looking move that blocks the black bishop, is generally considered
the best black move in this position. Despite the locked up bishop, this
variation is a main line in this opening variation.

38.R7f-8f          0/170        16/197
39.P*8g            1/171        0/197
40.R8f-8e          0/171        2/199
41.S3g-4f          17/188       0/199
42.N8a-7c          0/188        13/212
43.N2i-3g          54/242       0/212
44.P9c-9d?!        0/242        82/294

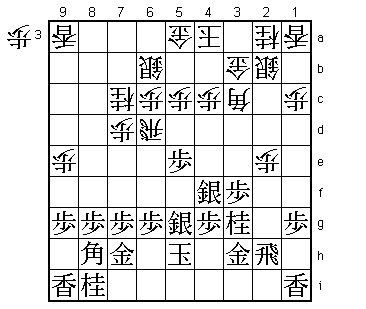
The sealed move and a change of plan by Habu. He initially wanted to play
44.P5d S6h P5e P7f P7e Rx2e Px7f R2i which seems a perfectly reasonable
way to play this position. Habu somehow did not like it and after long
thought decided to play the edge push instead. This game shows that
44.P5d might have been better after all.

45.S7i-6h          85/327       0/294
46.P9d-9e          0/327        9/303
47.P5g-5f          1/328        0/303
48.P*8f            0/328        27/330

Having allowed black to play P5f, threatening P5e~Rx2e~N4e next, white has
to act quickly to avoid a bad position.

49.P8gx8f          10/338       0/330
50.R8ex8f          0/338        0/330
51.P*8g            0/338        0/330
52.R8fx5f          0/338        0/330
53.S6h-5g          0/338        0/330
54.R5f-5d          0/338        0/330
55.P*5e            8/346        0/330
56.R5d-6d          0/346        29/359

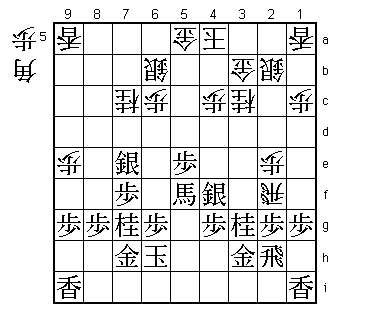
This shows the failure of Habu's plans. This rook will be a continuing problem.
The violent solution would be: 56.Bx5e Sx5e Rx5e P7f, but after both
S*6i Kx6i Rx5g+ B*6f S*5h K7i +Rx6g S*6h and R5d B*5e black has the
advantage.

57.S5g-6f          3/349        0/359
58.P7d-7e          0/349        1/360
59.S6fx7e          7/356        0/360
60.R6d-9d          0/356        0/360
61.P7g-7f          2/358        0/360
62.P5c-5d          0/358        1/361
63.B8h-6f          71/429       0/361

All black pieces suddenly start to work. The black bishop is very well
positioned here and N7g followed by N6e later is hard to defend against.

64.P5dx5e          0/429        13/374
65.N8i-7g          0/429        0/374
66.P5e-5f          0/429        33/407
67.B6fx3c+         3/432        0/407
68.N2ax3c          0/432        3/410
69.B*8c            0/432        0/410
70.R9d-5d          0/432        20/430
71.P*5e            0/432        0/430
72.P5f-5g+         0/432        0/430
73.K5hx5g          2/434        0/430
74.R5d-3d          0/434        0/430
75.K5g-6h          7/441        0/430
76.R3dx3f          0/441        4/434
77.B8c-5f+         13/454       0/434
78.R3f-2f          0/454        13/447
79.P*2g?!          0/454        0/447

Here Sato might have missed a chance. After 79.G2g P*3f Gx2f Px3g+ Sx3g
Px2f P*2c S3a P*3d black has a big advantage. For example, N*4d +B4f
N2e Sx2f P*5f K7i B*5g K8i Bx4f+ Px4f P5g+ P3c+ Gx3c R*2a black wins.
However, if white does not retreat with S3a after P*2c in the previous
variation, but takes the pawn with Sx2c instead, things are not very
clear.

80.R2f-3f          0/454        0/447
81.P5e-5d          0/454        0/447
82.P*5b            0/454        5/452
83.R2h-2i?         1/455        0/452

Too passive. Sato judges that white can do nothing but wait until
his rook is being captured and decides to improve his position. However,
this gives Habu time to strengthen his king position against a future
rook drop as well. Sato should have attacked immediately with 83.S7d
K3a Sx7c+ Sx7c N*4h. After Rx4f +Bx4f S6b R*8a black keeps his advantage.
After 83.R2i, things get complicated again.

84.K4a-3a          0/455        1/453
85.G3h-4h          0/455        0/453
86.G5a-4b          0/455        1/454
87.S7e-7d          2/457        0/454
88.K3a-2a          0/457        1/455
89.N7g-6e?         3/460        0/455

Overlooks the next move.

90.B*9b!           0/460        3/458

Great move that took Sato completely by surprise. 91.Nx7c+ Sx7c Sx7c+ now
fails to Bx5f and 91.P7e Nx6e Sx6e P*6d also loses. Sato has no choice:

91.S7dx7c+         9/469        0/458
92.S6bx7c          0/469        0/458
93.N*2h            0/469        0/458
94.B9bx6e          0/469        7/465
95.+B5fx6e         0/469        0/465
96.R3f-3d          0/469        0/465

White has saved the rook and the black knight on 2h looks terrible. Still,
the position is not hopeless.

97.N2h-1f?         7/476        0/465

But now it is. Habu feared 97.B*5f R1d +B6f and the two bishops have awesome
power. For example, Rx5d S5e R1d B8c+ S6d P1f and a white win seems very
far away. It may be that Sato was still disgusted by himself for missing
90.B*9b.

98.S7c-6d          0/476        4/469
99.+B6e-7d         0/476        0/469
100.P*3f           0/476        1/470

The combination of getting the silver into play and this attack on the weak
head of the knight, give white a winning position.

101.N3g-4e         0/476        0/470
102.P3f-3g+        0/476        1/471
103.+B7dx6c        2/478        0/471

If 103.Sx3g or 103.Gx3g then N4e wins easily, so Sato decides to make the
final position look a little better.

104.+P3gx4h        0/478        1/472
105.+B6cx6d        0/478        0/472
106.N*8e           0/478        0/472
107.K6h-5g         0/478        0/472
108.P*6c           0/478        1/473
109.P*3e           0/478        0/473
110.N3cx4e         0/478        0/473
111.K5g-5f         1/479        0/473
112.P6cx6d         0/479        3/476
113.P3ex3d         0/479        0/476
114.G*6e           0/479        1/476
Resigns            0/479        0/476
Time:              07:59:00     07:57:00

115.Kx4e B*5f K3e N*2c leads to mate. A tough loss for Sato, after winning
the opening. He now needs to win game 2 with white to avoid having a
mountain to climb in the rest of the match.
