49th Oi Match Game 5
[Black "Habu Yoshiharu, Challenger"]
[White "Fukaura Koichi, Oi"]
[Event "49th Oi-sen, Game 5"]
[Date "August 26th and 27th 2008"]
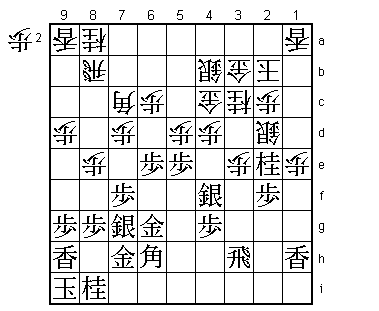
1.P7g-7f 00:00:00 00:00:00
A long break of 20 days between the fourth game and the fifth game. There was a lot
of excitement at the start of the game about the opening that would be played
considering there was such a long time to prepare.
2.P8c-8d 00:00:00 00:00:00
3.S7i-6h 00:03:00 00:00:00
4.P3c-3d 00:03:00 00:00:00
5.P6g-6f 00:04:00 00:00:00
6.S7a-6b 00:04:00 00:00:00
7.P5g-5f 00:06:00 00:00:00
8.P5c-5d 00:06:00 00:00:00
9.S3i-4h 00:07:00 00:00:00
10.S3a-4b 00:07:00 00:00:00
11.G4i-5h 00:11:00 00:00:00
12.G4a-3b 00:11:00 00:02:00
13.G6i-7h 00:15:00 00:02:00
14.G6a-5b 00:15:00 00:02:00
15.K5i-6i 00:16:00 00:02:00
16.S4b-3c 00:16:00 00:02:00
17.S6h-7g 00:17:00 00:02:00
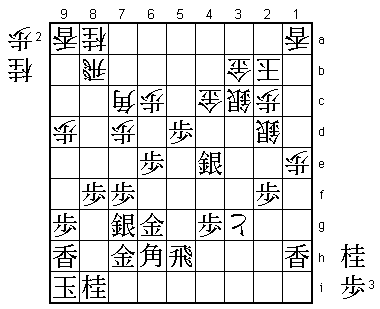
It would be exaggerating to use the word "disappointed" to describe the feelings
in press room, but the mood of anticipation changed a lot when it became clear
that this game would be a classic Yagura opening. Instead of immediately going
at it with quick attack opening strategies, a slow game with a long build-up of
forces can be expected. In a way, this moving away from quick attacking systems
feels fresh, although there was a time not too long ago that almost every title
match game was played with the double Yagura opening.
18.B2b-3a 00:17:00 00:02:00
19.P3g-3f 00:19:00 00:02:00
20.P4c-4d 00:19:00 00:02:00
21.B8h-7i 00:20:00 00:02:00
22.G5b-4c 00:20:00 00:02:00
23.G5h-6g 00:26:00 00:02:00
24.K5a-4a 00:26:00 00:03:00
25.S4h-3g 00:31:00 00:03:00
26.B3a-6d 00:31:00 00:10:00
27.B7i-6h 00:34:00 00:10:00
28.K4a-3a 00:34:00 00:11:00
29.K6i-7i 00:35:00 00:11:00
30.P7c-7d 00:35:00 00:12:00
31.K7i-8h 00:44:00 00:12:00
32.K3a-2b 00:44:00 00:13:00
33.S3g-4f 00:54:00 00:13:00
34.P8d-8e 00:54:00 00:20:00
35.N2i-3g 00:55:00 00:20:00
36.S6b-5c 00:55:00 00:20:00
37.P2g-2f 00:56:00 00:20:00
38.P1c-1d 00:56:00 00:32:00
39.P1g-1f 00:57:00 00:32:00
40.S3c-2d 00:57:00 00:32:00
41.R2h-3h 01:03:00 00:32:00
42.P9c-9d 01:03:00 00:42:00
43.L1i-1h 01:04:00 00:42:00
44.B6d-7c 01:04:00 00:42:00
45.L9i-9h 01:10:00 00:42:00
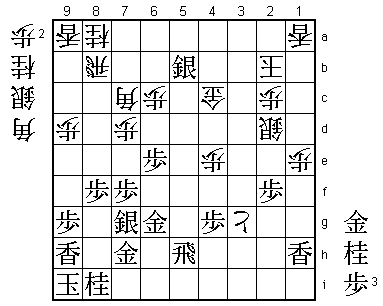
46.S5c-4b 01:10:00 01:16:00
In response to the S3g system, Fukaura plays the four general Yagura which was a
very popular way of playing a little while ago.
47.K8h-9i 01:13:00 01:16:00
Habu responds by changing his Yagura castle into an Anaguma castle, which is also
often played.
48.B7c-6d 01:13:00 01:16:00
49.P6f-6e 01:24:00 01:16:00
50.B6d-7c 01:24:00 01:16:00
51.N3g-2e 01:24:00 01:16:00
52.N2a-3c 01:24:00 01:17:00
53.P1f-1e 01:54:00 01:17:00
54.P1dx1e 01:54:00 02:29:00
55.P3f-3e 01:54:00 02:29:00
56.P3dx3e 01:54:00 02:29:00
57.P5f-5e 01:55:00 02:29:00
Opening the game with 53.P1e and 55.P3e is a little unusual because black hasn't
finished his Anaguma yet. There is always the risk that this will give white a
strong counter attack later, but Habu decides to start the hostilities anyway.

58.P3e-3f!?  01:55:00  02:30:00

Fukaura's new idea. White can opt to weather the storm with 58.Px5e Sx3e Sx3e Bx3e
P*3d B7i Nx2e Px2e, but there is the risk that black is going to be the only one
to attack. 58.P3f is a well-known tesuji to defend against major pieces by pulling
them closer, but not in this particular position. In response, Habu sinks into deep
thought as one hour passes and then two...

59.P5ex5d    04:02:00  02:30:00

Finally, after two hours and seven minutes, Habu plays 59.Px5d. With this move, he
is giving up on finishing the Anaguma and diving straight into the endgame. Very
risky, so this required deep calculation, but the rest of the game seems to indicate
that he judged the position perfectly.

60.P4d-4e    04:02:00  03:28:00

The sealed move and no surprise. Attacking the silver on 4f in this way is the
obvious counter in this position.

61.N2ex3c+   04:05:00  03:28:00
62.S4bx3c    04:05:00  03:28:00
63.S4fx4e    04:05:00  03:28:00
64.P8e-8f    04:05:00  03:29:00
65.P8gx8f    04:20:00  03:29:00
66.P3f-3g+   04:20:00  03:29:00
67.R3h-5h    04:21:00  03:29:00
White has made a tokin on 3g, which could be very helpful if white needs to escape
up the board. However, 67.R5h is the perfect rook switch which threatens to break
through on the fifth file.
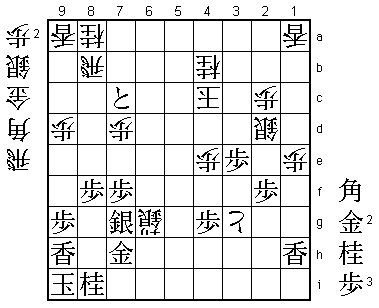
68.P*4d? 04:21:00 04:18:00
An important mistake that gives black the advantage. This position is not easy.
For example, 68.P*5b fails to 69.P5c+ Px5c P*3d Sx3d Sx3d Gx3d Rx5c+. Also, 68.+Px4g
is answered by 69.+Px4g P5c+ +Px5h Bx2d Sx2d +Px4c Gx4c P*4d and the black attack is
very strong. In the post-mortem analysis Fukaura in the end almost reluctantly
suggested 68.G3d here, but this turned out to be the right move. For example, 69.Sx3d
Sx3d P5c+ is answered by S*6i Bx2d Px2d P*3c Kx3c P*3e Sx5h= Px3d Kx3d G5f K3e and
it is not easy to stop the white king from entering. If black changing the order of
the attack with 69.Sx3d Sx3d Bx2d Px2d P*3c Kx3c P*3e Sx3e, then the conclusion of
the post-mortem analysis was that after P5c+ the position is unclear. Even though
68.G3d seems the right move here, it is very hard to find, because it follows inviting
the silver to 4e with the offer of exchanging it to a castle general.
69.P5d-5c+ 04:42:00 04:18:00
70.P4dx4e 04:42:00 04:18:00
71.+P5cx4c 04:42:00 04:18:00
72.G3bx4c 04:42:00 04:18:00
73.B6hx2d! 04:46:00 04:18:00
Habu is in full attacking mode now, driving the king out into the open, ignoring
material.
74.S3cx2d 04:46:00 04:23:00
75.S*5b 04:47:00 04:23:00
Seems to be forcing the position a little bit, but this is actually very unpleasant
for white. For example, 76.G3c is answered by 77.P*3d and the black attack continues,
and white gets no chance to play S*6i.

76.K2b-3c?   04:47:00  05:57:00

Actually, after 76.K3b, white has a little bit more chance to survive. White is
hoping for an entering king, but this is not going to happen. After 76.K3b, the
pawn drop on 3e like in the game is to far away, so black will play something
like 77.N*5e, which is answered by R5b Nx4c+ Kx4c Rx5b+ Kx5b G*5d and it seems
like black has an easy win. However, after G*5d, white has a final chance to try
and turn the tables with N*9e. This aims at driving the king out of the Anaguma
with N*8g next. After N*9e R*3b K6a (risky, but dropping anything between the rook
and king would weaken the power of the white attack too much) G*7b K5a R3a+ K5b
Gx7c just turns out to be enough for black because there is no mate and even if
white plays N*8g Gx8g Nx8g= K8g R*5h N*7h Rx5d+ to take out the important black
gold on 5d, black can answer with P*5e and then +Rx5e leads to mate after +R3b.
Black still seems to be winning here, but there are a lot more obstacles on the
road to victory than after 76.K3c.

77.P*3e!     05:01:00  05:57:00

This stops the entering king and ends all hope for white.

78.N*4b      05:01:00  06:00:00
79.P6e-6d    05:28:00  06:00:00
80.S*6i      05:28:00  06:06:00
81.S5bx4c+   05:38:00  06:06:00
82.K3cx4c    05:38:00  06:06:00
83.P6dx6c+   05:38:00  06:06:00
84.S6ix5h=   05:38:00  06:07:00
85.+P6cx7c   05:38:00  06:07:00
86.S5hx6g+   05:38:00  06:27:00
87.N*5e!     06:06:00  06:27:00

Habu shows high class endgame technique here that deserves careful study. There
are multiple pieces hanging here and black likes to play Gx6g or +Px8b to pick
up some extra material. Habu first plays a couple of checks to put the white king
in the perfect mating net before taking the promoted silver on 6g. His timing is
impeccable (as it almost always is).

88.K4c-4d    06:06:00  07:02:00
89.B*5c      06:13:00  07:02:00
90.K4dx5c    06:13:00  07:03:00
91.G*4c      06:13:00  07:03:00
92.K5c-5d    06:13:00  07:03:00
93.G7hx6g    06:13:00  07:03:00
94.N8ax7c    06:13:00  07:04:00
95.G*5c      06:13:00  07:04:00
96.K5dx5e    06:13:00  07:04:00
97.G6g-6f    06:13:00  07:04:00
Resigns      06:13:00  07:04:00
The mate is almost too simple: 98.K6d S*5e. Fukaura probably waited to resign to
have a final position where the white king is on 5e, the centre square of the shogi
board, which has some extra esthetical value. Of course this doesn't earn him
anything but some style points, as Habu fends off the first threat of finishing
this match early. A strong game by Habu, but he still needs a win with the white
pieces in game 6 to take this match to the decisive seventh game, just like last
year.