49th Oi Match Game 4
[Black "Fukaura Koichi, Oi"]
[White "Habu Yoshiharu, Challenger"]
[Event "49th Oi-sen, Game 4"]
[Date "August 6th and 7th 2008"]
1.P7g-7f 00:00:00 00:00:00
This game was played in the city of Sasebo in Nagasaki Prefecture on the southern
island of Kyushu. It is not often that games are played so far south, but also
not exceptional. The thing that makes this location special is that it is Fukaura's
hometown. Playing a title match here must be very special for him and also for the
local fans. If there was someone around hoping that Habu would win, I am sure that
he or she was very quiet about it. Actually, this is not the first time Fukaura
played an important game in Sasebo. In 2004, the first game of the Asahi Open
Tournament was also played in the same hotel in Sasebo. Fukaura was then the
titleholder and he faced the same challenger as in the Oi match here: Habu. Four
years ago it was a great fight, but Habu managed to hang on to a middle game lead
and win a difficult endgame, much to the disappointment of the local fans. In the
end, Fukaura lost the match 3-2 so in a way this first game in Sasebo could be
called decisive. The situation this time is a little better for Fukuara as he
takes a 2-1 lead into this game, but losing again in Sasebo is something that
he desperately wants to avoid.
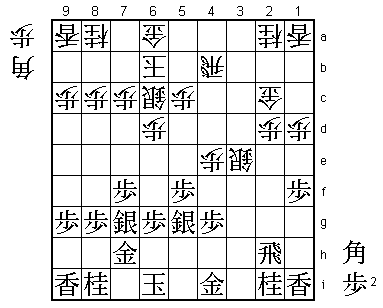
2.P3c-3d 00:00:00 00:00:00
3.P2g-2f 00:02:00 00:00:00
4.G4a-3b 00:02:00 00:01:00
5.G6i-7h 00:05:00 00:01:00
6.B2bx8h+ 00:05:00 00:06:00
7.S7ix8h 00:05:00 00:06:00
8.S3a-4b 00:05:00 00:06:00
9.S3i-3h 00:50:00 00:06:00
10.S7a-6b 00:50:00 00:15:00
11.P1g-1f 00:50:00 00:15:00
12.P1c-1d 00:50:00 00:47:00
13.P3g-3f 00:50:00 00:47:00
14.P6c-6d 00:50:00 00:47:00
15.P2f-2e 00:51:00 00:47:00
16.S4b-3c 00:51:00 00:47:00
17.S3h-3g 00:51:00 00:47:00
18.S6b-6c 00:51:00 01:01:00
19.S3g-4f 00:51:00 01:01:00
20.P4c-4d 00:51:00 01:03:00
21.P3f-3e 01:09:00 01:03:00
22.R8b-4b 01:09:00 01:04:00
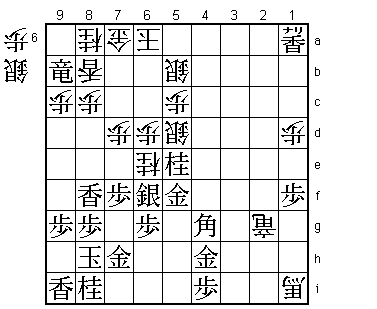
Fukaura has chosen the early silver attack against Habu's Kakugawari with tempo
loss opening. In response, Habu decides to build a defensive Furibisha position
with 22.R4b. With this, he can stop the white attack, but it also means that he
has to wait for an opportunity to attack himself, because there is no natural way
to open the game with white from here.
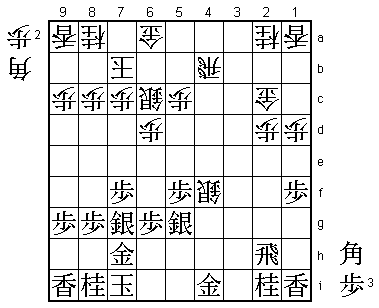
23.P3ex3d 01:39:00 01:04:00
24.S3cx3d 01:39:00 01:04:00
25.P2e-2d 01:39:00 01:04:00
26.P2cx2d 01:39:00 01:04:00
27.R2hx2d 01:39:00 01:04:00
28.G3b-2c 01:39:00 01:04:00
29.R2d-2h 01:39:00 01:04:00
30.P*2d 01:39:00 01:04:00
31.P5g-5f 02:17:00 01:04:00
32.P4d-4e 02:17:00 02:09:00
33.S4f-5g 02:17:00 02:09:00
34.S3d-3e 02:17:00 02:10:00
35.S8h-7g 02:25:00 02:10:00
36.K5a-6b 02:25:00 02:12:00
37.K5i-6i 03:11:00 02:12:00
38.K6b-7b 03:11:00 03:22:00
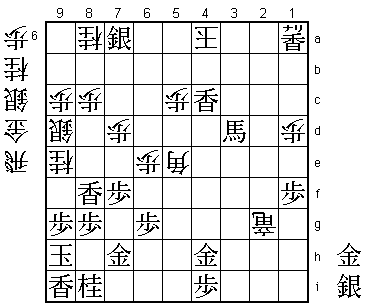
Here Habu had to make a very difficult decision. If he allows the black king to
enter the castle with K8h, the black position will be very difficult to attack,
white the white pieces are still all over the place. In such a position, black
can take some extra risks opening the game and it is very unlikely that white
can win in the counter attack. Therefore, white has to attack but the question
is whether this attack should be played now or if white should wait one move.
Specifically, is the position K6i versus K6b better for white than K7i versus
K7b if the position is opened up. After 70 minutes, Habu decides to wait one move,
but it is unclear if this is the right decision. Playing 38.P4f directly is also
a good candidate. If then 39.Px4f Sx4f P*4c Rx4c B*3b R4b Bx2a+ Sx5g+ P*4c R5b N*4d!
R5a +B3b S*2g (if Rx2g B*3f) and the position seems unclear.
39.K6i-7i 03:14:00 03:22:00
40.P4e-4f 03:14:00 03:24:00
41.P4gx4f 03:33:00 03:24:00
42.S3ex4f 03:33:00 03:25:00
43.P*4c      04:14:00  03:25:00

After 43.Sx4f Rx4f white has everything he wanted with the exchange of the silver
and the activation of the rook.

44.R4bx4c    04:14:00  03:29:00
45.B*3b      04:14:00  03:29:00
46.R4c-4b    04:14:00  03:29:00
47.B3bx2c+   04:14:00  03:29:00

This time black has no choice. 47.Bx2a+ Sx5g+ P*4c fails to R6b and black no longer
has N*4d like in the variation with the white king still on 6b. By the way, because
the black king is on 7i here, white doesn't have S*2g because after R*2g the drop
B*3f is not a check. Waiting one move changes everything.

48.S4fx5g+   04:14:00  03:30:00
49.P*4d!     04:14:00  03:30:00

A strong pawn drop. This draws the rook out and black even manages to exchange his
bad rook now. Black has the advantage here and slowly extends the lead.

50.R4bx4d    04:14:00  04:13:00
51.P*4e      04:15:00  04:13:00
52.R4d-5d    04:15:00  04:13:00
53.P5f-5e    04:18:00  04:13:00
54.R5dx5e    04:18:00  04:17:00
55.+B2cx2d   04:18:00  04:17:00
56.R5ex4e    04:18:00  04:27:00
57.G4i-5i    04:21:00  04:27:00
58.B*5e      04:21:00  05:12:00
59.R2h-2g    04:57:00  05:12:00
60.R4e-4g+   04:57:00  05:20:00
61.R2gx4g    05:08:00  05:20:00
62.+S5gx4g   05:08:00  05:20:00
63.+B2d-2e   05:08:00  05:20:00
64.R*3i      05:08:00  05:57:00
65.P*4i      05:15:00  05:57:00
66.S*5b      05:15:00  05:57:00
67.+B2ex4g   05:36:00  05:57:00
68.B5ex1i+   05:36:00  05:57:00
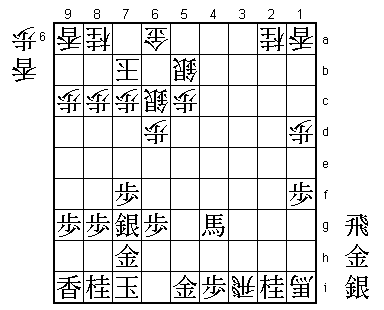
69.S*9b?!    05:42:00  05:57:00

If this would have really worked, it would have become a famous "devilish" move to
decide the game. Actually, after this move was played, it was expected that the
game would end soon. It looks very good, because after 70.Lx9b R*9a K8b +Bx8c is
winning. Also, after 70.Lx9b R*9a +B4f +Bx4f K8b black has the strong +B5g and
after Rx2i+ +Bx9c wins. However, Habu next shows that things are a little more
complicated than that. If Fukaura would have seen this, he probably would have
played 69.R*2b R3a+ R2f+ instead. This is much slower, but black's promoted rook
and bishop are working well and it is very hard for white to get anything going
against the black position.

70.L9ax9b    05:42:00  06:10:00
71.R*9a      05:42:00  06:10:00
72.+B1ix2i   05:42:00  06:15:00
73.R9ax9b+   05:42:00  06:15:00
74.L*8b      05:42:00  06:15:00
75.+B4gx2i   05:57:00  06:15:00
76.R3ix2i+   05:57:00  06:15:00

Now things are not so easy anymore, because black has given white a lot of pieces
in hand. In the press room some people even dared to suggest that Habu had turned
the tables here. The question was: how to tell this to all the Fukaura fans in the
commentary room?

77.K7i-8h    05:57:00  06:15:00
78.+R2i-2h   05:57:00  07:09:00
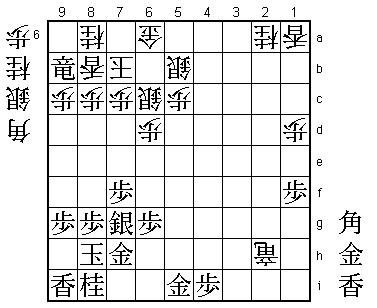
79.B*4g!     06:16:00  07:09:00

Fukaura still believes in his position. This doesn't look like a very impressive
move (it threatens Bx8c+, but this is easily blocked), but in combination with
his next move, this is very strong.

80.N*6e      06:16:00  07:19:00
81.L*2i!     06:18:00  07:19:00

The real point of 79.B*4g. Black would very much like to use this lance on 8f to
put pressure on the 8th file, but that doesn't really work here. In this position
Habu is a knight up and there is no direct attack for both players. Fukaura therefore
decides to go for material which is the right decision here. This lance picks up both
the knight on 2a and the lance on 1a, which gives the material advantage to Fukaura.
His deep understanding of how the balance of this game has shifted from attacking
(69.S*9b) to material has to be admired.

82.+R2h-1h   06:18:00  07:44:00

The alternative 82.+R1g looks better because it attacks the bishop on 4g, but after
83.Bx6e Px6e Lx2a+ the promoted rook on 1g is no longer a threat to the black king,
while the white position is very vulnerable to knight drops (for example on 7e).

83.L2ix2a+   06:19:00  07:44:00
84.B*4f      06:19:00  07:45:00
85.G5i-4h    06:30:00  07:45:00
86.P7c-7d    06:30:00  07:50:00
87.S7g-6f    06:35:00  07:50:00
88.+R1h-2g   06:35:00  07:52:00
89.+L2ax1a   06:35:00  07:52:00
90.G6a-7a    06:35:00  07:52:00
91.N*5e      07:01:00  07:52:00
92.S6c-5d    07:01:00  07:52:00
93.G*5f      07:01:00  07:52:00
94.B4f-1i+   07:01:00  07:53:00
95.L*8f      07:05:00  07:53:00
96.K7b-6a    07:05:00  07:53:00
This early escape seems to have made L*8f a useless move, but Fukaura has calculated
this deeply.

97.S6fx6e    07:09:00  07:53:00
98.P6dx6e?   07:09:00  07:55:00

White's last chance was 98.Sx5e and after 99.Gx5e +Bx5e S*6f +Bx1a Sx7d white has
the strong P6e and S7g is answered by P*7e. This variation was found after analyzing
the position for a long time in the post-mortem analysis and both players agreed
that white may have the better position here.

99.N*6d      07:09:00  07:55:00

A vulgar move, but a strong one because 100.Sx5e fails to Lx8c+.

100.S*9d     07:09:00  07:55:00
101.N6dx5b+  07:10:00  07:55:00
102.K6ax5b   07:10:00  07:55:00
103.S*7b     07:11:00  07:55:00

This looks slow, but is unexpectedly fast.

104.S5dx5e   07:11:00  07:55:00
105.S7bx7a=  07:13:00  07:55:00
106.S5ex5f   07:13:00  07:55:00
107.B4gx5f   07:13:00  07:55:00
108.+B1i-5e  07:13:00  07:55:00

A fork on king and promoted bishop, but black has nothing to fear.

109.K8h-9h   07:13:00  07:55:00
110.N*9e     07:13:00  07:55:00

After 110.+Bx5f S*4d the black attack cannot be stopped. Also, 110.S*6i is not a
mating threat, so black can simply play B3d and again white cannot properly defend.

111.B5f-3d   07:23:00  07:55:00
112.S*4c     07:23:00  07:56:00
113.S*4d     07:25:00  07:56:00
114.S4cx3d   07:25:00  07:57:00
115.S4dx5e   07:25:00  07:57:00
116.B*7c     07:25:00  07:57:00
117.+R9bx8b  07:26:00  07:57:00
118.B7cx8b   07:26:00  07:57:00
119.B*6a     07:26:00  07:57:00
120.K5b-4a   07:26:00  07:57:00
121.B6ax3d+  07:27:00  07:57:00
122.B8bx5e   07:27:00  07:57:00
123.L*4c     07:27:00  07:57:00
Resigns      07:27:00  07:57:00
Mate after 124.K5a (or K5b) G*6b, 124.K3a (or K3b) G*4b K2b +L1b or 124.P*4b Lx4b+
Kx4b S*4c etc. Fukaura answers the hopes of all his fans and wins in Sasebo. This
will make him very happy, but he will be even more satisfied with the score line.
He takes a 3-1 lead and only needs one more win to defend his Oi title for the first
time. Of course, the situation is the same as last year and then Habu managed to win
game 5 and 6 to take the match to an all-deciding seventh game. Fukaura knows that
needing only one more win is no guarantee against Habu...