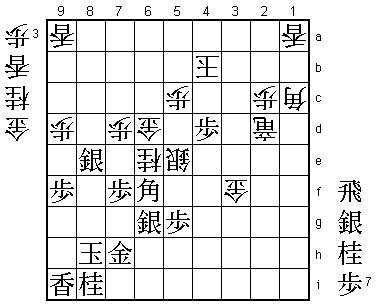
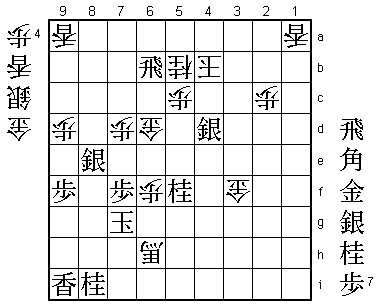
49th Oi Match Game 3
[Black "Habu Yoshiharu, Challenger"]
[White "Fukaura Koichi, Oi"]
[Event "49th Oi-sen, Game 3"]
[Date "July 31st and August 1st 2008"]
1.P2g-2f     00:00:00  00:00:00
2.P8c-8d     00:00:00  00:02:00
3.P2f-2e     00:03:00  00:02:00
4.P8d-8e     00:03:00  00:02:00
5.G6i-7h     00:05:00  00:02:00
6.G4a-3b     00:05:00  00:02:00
7.P2e-2d     00:09:00  00:02:00
8.P2cx2d     00:09:00  00:02:00
9.R2hx2d     00:09:00  00:02:00
10.P*2c      00:09:00  00:02:00
11.R2d-2h    00:09:00  00:02:00

The Meijin match also had a lot of Aigakari games with pulling back the rook to 2h,
so this was no surprise for Fukaura. In the professional scene the current feelings
are that white has a tough job getting good play against 11.R2h. Therefore, Fukaura's
counter strategy was awaited with anticipation.

12.P3c-3d    00:09:00  00:07:00
13.S3i-3h    00:14:00  00:07:00
14.S7a-7b    00:14:00  00:10:00
15.P9g-9f    00:18:00  00:10:00
16.P8e-8f    00:18:00  00:18:00
17.P8gx8f    00:18:00  00:18:00
18.R8bx8f    00:18:00  00:18:00
19.P*8g      00:18:00  00:18:00
20.R8f-8d    00:18:00  00:18:00
21.P4g-4f    00:24:00  00:18:00
22.P6c-6d    00:24:00  00:24:00
23.S3h-4g    00:26:00  00:24:00
24.S7b-6c    00:26:00  00:24:00
25.P7g-7f    00:31:00  00:24:00
26.S6c-5d    00:31:00  00:38:00
27.S4g-5f    00:35:00  00:38:00
28.P9c-9d    00:35:00  00:38:00
29.P1g-1f    01:01:00  00:38:00
30.P1c-1d    01:01:00  00:40:00
31.B8h-7g    01:02:00  00:40:00
32.G6a-5b    01:02:00  01:58:00
33.S7i-8h    01:03:00  01:58:00
34.P4c-4d    01:03:00  01:59:00
35.P8g-8f    01:24:00  01:59:00
36.R8d-8b    01:24:00  02:00:00
37.S8h-8g    01:27:00  02:00:00
38.S3a-4b    01:27:00  02:00:00
39.K5i-6h    01:28:00  02:00:00
40.S4b-4c    01:28:00  02:02:00
41.G4i-5h    01:29:00  02:02:00
42.P7c-7d    01:29:00  02:12:00
43.P3g-3f    02:01:00  02:12:00
44.G5b-6c    02:01:00  02:13:00
45.K6h-7i    02:47:00  02:13:00
46.N8a-7c    02:47:00  02:13:00

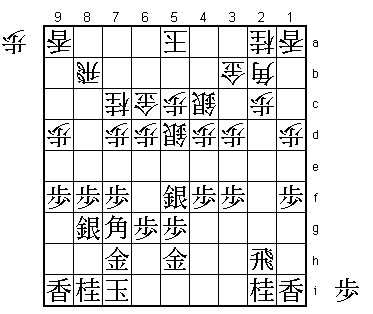
Most professionals in the press room were a little disappointed by Fukaura's choice of
strategy. One of black's aims in this opening is to build a strong Ginkanmuri castle
and Fukaura has just let this happen, trying to counter with thickness in the center.

47.P6g-6f?!  03:19:00  02:13:00

After the game, Habu said that he regretted this move. Keeping the bishop diagonal
open with 47.G5h-6h is better. Then it is more risky for white to move the king to
the left, so a development like 48.K6b N3g R8a can be expected, after which black
still has a number of ways to start the fight. After closing the bishop diagonal it
is much harder for black to find a way to start fighting. Because of the difference
in king position, this is what black wants, but he has to be very careful.

48.K5a-4a    03:19:00  03:04:00

With the bishop diagonal closed, it is better for white to move the king to the
left than to the right.

49.G5h-6g    03:20:00  03:04:00
50.K4a-3a    03:20:00  03:04:00
51.N2i-3g    03:21:00  03:04:00
52.R8b-4b    03:21:00  03:20:00
53.R2h-2f    03:25:00  03:20:00
54.K3a-4a    03:25:00  03:30:00
55.P3f-3e    03:39:00  03:30:00

56.K4a-5b!   03:39:00  03:40:00

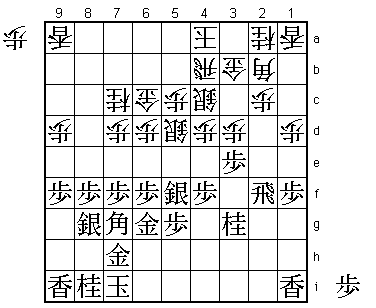
It looks like white can't make up his mind as far as the king is concerned, but
this is actually a very nice king manoeuvre, avoiding the line of fire. After
simply 56.Px3e, black can play 57.P1e Px1e P6e Px6e S5e and the attack goes on.

57.P3ex3d    03:52:00  03:40:00
58.S4cx3d    03:52:00  03:41:00
59.R2f-3f    03:52:00  03:41:00
60.P*3e      03:52:00  03:41:00
61.R3f-2f    03:52:00  03:41:00

62.G3b-3c!   03:52:00  04:14:00

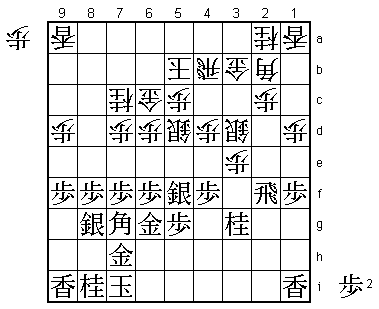
Ugly looking, but strong. The natural move is 62.B3c here, but that has no particular
aim and blocks a possible knight move to 3c. Instead, the gold move to 3c puts
pressure on the black attack, for example by P2d followed by P2e.

63.P1f-1e?   04:08:00  04:14:00

The pressure immediately pays off, because Habu replies with an important overplay.
Correct was 63.S4g and after 64.P2d R2i G2c black still has a good way to attack
with P5f followed by P5e. After 63.P1e, white wins a rook for a silver and that
is an important advantage.

64.P3e-3f    04:08:00  04:39:00
65.R2fx3f    04:27:00  04:39:00
66.G3c-2d    04:27:00  04:39:00
67.P1ex1d    04:28:00  04:39:00
68.S3d-3e    04:28:00  04:39:00
69.R3fx3e    04:28:00  04:39:00
70.G2dx3e    04:28:00  04:39:00
71.P*2d      04:28:00  04:39:00
72.R*2i      04:28:00  04:54:00
73.K7i-8h    04:28:00  04:54:00
74.R2ix2d+   04:28:00  04:54:00
75.P6f-6e    05:10:00  04:54:00
76.P*8e      05:10:00  05:04:00
77.P6ex6d    05:17:00  05:04:00
78.G6cx6d    05:17:00  05:04:00
79.P*3f      05:17:00  05:04:00
80.G3ex3f    05:17:00  05:15:00
81.P1d-1c+   05:18:00  05:15:00
82.N2ax1c    05:18:00  05:30:00
83.L1ix1c+   06:23:00  05:30:00
84.B2bx1c    06:23:00  05:31:00

White is up on material and has made a position that it hard to attack, but with
the rook near the king and the bishop on 1c not doing much at the moment, winning
from here is still going to be tough.

85.N3g-4e    06:23:00  05:31:00

Habu decides that it is now or never. This knight cannot be taken because of 85.Px4e
S*3c. In the press room, 85.N*2e was also analyzed. After 86.B2b S*3c Bx3c Nx3c+
+Rx3c it seems like black can play strongly P*3d because +Rx3d fails to B*2e. However,
if white answers P*3d with +R3a there is no good continuation. For example, B*2e
looks like a strong double threat (P3c+ and Bx3f), but after P2d P3c+ (Bx3f +Rx3d)
Px2e +Px4b +Rx4b black has only a rook so the attack is too weak.

86.P*6f      06:23:00  06:06:00

Strong counter, because 87.Gx6f blocks the bishop's diagonal and 87.Bx6f Px8f Sx8f
shakes up the black castle formation too much. Habu decides to give up one of the
castle generals for attacking chances, but this means that it becomes a lot easier
for white to attack the black king.

87.S*3c      06:31:00  06:06:00
88.P6fx6g+   06:31:00  06:06:00
89.S5fx6g    06:31:00  06:06:00
90.N7c-6e    06:31:00  06:38:00
91.B7g-6f    06:35:00  06:38:00
92.P8ex8f    06:35:00  06:40:00
93.S8gx8f    06:39:00  06:40:00
94.P*8e      06:39:00  06:41:00
95.S8fx8e    07:07:00  06:41:00
96.S5dx4e    07:07:00  07:11:00
97.S3cx4b+   07:13:00  07:11:00
98.K5bx4b    07:13:00  07:11:00
99.P4fx4e    07:13:00  07:11:00
100.S*5e     07:13:00  07:12:00
101.P4ex4d   07:24:00  07:12:00

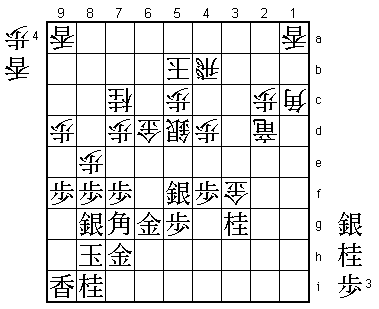
Here one of white's options is to go for an entering king with 102.K3c, but Fukaura
has found a much stronger way to play here.

102.S5ex6f!  07:24:00  07:25:00
103.S6gx6f   07:27:00  07:25:00
104.+R2dx4d! 07:27:00  07:29:00

This combination of taking the bishop and then the important pawn on 4d looks simple,
but required deep calculation as we will see next.

105.R*6b     07:28:00  07:29:00
106.N*5b     07:28:00  07:33:00
107.N*5f     07:30:00  07:33:00
108.+R4d-4h  07:30:00  07:37:00

The point of the white play is that this is a mating threat. It is quite a long
sequence, so not so easy to calculate and Fukaura already had to find it when playing
102.Sx6f.

109.S*4d     07:33:00  07:37:00

If 108.+R4h would not have been a mating threat, this would have turned the tables
in black's favour. Of course, Habu had also seen that he would be mated from here,
but the alternative 109.P*6h is even less attractive after 110.P*8f P*8g B*6i and
black is overpowered without getting a decent attacking position.

110.+R4hx7h  07:33:00  07:43:00
111.K8hx7h   07:33:00  07:43:00
112.G*6g     07:33:00  07:43:00
113.K7hx6g   07:33:00  07:43:00
114.B1cx5g+  07:33:00  07:43:00
115.S6fx5g   07:34:00  07:43:00
116.N6ex5g+  07:34:00  07:43:00
117.K6gx5g   07:34:00  07:43:00
118.B*4f     07:34:00  07:43:00
119.K5g-6g   07:35:00  07:43:00
120.P*6f     07:35:00  07:43:00
121.K6g-7g   07:35:00  07:43:00
122.B4f-6h+  07:35:00  07:43:00
Resigns      07:35:00  07:43:00

Mate after 123.Kx6h G*6g K5i S*5h K4h S4g+ K3i L*3g and even the lance on 1a joins
in to mate the black king. A fine performance by Fukaura, who wins a game with the
white pieces to take a 2-1 lead. In the fourth game he will have a great opportunity
to extend the lead with the black pieces. Not only that, but he is also playing in
his home town of Sasebo.
