49th Oi Match Game 1
[Black "Habu Yoshiharu, Challenger"]
[White "Fukaura Koichi, Oi"]
[Event "49th Oi-sen, Game 1"]
[Date "July 14th and 15th 2008"]
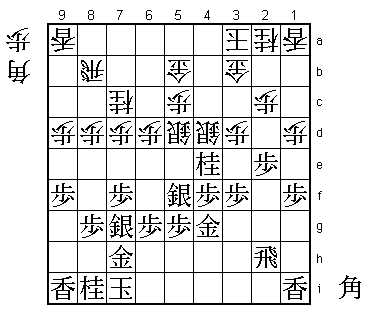
1.P7g-7f 00:00:00 00:00:00
The furigoma gives challenger Habu the black pieces in the first game. Fukaura is
looking to defend his Oi title for the first time, but he is facing the player he
took the Oi title from last year and Habu is of course looking for revenge. Fukaura
pledged in the pre-match interview that he would play as positively as possible,
trying to feel like the challenger instead of the defender of the title.
2.P3c-3d 00:00:00 00:02:00
3.P2g-2f 00:03:00 00:02:00
4.G4a-3b 00:03:00 00:03:00
5.G6i-7h 00:06:00 00:03:00
6.B2bx8h+ 00:06:00 00:05:00
The main idea behind the Kakugawari with tempo loss is to wait until the black
pawn is moved to 2e, because the difference between having a black pawn on 2e
while the white pawn is still on 8c or 8d can be significant (especially in the
Koshikakegin opening where the knight can jump to 8e because there is no pawn
there). This is in part compensation for losing a move by exchanging bishops.
However, recently the number of games where the bishops are exchanged before
black has committed the rook pawn to 2e have increased. This game is a good example
of white getting reasonable play even without the compensation of having the pawn
on 2e.
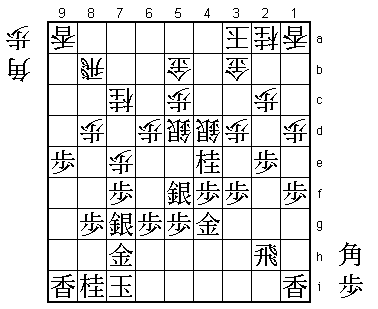
7.S7ix8h 00:06:00 00:05:00
8.S3a-4b 00:06:00 00:05:00
9.S3i-3h 00:15:00 00:05:00
10.S7a-6b 00:15:00 00:07:00
11.P4g-4f 00:26:00 00:07:00
12.P6c-6d 00:26:00 00:07:00
13.S3h-4g 00:28:00 00:07:00
14.S6b-6c 00:28:00 00:07:00
15.K5i-6h 00:30:00 00:07:00
16.P9c-9d 00:30:00 00:14:00
17.P9g-9f 00:33:00 00:14:00
18.G6a-5b 00:33:00 00:16:00
19.S8h-7g 00:36:00 00:16:00
20.K5a-4a 00:36:00 00:22:00
21.P1g-1f 00:42:00 00:22:00
22.P1c-1d 00:42:00 00:22:00
23.P3g-3f 00:47:00 00:22:00
24.P7c-7d 00:47:00 01:03:00
25.N2i-3g 01:00:00 01:03:00
26.S6c-5d 01:00:00 01:03:00
27.S4g-5f 01:17:00 01:03:00
28.K4a-3a 01:17:00 01:08:00
29.K6h-7i 01:38:00 01:08:00
30.P8c-8d 01:38:00 01:21:00
31.G4i-4h 02:02:00 01:21:00
32.N8a-7c 02:02:00 02:14:00
33.G4h-4g 02:47:00 02:14:00
34.P4c-4d 02:47:00 03:33:00
35.P2f-2e 03:10:00 03:33:00
36.S4b-3c 03:10:00 03:33:00
37.P4f-4e 03:11:00 03:33:00
38.P4dx4e 03:11:00 03:42:00
39.N3gx4e 03:12:00 03:42:00
40.S3c-4d 03:12:00 03:42:00
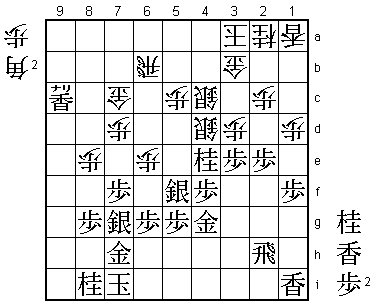
41.P*4f 03:54:00 03:42:00
The sealed move. This game has developed into a classical Koshikakegin (or Double
Reclining Silver) opening. It is considered strong for black even without the
tempo loss of the white bishop exchange on the 6th move. Common sense states that
the Koshikakegin should be even better here, but things are not so simple. Because
of the tempo loss, white has not been forced to push the pawn to 8e, so the counter
attack with N8e is also possible here. Therefore, black has to be very careful.
After 41.P*4f there is the threat of attacking next with P3e followed by P2d. White
can stop this with 41.B*4b and after 42.P6f S4c K8h P5d the position is very tight.
Even though black has the bishop still in hand, it cannot be dropped anywhere and it
is not unlikely that the position will end in sennichite because neither player has a
way to open the game. Fukaura is known for his defence, not shying away from sennichite
(especially with white) if that means killing his opponent's opportunities to start
the attack, but...

42.P9d-9e    03:54:00  03:45:00

Fukaura is true to his words in the pre-game interview and doesn't play the rock
hard defence here. Instead, he is attacking himself, dragging the game into a very
sharp mutual attack. Strictly speaking, this game seems to indicate that the decision
might not have been objectively correct. However, nobody could foresee what Habu
would come up with next...

43.P9fx9e    03:57:00  03:45:00
44.P7d-7e    03:57:00  03:45:00
And after 45.Px7e N8e S7f S6e S5fx6e Px6e black has trouble keeping the position
together. Also, 45.S6f is answered by P*9g Lx9g N8e and the edge attack looks very
strong.
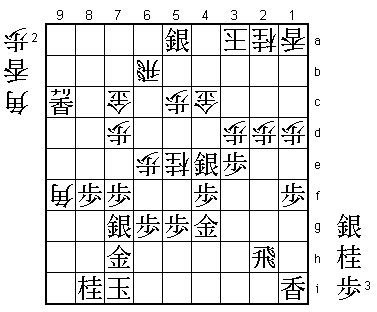
45.B*6f!? 05:07:00 03:45:00
A "don't try this at home" move. If anyone but Habu would have played it, the reaction
in the press room would have been to laugh out loud. Because Habu played it, the
reaction was a little more subdued: "Not even Habu...". Still, the overwhelming opinion
was that this bishop drop was bad. The reason is simple: it is so boxed in that it will
be lost soon. Not only this, but white can develop his attack while attacking it.
Shima (9-dan) wrote that this drop is bad in 9 out of 10 times, but it is probably
closer to 99 out of a 100 times. It is very unlikely that Fukaura saw this bishop
coming when he started the attack with 42.P9e.
46.S5d-4c 05:07:00 04:24:00
47.P3f-3e! 05:08:00 04:24:00
This is an important follow-up. It doesn't look like much, but the reason why this
move is good will become clear later.
48.P6d-6e 05:08:00 04:37:00
49.B6fx7e 05:16:00 04:37:00
50.G5b-6c 05:16:00 05:44:00
51.P9e-9d 05:33:00 05:44:00
52.P*7d 05:33:00 05:44:00
53.B7e-8f 05:36:00 05:44:00
54.P8d-8e 05:36:00 05:44:00
55.P9d-9c+ 05:36:00 05:44:00
56.R8b-6b 05:36:00 06:05:00
57.B8f-9e 05:36:00 06:05:00
58.L9ax9c 05:36:00 06:05:00
White has chased the bishop around (B6f-7e-8f-9e) and now black has to give it up.
59.B9ex7c+ 05:36:00 06:05:00
60.G6cx7c 05:36:00 06:05:00
61.L9ix9c+ 05:36:00 06:05:00
Black has managed to get two pieces for the bishop: a knight and a lance. Again,
this would in general not be enough compensation because the lack of attacking
power of these two pieces. On the other hand, a bishop in hand usually ties the
pieces to defending drop squares, so that it is not easy to attack. However, this
position is an exception among exceptions. The black position is very well defended
against a bishop drop and the white bishop in hand is not hindering attacking
plans much. Furthermore, the lance and knight are extremely effective attacking
pieces here, because they can be dropped on 5e (knight) or 4d (if the silver moves)
or 3c (if white allows black to take the pawn on 3d). The simple black threat is
Px3d followed by L*3c, so white cannot afford to wait for his material to become
a factor.

62.P8e-8f    05:36:00  06:08:00
63.P8gx8f    06:27:00  06:08:00
64.S4dx4e    06:27:00  06:30:00
65.S5fx4e    06:28:00  06:30:00
66.N*5e      06:28:00  06:30:00
67.P2e-2d    06:43:00  06:30:00
68.P2cx2d    06:43:00  06:51:00
69.L*4d      06:44:00  06:51:00
70.B*9f!     06:44:00  07:03:00

This also is not a usual spot for a bishop drop, but in this case 9f is a strong
attacking position. Habu may have made the dumb looking bishop drop B*6f work for
him, the position is still extremely close.

71.L4dx4c+   07:07:00  07:03:00
72.G3bx4c    07:07:00  07:03:00
73.S*5a      07:07:00  07:03:00
74.P6e-6f?   07:07:00  07:30:00

Opening up squares near the king with a pawn sacrifice is almost always good, so
most professionals would have done the same here. However, in this case 74.L*2e
directly would have been the right move. Then after 75.P*2f Lx2f Rx2f Nx6g+ Gx6g
P6f G6h P6g+ Sx6b= B*5h! (not B*8g which looks winning because black can defend
with R2h!) and +Px6h is a mating threat that seems impossible to defend. So, Fukaura
had a forced win here? Not exactly. If black answers 74.L*2e with 75.P*9g Lx2h+
Px9f the post-mortem analysis showed that the black attack is stronger. This is
not easy to see, because there are moves like P*8g in the position which are very
dangerous combined with a rook in hand.

75.P6gx6f    07:30:00  07:30:00
76.L*2e      07:30:00  07:30:00
77.P*2f      07:30:00  07:30:00
78.L2ex2f    07:30:00  07:45:00
79.R2hx2f    07:33:00  07:45:00
80.B9fx7h+?  07:33:00  07:46:00

This is a strong attack, but with good defence just comes up short. Fukaura could
have made it (even) more difficult for Habu by playing 80.N6g+ here. Then 81.L*8g
(Gx6g B*8g R2h B6i+ is good for white) +Nx7h Kx7h Bx8g+ Kx8g B*6i and black looks
in a lot of trouble. For example, N*7h fails to G*9f Kx9f Bx7h+ N*8g P*9e Kx9e L*9a
P*9d N*8c K9f Lx9c Px9c+ G8d and white has managed to even make the passive gold
join the attack. The long post-mortem analysis showed that in response to B*6i,
black probably still wins after S*7h G*9f K8h L*8g K7i Bx4g+ Sx6b= but the road
to victory in these variations is very narrow and even for Habu it would have been
difficult to find the perfect way to play with limited time.

81.K7ix7h    07:33:00  07:46:00
82.B*6g      07:33:00  07:46:00
83.K7h-8h    07:41:00  07:46:00
84.P*8g      07:41:00  07:46:00
85.K8h-9h    07:46:00  07:46:00
86.B6g-7h+   07:46:00  07:47:00

It seems that 86.Bx8i+ Kx8i N*9f K9h N8h+ Sx8h Px8h+ Kx8h P*8g Kx8g Rx6f is winning
for white because there is no proper defence against the mating threat Rx6g+ next,
but in this position black has a long mate after S*4b Gx4b N*2c. Even Habu could
not have foreseen this, so this is just plain bad luck for Fukaura. By the way,
86.B7h+ threatens mate with P*9g Kx9g P*9f Kx9f P8h+ so this is far from a powerless
move.

87.R2f-2h!   07:47:00  07:47:00

This is just good enough to survive.

88.R6bx6f    07:47:00  07:59:00
89.R2hx7h    07:48:00  07:59:00
90.R6f-6i+   07:48:00  07:59:00
91.L*7i      07:49:00  07:59:00
92.K3a-4a    07:49:00  07:59:00
93.S*6b      07:54:00  07:59:00
94.P*9g      07:54:00  07:59:00
95.K9hx8g    07:54:00  07:59:00
96.N5e-6g+   07:54:00  07:59:00
97.B*2c      07:55:00  07:59:00
Resigns      07:55:00  07:59:00
After 98.G*3b Bx3b+ Kx3b N*4d Gx4d B*4a leads to mate. If white plays 98.K3a there
is no mate, but there is also no mating threat against the black king, so Sx7c+ wins
easily. A very exciting endgame to start this Oi match, and it looks like we have
another great match coming up. Fukaura may have lost the game, but in the post-mortem
analysis he didn't show any disappointment and seemed to genuinely enjoy analysing
this endgame with the strongest endgame player the game has ever known. This being
said, a loss with the black pieces in the second game would put him in a deep hole,
so there is definitely some pressure on Fukaura here.