48th Oza Match Game 4
Black: Habu Yoshiharu, Oza
White: Fujii Takeshi, Challenger
48th Oza-sen, Game 4, October 4th 2000
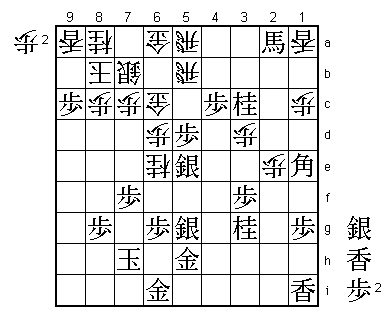
1.P7g-7f 0/0 0/0
2.P3c-3d 0/0 3/3
3.P2g-2f 3/3 0/3
4.P4c-4d 0/3 3/6
5.S3i-4h 3/6 0/6
6.S3a-3b 0/6 3/9
7.P5g-5f 3/9 0/9
8.R8b-4b 0/9 2/11
9.K5i-6h 6/15 0/11
10.S7a-7b 0/15 5/16
11.K6h-7h 1/16 0/16
12.S3b-4c 0/16 1/17
13.G4i-5h 10/26 0/17
14.P9c-9d 0/26 1/18
15.P9g-9f 4/30 0/18
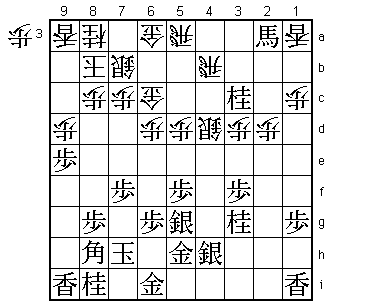
An interesting change of strategy by Habu. In the first three games he faced
the Fujii System head on, but this time he picks a more classic variation of
the Shikenbisha. Did he find something new or is it just an attempt to break
Fujii's rhythm?
16.K5a-6b 0/30 20/38
17.S7i-6h 19/49 0/38
18.K6b-7a 0/49 10/48
19.P3g-3f 9/58 0/48
20.K7a-8b 0/58 13/61
21.P2f-2e 16/74 0/61
22.B2b-3c 0/74 0/61
23.S6h-5g 0/74 0/61
24.P5c-5d 0/74 17/78
25.P4g-4f 22/96 0/78
26.G4a-5b 0/96 16/94
27.P4f-4e 3/99 0/94
This quick attack has been analysed extensively. The conclusion seems to
be that the Shikenbisha side has nothing to fear.
28.P6c-6d 0/99 9/103
29.N2i-3g 6/105 0/103
30.G5b-6c 0/105 7/110
31.P2e-2d 13/118 0/110
32.B3cx2d 0/118 1/111
33.P4ex4d 2/120 0/111
34.S4cx4d 0/120 0/111
35.R2hx2d 1/121 0/111
36.P2cx2d 0/121 0/111
37.P*4c 0/121 0/111
38.R4bx4c 0/121 0/111
39.B*3b 0/121 0/111
40.R4c-4b 0/121 5/116
41.B3bx2a+ 1/122 0/116
42.R*4a 0/122 0/116
43.N*3c 6/128 0/116
44.R4a-5a 0/128 4/120
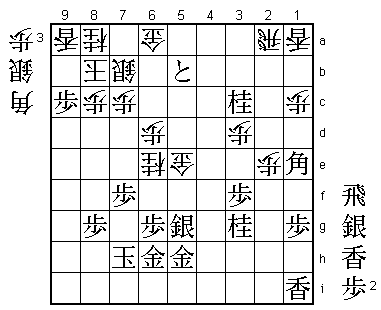
45.P9f-9e 2/130 0/120
So far this is all theory. The joseki books say 45.Px9e Lx9e Lx9e P*4c R4b-5b
Bx4d and black has a winning position. The same position was played between
Goda and Suzuki in the Ryu-O tournament on April 10th of this year. Suzuki
tried 45.P5e, but in the end lost the game. Look what Fujii plays here:

46.P9dx9e!?  0/130     34/154

Never trust the joseki books! Fujii did not like giving up the edge after
46.P5e Px9d, and gives up a silver instead after the forced book line.

47.L9ix9e    13/143    0/154
48.L9ax9e    0/143     3/157
49.P*4c      1/144     0/157
50.R4b-5b    0/144     0/157
51.B8hx4d    0/144     0/157
52.P5d-5e    0/144     4/161
53.P5fx5e    13/157    0/161
54.L9e-9h+   0/157     0/161
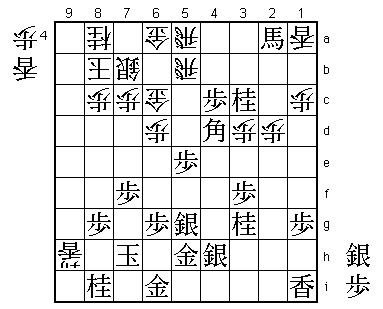
Surprise, surprise, but this position is not at all a winning position for
black. Even though white is a full silver down, the knight on 3c and the
horse on 2a can not move so black has no good way to continue. Fujii again
shows great judgment: the position is probably about even.
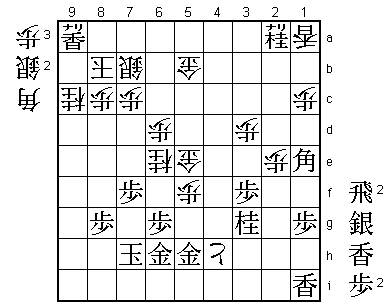
55.S5g-5f 12/169 0/161
With no direct attack, black just settles for improving his position.
56.G6c-5c 0/169 41/202
57.B4d-2f 27/196 0/202
58.P2d-2e 0/196 4/206
59.B2f-1e 13/209 0/206
60.G5c-6c 0/209 13/219
61.S4h-5g 21/230 0/219
62.+L9hx8i?! 0/230 32/251
After the game, Fujii said that he regretted this move as he considered the
promoted lance near the king worth at least a gold. He had to do something,
as Habu was threatening to complete the improvement of his position with
63.S6f followed by the strong attack S*4a. Fujii said that he should have
played 62.L*8d instead. Still, the professionals in the press room did not
think Fujii's plan was bad. He is making the black king very vulnerable and
then attacks through the center to activate his rooks.

63.K7hx8i    6/236     0/251
64.L*9a      0/236     2/253
65.K8i-7h    5/241     0/253
66.P*5d      0/241     0/253
67.P5ex5d    8/249     0/253
68.P*5e      0/249     5/258
69.S5fx5e    9/258     0/258
70.N*6e      0/258     2/260
71.P*9c!     6/264     0/260
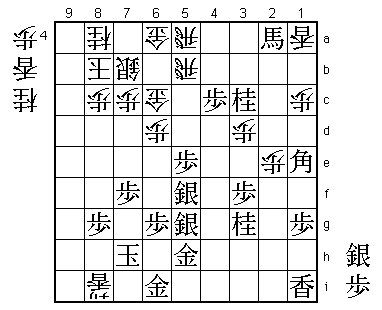
Weird move... It seems like black has no time for this, as the head of the
king is very weak and white now gets a general in hand to attack that weak
spot. This can only be called "Habu Magic" as it might just be good enough to
turn the position in black's favour.

72.G6cx5d    0/264     8/268
73.P4c-4b+!  9/273     0/268

No way back.

74.R5ax2a    0/273     6/274

The best response. After 74.Gx5e 75.+Px5b 76.S*7g white would win, but if black
plays 75.+Bx6e instead, the white attack is stopped.

75.+P4bx5b   1/274     0/274
76.G5dx5e    0/274     0/274
77.G6i-6h!   3/277     0/274
Well timed defence. Black defends 7g and makes an escape route for the king
that is hard to close without a rook. Also, white has to do something, as both
the rook on 2a and the gold on 6a are hanging. It seems that black now has
the advantage, but actually things are still quite close.

78.P*5f      0/277     7/281
79.S5g-4h?   4/281     0/281

A mistake. After 79.+Px6a Rx6a S6f black seems to be winning. If he gets a
knight in hand (for example by Sx6e next), the drop N*9d is very painful for
white.

80.P*4g      0/281     15/296
81.N3cx2a+   9/290     0/296
82.G6ax5b    0/290     2/298
83.L*9b      4/294     0/298
84.P4gx4h+   0/294     0/298
85.L9bx9a+   0/294     0/298
86.N8ax9c?   0/294     1/299
Bad luck for Fujii. This looks like a great move, as black had a mate after
86.+Px5h R*9b K7a +Lx8a etc., and after 86.Nx9c white is threatening mate
himself with S*7g Gx7g Nx7g+ Kx7g N8e etc. Unfortunately, black now gets the
chance to slow down white's attack, so 86.Nx9c is the losing move. After
86.P7d instead (creating an escape for the king), the position is still
unclear.

87.R*9b      2/296     0/299
88.K8b-7a    0/296     0/299
89.R*4a      1/297     0/299
90.K7a-6b    0/297     0/299
91.R4ax4h+   1/298     0/299

Decisive. White needed this promoted pawn for his attack.

92.P*4g      0/298     0/299
93.P*5c      0/298     0/299
94.G5bx5c    0/298     0/299
95.+R4hx4g   0/298     0/299
96.S*7g      0/298     0/299
97.G6hx7g    0/298     0/299
98.N6ex7g+   0/298     0/299
99.K7hx7g    0/298     0/299
100.N9c-8e   0/298     0/299
101.K7g-7h   0/298     0/299
102.S*7g     0/298     0/299
103.K7h-6i   0/298     0/299
104.G*6h     0/298     0/299
105.G5hx6h   0/298     0/299
106.S7gx6h+  0/298     0/299
107.K6ix6h   0/298     0/299
108.G*5g     0/298     0/299
109.K6h-7h   0/298     0/299
110.G5gx4g   0/298     0/299
111.N*5d     0/298     0/299
112.G5cx5d   0/298     0/299
113.S*5a     0/298     0/299
Resigns      0/298     0/299
Time:        04:58:00  04:59:00

And mate after 114.K6c S*5b Kx5b B4b+ K6c S*5b. So, Habu survives Fujii's
first attempt at taking his Oza title, albeit with the smallest possible
margin. For the third time in a row Habu has to be a decisive game in
a title match. So far his results have been good as he won in the Kisei-sen
and the Oi-sen against Tanigawa. Will Fujii do better?