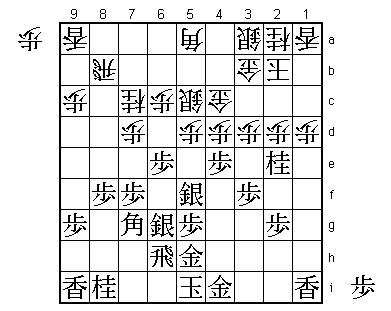
48th Oza Match Game 2
Black: Fujii Takeshi, Challenger
White: Habu Yoshiharu, Oza
48th Oza-sen, Game 2, September 8th 2000
1.P7g-7f 0/0 0/0
2.P3c-3d 0/0 3/3
3.P6g-6f 1/1 0/3
4.S7a-6b 0/1 1/4
5.R2h-6h 5/6 0/4
6.K5a-4b 0/6 1/5
7.P1g-1f 2/8 0/5
8.K4b-3b 0/8 3/8
9.S3i-3h 5/13 0/8
10.P5c-5d 0/13 10/18
11.S7i-7h 7/20 0/18
12.G6a-5b 0/20 4/22
13.S7h-6g 20/40 0/22
14.P8c-8d 0/40 4/26
15.P1f-1e 17/57 0/26
16.S6b-5c 0/57 20/46
17.G6i-5h 2/59 0/46
18.P8d-8e 0/59 19/65
19.B8h-7g 0/59 0/65
20.B2b-3c 0/59 0/65
21.P4g-4f 5/64 0/65
22.P4c-4d 0/64 8/73
23.P3g-3f 0/64 0/73
24.G5b-4c 0/64 5/78
25.N2i-3g 1/65 0/78
26.K3b-2b 0/65 26/104
No millenium castle this time. Habu just said that he wanted to play the
normal anaguma, facing the Fujii system head on.
27.P6f-6e 13/78 0/104
28.G4a-3b 0/78 1/105
29.S3h-4g 2/80 0/105
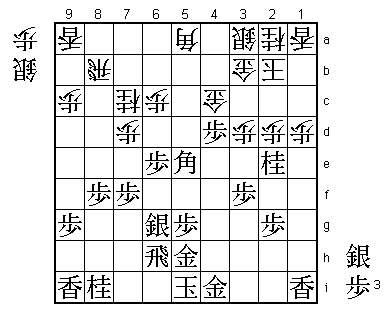
30.P7c-7d?! 0/80 4/109

Brave move. This opens the diagonal to the rook and looks very risky. It
is Habu's way of saying "come and get me if you can".
31.N3g-2e 27/107 0/109
After some thought, Fujii accepts the challenge and attacks.
32.B3c-5a 0/107 2/111
33.P1e-1d 1/108 0/111
It is important to play this move early, so that the lance can be sacrificed
on 1d after B7c.
34.P1cx1d 0/108 4/115
35.P4f-4e 0/108 0/115
36.P8e-8f 0/108 53/168
37.P8gx8f 2/110 0/168
38.N8a-7c 0/110 0/168
39.S4g-5f 88/198 0/168
More natural is 40.S6g-5f, but with the sitting king, the attack on the
head of the bishop (P7e) is too dangerous.
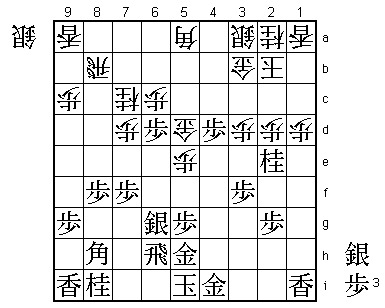
40.P2c-2d 0/198 37/205
The point of the game. Black's attack on 4d looks very strong, but white has
to force black into action with this attack on the knight.

41.P4ex4d    0/198     0/205
42.S5cx4d    0/198     4/209
43.P*4e      0/198     0/209
44.S4d-5e    0/198     0/209
45.S5fx5e    0/198     0/209
46.P5dx5e    0/198     0/209
47.B7gx5e    0/198     0/209
48.P*4d!     0/198     0/209

Great defence. White just ignores the power of the bishop on the king's
diagonal.

49.P4ex4d?   1/199     0/209
Here Fujii misses a good chance. The right move was 49.P*1b. It looks a
little strange as after 50.Kx1b (the move Habu intended to play), the king
is no longer on the diagonal of the bishop. However, after 51.Lx1d P*1c
Px4d G5d Nx1c+ Nx1c B8h black can play Lx1c+ followed by N*4c next, which is
very strong. Probably better is 50.Lx1b, but then P*1c Px2e Px1b+ Kx1b L*1h
is good for black, as he can also use the bishop on 4f.
50.G4c-5d 0/199 0/209
51.B5e-8h 0/199 0/209
52.P*5e! 0/199 26/235
Now black's attack is stopped and the bishop on 8h is just ballast.
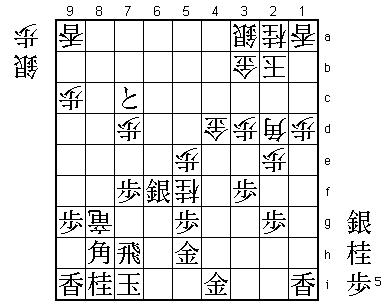
53.P6e-6d? 34/233 0/235
The move Fujii regretted most after the game. He counted on 54.Px6d P*6b, but
overlooked Habu's next move. Better was 53.S5f Px2e Sx5e Gx5e Bx5e and things
are still complicated.

54.P2dx2e    0/233     8/243

Habu just ignores the pawn promotion.

55.P6dx6c+   1/234     0/243
56.B5a-2d    0/234     5/248

A perfect square for the bishop to attack the black king and this also
defends against S*5b. The game is virtually over from now, even though
Fujii desperately struggles for another 40 moves. It might have been
enough to get back in the game against any other player, but Habu does
not give him any chance.

57.+P6cx7c   33/267    0/248
58.R8bx8f    0/267     0/248
59.N*7i      0/267     0/248
60.P*6f      0/267     10/258
61.S6gx6f    9/276     0/258
62.N*5f      0/276     0/258
63.R6h-7h    0/276     0/258
64.S*8g      0/276     3/261
65.N7ix8g    0/276     0/261
66.R8fx8g+   0/276     0/261
67.S*7i      0/276     0/261
68.N*6g      0/276     14/275
69.K5i-6i    0/276     0/275
70.N6gx7i+   0/276     0/275
71.K6ix7i    0/276     0/275
72.G5dx4d    0/276     0/275
There goes black's final stronghold.

73.P*6h      7/283     0/275
74.P*8f      0/283     3/278
75.P9g-9f    9/292     0/278
76.B2d-4f    0/292     4/282
77.R7h-7g    2/294     0/282
78.+R8gx7g   0/294     1/283
79.B8hx7g    0/294     0/283
80.S*8g      0/294     0/283
81.B7gx8f    0/294     0/283
82.R*7h      0/294     1/284
83.K7i-6i    0/294     0/284
84.S8g-8h+   0/294     0/284
85.G5h-5i    0/294     0/284
86.B4f-3g+   0/294     2/286
87.K6i-5h    1/295     0/286
88.R7hx7f+   0/295     2/288
89.B8f-5c+   0/295     0/288
90.+R7fx6f   0/295     3/291
91.+B5cx4d   0/295     0/291
92.N2a-3c    0/295     0/291
93.G*3h      0/295     0/291
94.+B3gx3f   0/295     4/295
95.P*4g      0/295     0/295
96.P*4h      0/295     0/295
97.P*3g      0/295     0/295
98.+S8h-7h   0/295     2/297
99.R*6g      0/295     0/297
100.P4hx4i+  0/295     0/297
101.R6gx6f   0/295     0/297
102.+P4ix5i  0/295     0/297
Resigns      0/295     0/297
Time:        04:55:00  04:57:00
Mate after 103.K6g Nx6h+ etc. or 103.Kx5i +Bx3g etc.