48th Osho Match Game 3
Black: Habu, Osho
White: Morishita, Challenger
48th Osho-sen, Game 3, January 27th and 28th 1999
1.P7g-7f           1/1          0/0
2.P8c-8d           0/1          2/2
3.G6i-7h           3/4          0/2
4.G4a-3b           0/4          5/7
5.S7i-6h           2/6          0/7
6.P3c-3d           0/6          6/13
7.P6g-6f           2/8          0/13
8.S7a-6b           0/8          4/17
9.P5g-5f           4/12         0/17
10.P5c-5d          0/12         3/20
11.S3i-4h          8/20         0/20
12.S3a-4b          0/20         1/21
13.K5i-6i          4/24         0/21
14.K5a-4a          0/24         3/24
15.G4i-5h          3/27         0/24
16.G6a-5b          0/27         4/28
17.S6h-7g          19/46        0/28
18.S4b-3c          0/46         3/31
19.B8h-7i          3/49         0/31
20.B2b-3a          0/49         1/32
21.P3g-3f          6/55         0/32
22.P4c-4d          0/55         8/40
23.G5h-6g          67/122       0/40
24.P7c-7d          0/122        11/51
25.S4h-3g          4/126        0/51
26.B3a-6d          0/126        4/55
27.B7i-6h          21/147       0/55
28.G5b-4c          0/147        5/60
29.K6i-7i          1/148        0/60
30.K4a-3a          0/148        1/61
31.K7i-8h          3/151        0/61
32.P9c-9d          0/151        22/83
33.P1g-1f          17/168       0/83
34.K3a-2b          0/168        25/108
35.S3g-4f          22/190       0/108
36.S6b-5c          0/190        14/122
37.N2i-3g          0/190        0/122
38.P1c-1d          0/190        1/123
39.P2g-2f          14/204       0/123
40.S3c-2d          0/204        2/125
41.L1i-1h          22/226       0/125
42.P8d-8e          0/226        58/183
43.R2h-3h          20/246       0/183
44.N2a-3c          0/246        28/211

The end of the first day. As often happens in two day games, the position
after the first day is not new.

45.P9g-9f          12/258       0/211
46.S5c-4b          0/258        14/225

This is a new move. 46.P4e is an alternative, but looks risky. S4b is more
typical of Morishita's defensive style.

47.P6f-6e          14/272       0/225
48.B6d-7c          0/272        5/230
49.B6h-5g          0/272        0/230
50.P6c-6d          0/272        48/278

Black is planning to put the bishop on 6f, where it is very well positioned.
White can not allow that without getting something in return, so Morishita
attacks the vanguard pawn.

51.P6ex6d          29/301       0/278
52.B7cx6d          0/301        0/278
53.P*6e            1/302        0/278
54.B6d-7c          0/302        42/320
55.B5g-6f          37/339       0/320
56.R8b-6b          0/339        6/326
57.P5f-5e          12/351       0/326
58.R6bx6e          0/351        16/342
59.P5ex5d          1/352        0/342
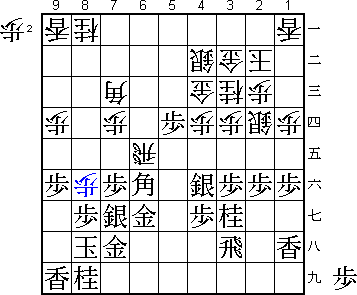
60.P8e-8f!         0/352        2/344

Strong move.

61.S7gx8f!         32/384       0/344

Some people in the press room already thought that Habu had blundered in the
same way as in game one. The natural 61.Px8f P*8e Px8e N9c is bad for black
but 61.Sx8f seems even worse...

62.R6ex6f          0/384        42/386
63.G6gx6f          0/384        0/386
64.B*2g            0/384        0/386
65.R3h-6h          17/401       0/386
66.B2gx3f+         0/401        1/387
67.G6f-5f          0/401        0/387
68.+B3fx4g         0/401        14/401
69.R6h-6a+         1/402        0/401
70.P*5a            0/402        0/401
71.G5f-5g          13/415       0/401
72.+B4gx4f         0/415        0/401
73.G5gx4f          0/415        0/401
74.B7cx4f          0/415        0/401

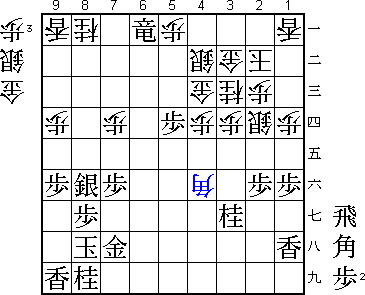
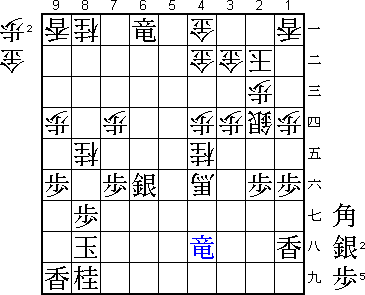
The moves from 61.Sx8f are almost forced and all general shogi rules say that
this position is an overwhelming advantage for white: white has two generals
for the rook, white's king is completely safe with the anchor pawn on 5a and
black's king looks like the defense can be broken down easily. However, Habu
has deeply calculated this variation when he played 61.Sx8f and correctly
judged that it is far from easy. The promoted rook on 6a is working very
well in defense. If Morishita has an advantage here, it is only marginal.

75.P5d-5c+!        10/425       0/401

Did Habu see everything here, including move 87? If so, he proves again that
he is the strongest player on the planet.

76.G4cx5c          0/425        0/401
77.P*4c            0/425        0/401
78.G5cx4c          0/425        22/423

If 78.G3bx4c then after 79.P*3h the white king suddenly does not look that
safe anymore, while white has no good moves to attack.

79.P*5b            0/425        0/423
80.P*6f            0/425        1/424
81.P5bx5a+         16/441       0/424
82.S*6i            0/441        6/430
83.+R6ax6f         8/449        0/430
84.S6ix7h+         0/449        4/434
85.K8hx7h          0/449        0/434
86.P*5f            0/449        0/434

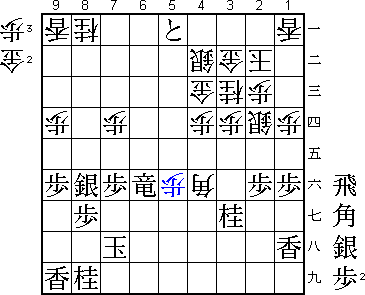
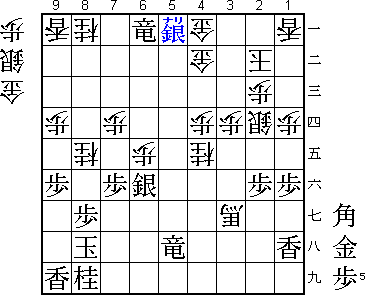
Morishita thought this was winning, since 87.+P5b B5g+ is very good for white.
Habu's next move must have been an unpleasant surprise.

87.K7h-8h!         6/455        0/434

"An early escape is worth eight moves". This looks desperate, but shogi is
sometimes a strange game.

88.P*6g            0/455        10/444
89.P*6i            2/457        0/444
90.P6g-6h+         0/457        0/444
91.P6ix6h          1/458        0/444
92.P*6g            0/458        0/444
93.+R6fx6g         3/461        0/444
94.P5f-5g+         0/461        1/445
95.+R6g-6a         2/463        0/445
96.+P5gx6h         0/463        1/446
97.+P5a-5b         2/465        0/446

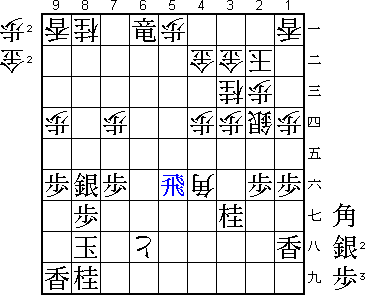
Morishita skillfully created a tokin, but now it is Habu's turn to attack.

98.P*5a            0/465        3/449
99.+P5bx4b         1/466        0/449
100.G4cx4b         0/466        0/449
101.R*5f!          0/466        0/449

Again the only move to keep the position together. This forces white to drop
a gold on 4a, a gold he would much rather have used in attack.

102.B4fx3g+        0/466        4/453
103.R5fx5a+        1/467        0/453
104.G*4a           0/467        0/453
105.+R5a-5g        0/467        0/453
106.N3c-4e?!       0/467        5/458

Better would have been 106.+B5i followed by +B6i. However, the position is
still difficult.

107.+R5gx6h        0/467        0/458
108.+B3g-5e        0/467        0/458
109.S8f-7g         3/470        0/458
110.N*8e           0/470        7/465
111.S7g-6f         3/473        0/465
112.+B5e-4f        0/473        4/469
113.+R6h-4h        0/473        0/469

114.+B4f-3g?       0/473        2/471

Here Morishita missed a good chance. After 114.+B5f P*5g the hidden move
N3g+! would still have given him the better chances after both +Rx3h G*7h
and Px5f +Nx4h.

115.+R4h-5h        0/473        0/471
116.P*6e           0/473        0/471

An alternative is 116.P*5g +R6g P*6e +Rx6e N7c +R6a, but white has no pawns
in hand and therefore can not continue the attack.

117.P*4c           0/473        0/471
118.G3bx4c         0/473        0/471
119.S*5b           3/476        0/471
120.P*5a           0/476        1/472
121.S5bx4a+        0/476        0/472
122.G4bx4a         0/476        0/472
123.S*5b           0/476        0/472
124.G4c-4b         0/476        1/473
125.S5bx5a+        0/476        0/473

126.+B3g-4f?       0/476        5/478

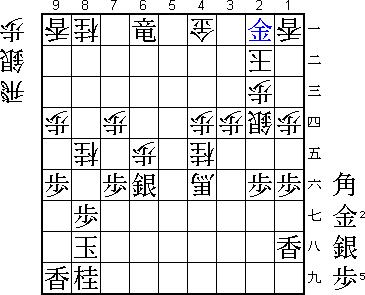
Here Morishita misses his final chance. Best was 126.G3a +S5b G4b-3b. Then
G*4b G*2a only leads to sennichite. Habu planned on playing +S4a Gx4a +Rx4a
G*3a +Rx8a Px6f N*4c, but after +B6d, which works both in attack and defense,
it seems white has the better chances. After the game, the players looked
at P*3c instead of N*4c, and it seemed that black indeed has the better
position after Sx3c N*2e. However, Morishita should have tried this, since
126.+B4f is not good enough, Habu is one move quicker to mate.

127.+S5ax4a        0/476        0/478
128.S*7i           0/476        0/478
129.K8h-9h         0/476        0/478
130.G*8h           0/476        1/479
131.+R5hx8h        0/476        0/479
132.S7ix8h+        0/476        0/479
133.K9hx8h         0/476        0/479
134.G4bx4a         0/476        0/479
135.G*2a           0/476        0/479
Resigns            0/476        0/479
Time:              07:56:00     07:59:00

After 136.K1b S*1c Sx1c Gx1a Kx1a G*2a Kx2a +Rx4a G*3a G*3b K1b G*1a white
is mated.

Another tough game and again Habu emerges as the winner. It is strange that
a position like the one after the 74th move is not good for white. Morishita
beaten by one of those exceptions to the general rules...
