48th Osho Match Game 2
Black: Morishita, Challenger
White: Habu, Osho
48th Osho-sen, Game 2, January 20th and 21st 1999
1.P7g-7f 0/0 0/0
2.P8c-8d 0/0 5/5
3.S7i-6h 4/4 0/5
4.P3c-3d 0/4 3/8
5.P6g-6f 2/6 0/8
6.S7a-6b 0/6 2/10
7.P5g-5f 1/7 0/10
8.P5c-5d 0/7 6/16
9.S3i-4h 2/9 0/16
10.S3a-4b 0/9 3/19
11.G4i-5h 3/12 0/19
12.G4a-3b 0/12 4/23
13.G6i-7h 3/15 0/23
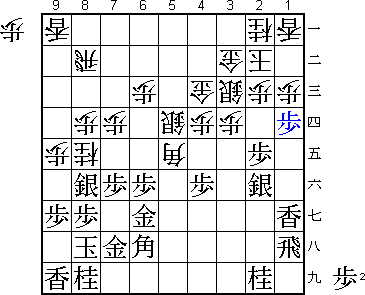
14.K5a-4a 0/15 2/25
A Yagura game. This is a small surprise. After losing the first game, most
commentators expected that Habu would play Furibisha or Yokofudori. Morishita
is a specialist in the Yagura, and it still seems that black has the biggest
chance to get a better position from this opening. Habu ignores these
considerations and plays the Yagura anyway, despite the fact that it is
crucial for him to win this game.
15.K5i-6i 1/16 0/25
16.G6a-5b 0/16 12/37
17.S6h-7g 9/25 0/37
18.S4b-3c 0/25 10/47
19.B8h-7i 1/26 0/47
20.B2b-3a 0/26 0/47
21.P3g-3f 2/28 0/47
22.P4c-4d 0/28 0/47
23.G5h-6g 20/48 0/47
24.P7c-7d 0/48 19/66
25.S4h-3g 11/59 0/66
26.B3a-6d 0/59 19/85
27.B7i-6h 7/66 0/85
28.G5b-4c 0/66 3/88
29.K6i-7i 0/66 0/88
30.K4a-3a 0/66 1/89
31.K7i-8h 3/69 0/89
32.P9c-9d 0/69 87/176
33.P2g-2f 34/103 0/176
34.K3a-2b 0/103 12/188
35.P1g-1f 8/111 0/188
36.S6b-5c 0/111 2/190
37.P1f-1e 17/128 0/190
38.P9d-9e 0/128 6/196
39.L1i-1g 39/167 0/196
40.B6d-7c 0/167 61/257
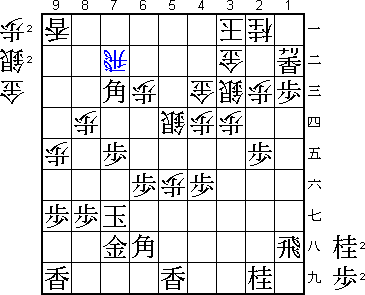
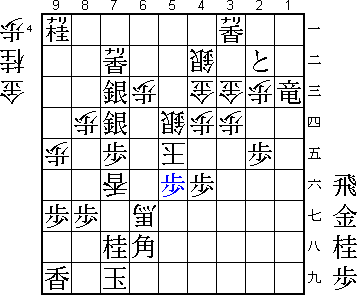
41.R2h-1h 27/194 0/257
The sealed move. Morishita had studied this position at home. It looks
like a perfectly normal Yagura position, but it is slightly different
from the normal way of playing. The difficulty of the Yagura is that
such miniscule differences can have important consequences. This game
is an illustration.
42.S3c-2d 0/194 7/264
43.P4g-4f 6/200 0/264
44.N8a-9c 0/200 21/285
45.S7g-8f 41/241 0/285
46.N9c-8e 0/241 1/286
47.P2f-2e 18/259 0/286
48.S2d-3c 0/259 14/300
No choice. After 48.Sx2e P7e black gets a pawn in hand that will be dropped
on 2f to capture the silver.
49.S3g-2f 0/259 0/300
This position looks very strong for black. Morishita's opening preparation
seems to have paid off.
50.P5d-5e 0/259 10/310
51.P5fx5e 2/261 0/310
52.B7cx5e 0/261 0/310
53.P3f-3e 27/288 0/310
54.P3dx3e 0/288 2/312
55.S2fx3e 0/288 0/312
56.P*3d 0/288 16/328
57.S3e-2f 0/288 0/328
58.S5c-5d 0/288 2/330
59.P1e-1d 54/342 0/330
Black is the side to start attacking first. Habu has not been able to show
that he has found something good for the white Yagura. Still, the game is
only just starting.
60.P1cx1d 0/342 0/330
61.P*1c 0/342 0/330
62.L1ax1c 0/342 6/336
63.P*1e 0/342 0/336
64.P1dx1e 0/342 0/336
65.S2fx1e 0/342 0/336
66.L1cx1e 0/342 15/351
67.L1gx1e 0/342 0/351
68.P*5f! 0/342 0/351
Habu starts to set up a counter attack.
69.L1e-1b+ 19/361 0/351
70.K2b-3a 0/361 2/353
71.L*5i 11/372 0/353
72.B5e-6d 0/372 21/374
73.P*1c 26/398 0/374
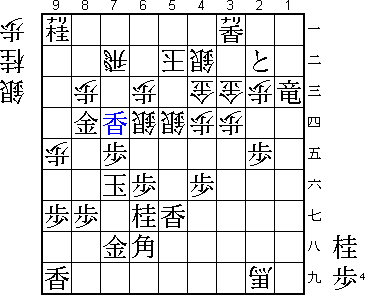
Black's position seems overwhelming with the break-through on the first file.
However, black can not use the knight on 2a anywhere, so it is not easy to
continue the attack. Morishita: "P1c was very painful, but the attack had
run out of steam...". It seems like both players have equal chances here.
74.P7d-7e?! 0/398 44/418
Starts the counter attack, but Morishita feared 74.P9f Px9f P*9g Lx9g P*9h
more. If then P*5e Sx5e P6e B7c the position is unclear, but it is hard
for black to find good moves. Habu: "That would indeed have been better".
75.S8fx7e 27/425 0/418
76.P*7g 0/425 6/424
77.N8ix7g 1/426 0/424
78.N8ex7g+ 0/426 0/424
79.G6gx7g 6/432 0/424
80.B6dx7e 0/432 10/434
81.P7fx7e 0/432 0/434
82.N*8e 0/432 0/434
83.B*7c 6/438 0/434
Morishita: "Isn't this entering with the bishop winning...?".
84.N8ex7g+ 0/438 7/441
85.K8hx7g 0/438 0/441
86.R8b-7b! 0/438 4/445
Morishita underestimated this move. He concluded that after 86.R8a B6b+
black would be much better. However, after R7b, white can drive the bishop
back, which results in a very complicated endgame position.

87.B7c-5a+         19/457       0/445
88.R7b-7a          0/457        9/454
89.P*5b            12/469       0/454
90.S3c-4b          0/469        6/460
91.+B5ax8d         1/470        0/460
92.P*7f            0/470        1/461
93.K7gx7f          1/471        0/461
94.G*7c            0/471        2/463
95.N*8c            2/473        0/463
96.R7a-7b          0/473        6/469
97.+B8dx7c         0/473        0/469
98.R7bx7c          0/473        0/469
99.G*8d!           0/473        0/469
100.R7c-7b         0/473        0/469
101.N8cx9a+        0/473        0/469
102.S*6d           0/473        3/472
103.N*6g!          0/473        0/472

The moves 99.G*8d and 103.N*6g use the pieces in hand to slow down white's
attack. With this, Morishita creates the time to activate his pieces on the
first and second file.

104.B*4g           0/473        3/475
105.+L1bx2a        1/474        0/475
106.K3a-4a         0/474        0/475
107.P1c-1b+        1/475        0/475
108.B4gx2i+        0/475        0/475
109.R1h-1c+        1/476        0/475
110.P5f-5g+        0/476        0/475
111.+P1b-2b        1/477        0/475
112.G3b-3c         0/477        0/475
113.L5ix5g         0/477        0/475
114.P*8c           0/477        0/475
115.+L2a-3a        1/478        0/475
116.K4ax5b         0/478        0/475
117.L*7d           0/478        0/475
118.S6d-6e 0/478 4/479
Morishita has shown his great defensive skills. Habu can not find a good
way to continue the attack and uses all of his remaining time on this
silver sacrifice. It is not good enough, but there is nothing else.
119.P6fx6e 0/478 0/479
120.+B2ix6e 0/478 0/479
121.K7f-8f 0/478 0/479
122.P8cx8d 0/478 0/479
123.L7dx7b+ 0/478 0/479
124.S*8e 0/478 0/479
125.K8f-7g 0/478 0/479
126.S8e-7f 0/478 0/479
127.K7g-8h 0/478 0/479
128.+B6e-6f 0/478 0/479
129.N*7g 1/479 0/479
130.S7fx7g= 0/479 0/479
131.B6hx7g 0/479 0/479
132.N*7f 0/479 0/479
133.K8h-9h 0/479 0/479
134.G*8h 0/479 0/479
This looks like mate, but it is not. If this is not mate, 134.+Bx7g seems
like a good alternative. However, after 135.P*5c Kx5c S*6b K6d S7c= K6e
S*7d K6f R*5f white is mated.
135.G7hx8h 0/479 0/479
136.N7fx8h+ 0/479 0/479
137.K9hx8h 0/479 0/479
138.N*7f 0/479 0/479
139.K8h-7i 0/479 0/479
140.+B6fx5g 0/479 0/479
141.P*6h 0/479 0/479
142.N7fx6h+ 0/479 0/479
143.B7gx6h 0/479 0/479
Also good seems 143.K8h. Then 144.+Nx6g N*6d K5c R*5b Kx6d S*5e K7e G*8f
K6e Sx5d K5f S*4e! K4g +R1g is one of the many difficult variations, but
black seems to be winning.
144.L*7f 0/479 0/479
145.N*7h 0/479 0/479
146.+B5gx6g 0/479 0/479
147.P*5c 0/479 0/479
148.K5bx5c 0/479 0/479
149.S*6b 0/479 0/479
150.K5c-6d 0/479 0/479
151.S6b-7c= 0/479 0/479
152.K6d-6e 0/479 0/479
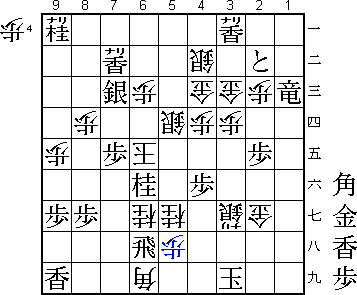
153.P*6f? 0/479 0/479
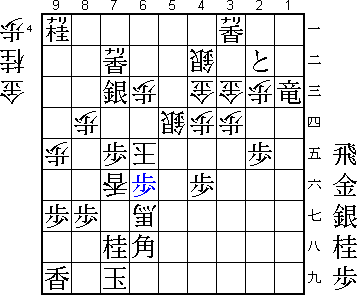
It is Morishita who makes the decisive mistake. If 153.S*7d K5e P*5f (diagram)
then he would have won: 1) +Bx5f N*4g! +Bx4g G*6f is mate, and 2) Kx5f P*5g
Kx4f +R1f N*3f R*4h is winning. Black needs exactly two pawns to pull this
off, so the pawn drop on 6f is the decisive mistake.
154.+B6gx6f        0/479        0/479
155.N*7g           0/479        0/479
156.L7fx7g+        0/479        0/479
157.B6hx7g         0/479        0/479
158.N*6g           0/479        0/479
159.K7i-6i         0/479        0/479
160.+B6fx7g        0/479        0/479
161.S*6f           0/479        0/479
162.+B7gx6f        0/479        0/479
163.N7hx6f         0/479        0/479
164.N*5g           0/479        0/479
165.K6i-5h         0/479        0/479
166.B*6i           0/479        0/479
167.K5h-4h         0/479        0/479
168.S*4g           0/479        0/479
169.K4h-3g         0/479        0/479
170.S4g-3f+        0/479        0/479
171.K3g-2h         0/479        0/479
172.G*2g           0/479        0/479
173.K2h-3i         0/479        0/479
174.+S3f-3g        0/479        0/479
175.R*6h           0/479        0/479
176.P*5h           0/479        0/479
Resigns            0/479        0/479
Time:              07:59:00     07:59:00
A great game where both players had to play 47 byoyomi moves in a very
complicated endgame. In the final position there are only five pieces
that have not moved: the pawns on 2c, 6c, 8g and 9g and the lance on
9i. Habu wins these gruelling games too often to call this a lucky win.
Will Morishita be able to recover from this missed opportunity and
take back the lead in game 3?