48th Osho Match Game 1
Black: Habu, 4K
White: Morishita, Challenger
48th Osho-sen, Game 1, January 11th and 12th 1999
1.P2g-2f           0/0          0/0

The first title match game of the new year. Morishita is making
another attempt at winning his first title, after failing in the
Ryu-O, Meijin, Kisei and Kio (twice). Being a challenger in five
different title matches is remarkable, proving that Morishita is
strong all through the year and in all kinds of tournament systems.
Morshita, at age 32, is also trying to become the only titleholder
in his 30s. Will he be able to finally beat Habu, against whom he
has an abysmal 7-25 record?

2.P8c-8d           0/0          5/5
3.P2f-2e           3/3          0/5
4.P8d-8e           0/3          0/5
5.G6i-7h           1/4          0/5
6.G4a-3b           0/4          0/5
7.P2e-2d           3/7          0/5
8.P2cx2d           0/7          0/5
9.R2hx2d           0/7          0/5
10.P*2c            0/7          0/5
11.R2d-2f          0/7          0/5
12.S7a-7b          0/7          6/11
13.K5i-5h          11/18        0/11
14.P1c-1d          0/18         17/28
15.P7g-7f          39/57        0/28
16.P6c-6d          0/57         26/54
17.P3g-3f          47/104       0/54
18.P3c-3d          0/104        54/108
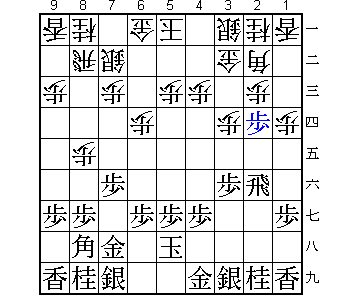
19.P*2d            32/136       0/108

This is an interesting idea, perhaps inspired by the Tsukada system,
which in its primitive form has almost disappeared from the professional
scene. There are only two previous game examples with this move, with
black and white each winning one game.

20.P2cx2d          0/136        59/167

The other two games both continued with 20.Bx8h+ Sx8h B*1e R2h Bx2d. It
is then a question whether the win of the pawn outweighs the disadvantage
of having dropped the bishop. Morishita played Px2d: "I thought that
dropping the bishop was uninteresting".

21.R2fx2d          1/137        0/167
22.S7b-6c          0/137        0/167
23.R2dx3d          54/191       0/167
24.B2b-3c!         0/191        7/174

Good move, not allowing the black rook to return to the second file.

25.R3d-3e          34/225       0/174
26.S6c-5d?!        0/225        5/179

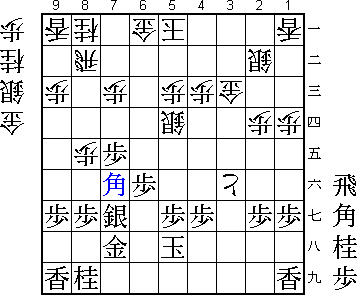
Habu feared 26.Bx8h+ Sx8h N3c, which leaves the black rook in danger
of being captured. This seems to better than 26.S5d.

27.R3e-2e          14/239       0/179
28.S3a-2b          0/239        42/221
29.S3i-3h          14/253       0/221
30.P6d-6e          0/253        9/230
31.N2i-3g          26/279       0/230
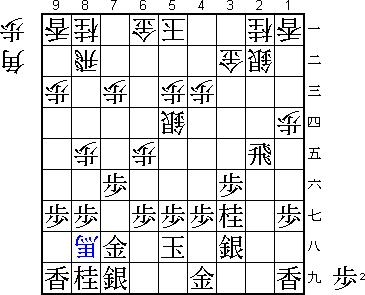
32.B3cx8h+         0/279        21/251

33.S7ix8h??        0/279        0/251

A terrible blunder. Habu completely overlooked the next move, which is
amazing for a player of his caliber. Perhaps 31.N3g is the real mistake,
but if Habu had realized here what would come next, he might still have
had a chance to repair things. After 33.Gx8h P6f Px6f there is no problem
for black. Also, 33.Gx8h P8f Px8f Rx8f B*6d is good for black. So, after
33.Gx8h instead of the natural Sx8h that Habu played without thinking,
the position would still have been very complicated.

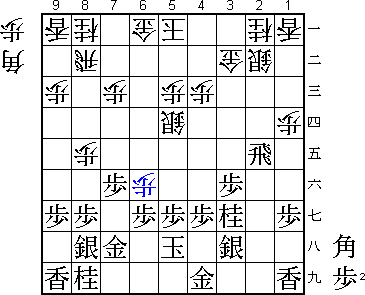
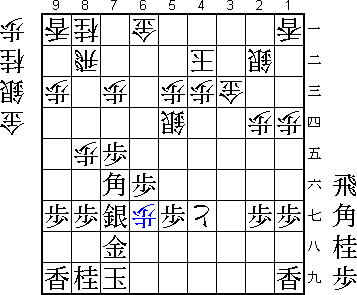
34.P6e-6f          0/279        1/252

So simple that it does not even deserve an exclamation mark.

35.P6gx6f          47/326       0/252

Habu only now realised the disaster. He can not allow Px6g+, since this will
completely ruin his position and chances of winning the game. Painful as it
is, he has to give up the rook.

36.B*3d            0/326        8/260
37.B*6g            3/329        0/260
38.B3dx2e          0/329        13/273
39.N3gx2e          0/329        0/273
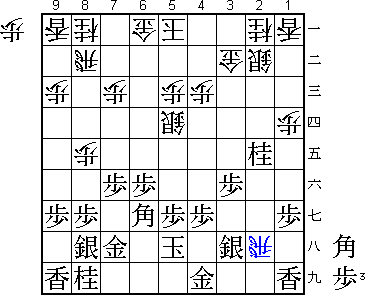
40.R*2h!           0/329        70/343

Well calculated. 40.P*2d B*3e is far from clear. Morishita gives up the
rook for two generals and a promoted pawn. An overwhelming material advantage,
but it was necessary to calculate deeply that Habu has no nasty counter
with the rook.

41.P*2g            14/343       0/343
42.P*3g!           0/343        0/343
43.G4i-3i          0/343        0/343
44.R2hx3h+         0/343        0/343
45.G3ix3h          0/343        0/343
46.P3gx3h+         0/343        0/343
47.S8h-7g          0/343        0/343
48.+P3h-3g         0/343        7/350
49.P7f-7e          22/365       0/350

Aiming at P7d Px7d B*6d.

50.+P3gx3f!        0/365        11/361

Great move by Morishita. He now gets a vital pawn in hand and at the same
time defends against Habu's plan. After 51.Px7d Px7d B*6d G*7c Bx5c+ G6c
black loses the bishop.

51.P*3d            12/377       0/361
52.P*2d            0/377        13/374
53.P3d-3c+         0/377        0/374
54.N2ax3c          0/377        1/375
55.N2ex3c+         0/377        0/375
56.G3bx3c          0/377        0/375
57.B6g-7f          0/377        0/375

Desperate. 57.Bx5d Px5d N*5c is the threat.

58.K5a-4b          0/377        2/377

This ends all black's attacking hopes. Morishita: "Here I realised I would
win".

59.K5h-6h          15/392       0/377
60.+P3fx4g         0/392        24/401
61.K6h-7i          0/392        0/401
62.P*6g            0/392        11/412
Resigns            25/417       0/412
Time:              06:57:00     06:52:00

Habu took 25 minutes before resigning. The variations 1) 63.N*4e Sx4e B*6c
S5d R*4a K3b B7fx5d Px5d Rx6a+ K2c, 2) 63.Bx5d Px5d N*4e S*4d, and
3) 63.P*3d Gx3d Bx6g P*3c followed by +Px5g, clearly show that white is
much better, but he could have tried to play on for a while. Maybe he
was too disgusted with himself about his early blunder to find the right
mental attitide to continue fighting from a lost position.

A dream start for challenger Morishita, being handed an easy win with white
to start this title match. Will this be the confidence booster he needs to
finally win a title?
