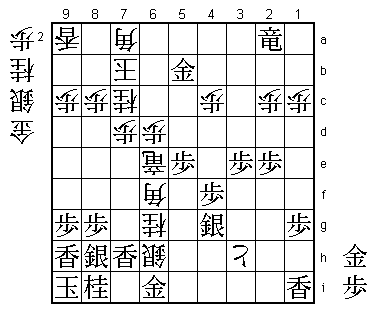
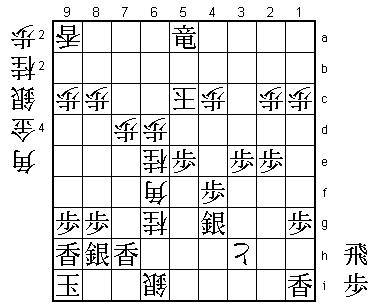
48th Oi Match Game 7
[Black "Fukaura Koichi, Challenger"]
[White "Habu Yoshiharu, Oi"]
[Event "48th Oi-sen, Game 7"]
[Date "September 25th and 26th 2007"]
1.P7g-7f     00:01:00  00:00:00

The furigoma gives Fukuara the black pieces in what is probably the
biggest game of his career.

2.P3c-3d     00:01:00  00:04:00
3.P2g-2f     00:04:00  00:04:00
4.P5c-5d     00:04:00  00:07:00
5.K5i-6h     00:24:00  00:07:00
6.P5d-5e     00:24:00  00:24:00
7.S3i-4h     00:24:00  00:24:00
8.R8b-5b     00:24:00  00:29:00

Central rook like in game 5.

9.K6h-7h     00:24:00  00:29:00
10.K5a-6b    00:24:00  00:32:00
11.P4g-4f    00:25:00  00:32:00
12.K6b-7b    00:25:00  01:14:00
13.S4h-4g    00:25:00  01:14:00
14.K7b-8b    00:25:00  01:21:00
15.G4i-5h    00:28:00  01:21:00
16.S7a-7b    00:28:00  01:23:00
17.S7i-6h    00:29:00  01:23:00
18.G4a-3b    00:29:00  01:25:00

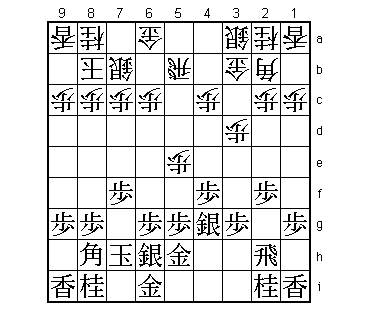
The normal way to play here would be 18.S4b, but because the bishop is
undefended, black can attack the vanguard pawn with 19.P5f. Also, 18.B3c
is not possible because of 19.S3f followed by S4e to attack the head of
the bishop. 18.G3b therefore makes perfect sense, but Fukaura has an
interesting reply.

19.B8h-7g!?  01:06:00  01:25:00

This aims at the anaguma position. Very hard to think of this when the
silver is on 6h, because this silver now has to move back to 8h. Therefore,
instead of moving from 7i to 8h immediately, the silver manoeuvre 7i-6h-7i-8h
will cost two extra moves. The point here is that against the anaguma, the gold
on 3b is pointless. This gold therefore also has to move back into the mino
castles, after which G4a-3b-4b-5b also takes two extra moves and we are all
even again.

20.S3a-4b    01:06:00  01:42:00
21.K7h-8h    01:11:00  01:42:00
22.R5b-5d    01:11:00  01:53:00
23.P6g-6f    01:17:00  01:53:00
24.P3d-3e    01:17:00  01:53:00
25.L9i-9h    01:46:00  01:53:00
26.R5d-3d    01:46:00  02:00:00
27.K8h-9i    01:47:00  02:00:00
28.S4b-5c    01:47:00  02:25:00
29.S6h-7i    01:55:00  02:25:00
30.G3b-4b    01:55:00  02:35:00
31.S7i-8h    01:57:00  02:35:00
32.P6c-6d    01:57:00  02:40:00
33.P2f-2e    02:41:00  02:40:00
34.S5c-5d    02:41:00  02:54:00
35.B7g-8f    02:44:00  02:54:00
36.G4b-5c    02:44:00  02:59:00
37.R2h-3h    02:44:00  02:59:00
38.G5c-6c    02:44:00  03:08:00
39.P3g-3f    02:52:00  03:08:00
40.P3ex3f    02:52:00  03:12:00
41.S4gx3f    02:52:00  03:12:00
42.P5e-5f    02:52:00  03:43:00
43.P5gx5f    03:06:00  03:43:00
44.B2bx6f    03:06:00  03:52:00
45.P*3e      03:15:00  03:52:00

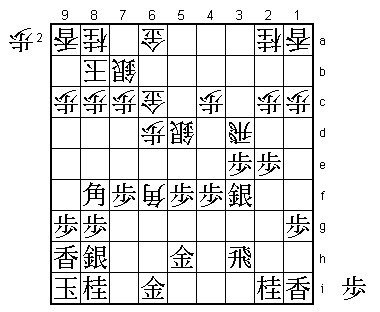
46.R3d-4d!   03:15:00  04:23:00

The sealed move and a very important one. Normal would be to move the rook back
to 3b, but this would make the white position very passive and there is a
considerable risk that black just pushes white off the board. On the other hand,
46.R4d needs accurate calculation, because the rook is in a tight spot here and
in danger of being captured. Still, Habu's judgment is correct here and it seems
that white has the upper hand here.

47.S3f-4g    03:17:00  04:23:00
48.S5d-6e    03:17:00  04:24:00
49.G5h-6g    03:19:00  04:24:00
50.P*3g      03:19:00  04:25:00
51.N2ix3g    03:50:00  04:25:00
52.P*3f      03:50:00  04:25:00
53.N3g-4e    03:50:00  04:25:00
54.P3f-3g+   03:50:00  04:26:00
55.G6gx6f    03:50:00  04:26:00
56.+P3gx3h   03:50:00  04:27:00
57.G6fx6e    03:50:00  04:27:00
58.R*6g      03:50:00  04:28:00
59.G6i-7i    04:11:00  04:28:00
60.R6gx6e+   04:11:00  04:28:00
61.B*4a      04:11:00  04:28:00
62.G*6b      04:11:00  05:01:00
63.B4ax6c+   04:30:00  05:01:00
64.G6bx6c    04:30:00  05:03:00
65.G*5c      04:30:00  05:03:00
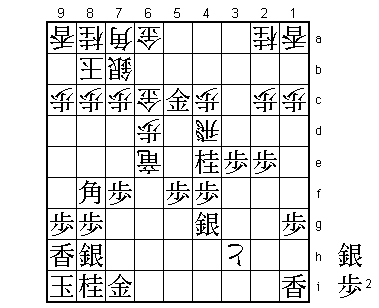
66.B*7a!     04:30:00  05:03:00

Another strong move by Habu. The position is complicated with the strong knight
on 4e and because white has no pawns in hand. However, the rooks are making it
hard for black to make any progress and the silver on 4g is not doing anything.
Black has to move forward, or the tokin on 3h will move towards the anaguma with
tempo by +P4h. In the press room the opinion was that 66.B*7a killed black's
attack and that white had a strong position.

67.S*4b!     05:22:00  05:03:00

Fukaura finds a way to keep his attack going. This threatens Gx6c Sx6c N5c+, so
it seems white has to defend.

68.G6c-6b?!  05:22:00  05:31:00

Habu also thought so, but after the game it became clear that 68.+Rx7f is a strong
alternative. For example, after 69.Gx6c Sx6c Nx5c+ the move G*5b! is good for white.
Habu had seen this, but he was afraid that after +Nx5b Gx5b and then G*7g or P*7g
the promoted rook would be lost. The post-mortem analysis showed that black cannot
get this promoted rook, so Habu had to admit that +Rx7f was a strong alternative.

69.B8f-7g    05:34:00  05:31:00

Brave decision. Sennichite is possible here after 69.Gx6b Gx6b G*5c G*6a, but
Fukaura decides to put all his eggs in one basket. Giving up the black pieces
in case of a replay may have been another reason for his decision.

70.+R6ex7f   05:34:00  05:32:00
71.G5cx6b    06:36:00  05:32:00
72.G6ax6b    06:36:00  05:32:00
73.N4e-5c+   06:36:00  05:32:00
74.G6bx5c    06:36:00  05:32:00
75.S4bx5c+   06:36:00  05:32:00
76.B7ax5c    06:36:00  05:32:00
77.G*5b      06:36:00  05:32:00
78.B5c-7a    06:36:00  05:32:00
79.G*6b      06:45:00  05:32:00
80.R4d-5d    06:45:00  05:33:00
81.G6bx7b    06:48:00  05:33:00
82.K8bx7b    06:48:00  05:33:00
83.S*6a      06:48:00  05:33:00
84.K7b-6c    06:48:00  06:48:00
85.B7gx1a+   06:48:00  06:48:00
86.N*6g      06:48:00  06:49:00
87.L*7h      07:02:00  06:49:00

88.+R7f-6e?  07:02:00  07:01:00

Here Habu misses his first chance to win this game. As Kato Hifumi pointed out,
white could have played 88.Nx7i+ here. For example, 89.Lx7f +Nx8i Kx8i G*6g is
good for white, or 89.Sx7i (the move Habu was worried about) +Rx7h Sx7h P*3c!
(the move Habu overlooked). This shuts out the bishop from the defence and the
mating threat S*7i next is strong. Even after P*7i, white can play S*6h followed
by Sx7i=.

89.G7i-6i    07:05:00  07:01:00
90.G*3a      07:05:00  07:10:00
91.+B1ax2a   07:11:00  07:10:00
92.G3ax2a    07:11:00  07:11:00
93.N*5e      07:11:00  07:11:00
94.R5dx5e    07:11:00  07:14:00
95.P5fx5e    07:11:00  07:14:00
96.B*6f      07:11:00  07:38:00
97.R*5a      07:26:00  07:38:00
98.P7c-7d    07:26:00  07:39:00
99.S6a-7b=   07:42:00  07:39:00
100.K6cx7b   07:42:00  07:39:00
101.P*7c     07:42:00  07:39:00
102.N8ax7c   07:42:00  07:41:00
103.R5ax2a+  07:42:00  07:41:00
104.S*6h     07:42:00  07:44:00

It seems white is winning here, because this is a mating threat (Bx8h+ etc.) and
it seems very hard to defend against this.

105.N8i-7g   08:01:00  07:44:00

Fukaura spends 19 of his final 21 minutes to make one last desperate attempt.
This is a mating threat...

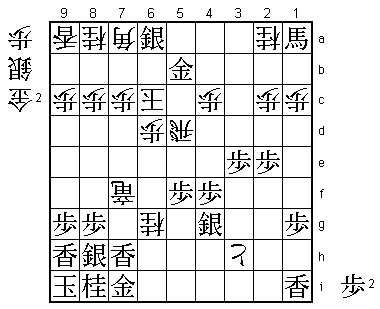
106.S6hx6i=?? 08:01:00  07:51:00

Which Habu overlooks! An unbelievable blunder by the endgame magician himself
at the worst possible time, with his Oi title on the line. Habu could have won
the game and the match here with 106.N*7f which is a mating threat that also
defends against mate. For example, 107.G*6c Kx6c +R6a G*6b Gx6b Bx6b G*5c Kx5c
Nx6e Px6e R*5d K6c and black only has mate with a pawn drop.

107.G*6b     08:01:00  07:51:00
108.B7ax6b   08:01:00  07:51:00
109.G5bx6b   08:01:00  07:51:00
110.K7bx6b   08:01:00  07:52:00
111.B*5c     08:01:00  07:52:00

Here Habu realised that he was being mated.

112.K6bx5c   08:01:00  07:59:00
113.N7gx6e   08:01:00  07:59:00
114.N7cx6e   08:01:00  07:59:00
115.+R2a-5a  08:01:00  07:59:00
Resigns      08:01:00  07:59:00

Mate after 116.K4d R*3d or 116.P*5b R*5d K6c +Rx5b K7c +R7a or 116.K6c R*5c etc.
A dramatic game where Habu seemed to succeed in coming back from 3-1 down to
defend his Oi title just to see everything slip through his fingers at the final
moment. Still, one must admire the new Oi title holder Fukaura, who never stopped
believing in a miracle and made it happen by fighting back until the end.
