48th Oi Match Game 3
[Black "Habu Yoshiharu, Oi"]
[White "Fukaura Koichi, Challenger"]
[Event "48th Oi-sen, Game 3"]
[Date "July 31st and August 1st 2007"]
1.P7g-7f     00:01:00  00:00:00
2.P8c-8d     00:01:00  00:01:00
3.S7i-6h     00:05:00  00:01:00
4.P3c-3d     00:05:00  00:02:00
5.S6h-7g     00:06:00  00:02:00
6.S7a-6b     00:06:00  00:02:00
7.P5g-5f     00:08:00  00:02:00
8.P5c-5d     00:08:00  00:02:00
9.S3i-4h     00:10:00  00:02:00
10.S3a-4b    00:10:00  00:02:00
11.G6i-7h    00:12:00  00:02:00
12.G4a-3b    00:12:00  00:02:00
13.K5i-6i    00:13:00  00:02:00
14.K5a-4a    00:13:00  00:03:00
15.G4i-5h    00:18:00  00:03:00
16.G6a-5b    00:18:00  00:03:00
17.P6g-6f    00:21:00  00:03:00
18.P4c-4d    00:21:00  00:05:00
19.B8h-7i    00:25:00  00:05:00
20.S4b-3c    00:25:00  00:05:00
21.P3g-3f    00:27:00  00:05:00
22.B2b-3a    00:27:00  00:05:00
23.S4h-3g    00:30:00  00:05:00
24.B3a-6d    00:30:00  00:19:00
25.G5h-6g    00:57:00  00:19:00
26.G5b-4c    00:57:00  00:23:00
27.B7i-6h    01:21:00  00:23:00
28.K4a-3a    01:21:00  00:24:00
29.K6i-7i    01:23:00  00:24:00
30.K3a-2b    01:23:00  00:25:00
31.K7i-8h    01:23:00  00:25:00
32.P7c-7d    01:23:00  00:25:00
33.S3g-4f    01:24:00  00:25:00
34.S6b-5c    01:24:00  00:36:00
35.N2i-3g    01:25:00  00:36:00
36.S3c-2d    01:25:00  00:39:00
37.P2g-2f    01:26:00  00:39:00
38.P1c-1d    01:26:00  00:39:00
39.P1g-1f    01:26:00  00:39:00
40.P8d-8e    01:26:00  01:01:00
41.L1i-1h    01:30:00  01:01:00
42.P9c-9d    01:30:00  01:08:00
43.R2h-3h    01:38:00  01:08:00
44.B6d-7c    01:38:00  01:12:00
45.P9g-9f    02:11:00  01:12:00
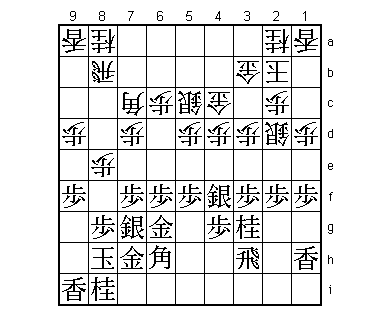
A long theoretical battle in the Yagura opening to start this game.
In recent years, changing the Yagura into an Anaguma with 45.L9h has
been the normal way of playing this position. 45.P9f is the old way of
playing, for example appearing in the Ryu-O match that Habu played against
Shima when he won his first title as a 19-year old. A few years ago, 45.P9f
disappeared completely, but this year it was played in two games again.
The reason 45.P9f is not trusted is that it allows white to get a pawn in
hand after P9e Px9e Lx9e P*9g, and black has to be very careful not to hand
over the initiative after that.
46.P9d-9e 02:11:00 02:11:00
47.P9fx9e 02:15:00 02:11:00
48.L9ax9e 02:15:00 02:11:00
49.P*9g 02:16:00 02:11:00
50.S5c-4b 02:16:00 02:59:00
51.P2f-2e 02:26:00 02:59:00
52.S2d-1c 02:26:00 03:14:00
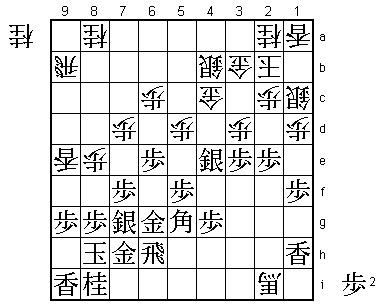
53.P6f-6e 02:27:00 03:14:00
This is the new way of playing this position that appeared in the two games
played this year. In both games, opening the square 6f was used to play the
silver there, building a stronghold there. However, in this game Habu shows
that there is another way to use the square 6f.
54.P4d-4e 02:27:00 03:41:00
55.N3gx4e 02:46:00 03:41:00
56.P*4d 02:46:00 03:41:00
Fukaura uses the pawn to win material. White has to act quickly, because the
lance on 9e is a liability that will become a target of attack if the game
slows down.
57.P3f-3e 02:46:00 03:41:00
58.P4dx4e 02:46:00 04:11:00
59.S4fx4e 02:53:00 04:11:00
60.B7c-1i+ 02:53:00 04:12:00
61.B6h-4f 03:15:00 04:12:00
62.+B1i-2i 03:15:00 04:13:00

No choice. 62.+Bx4f Px4f looks like the obvious continuation, but black strongly
threatens B*6f next and white has no good way to defend the long diagonal to the king.
63.R3h-6h! 04:21:00 04:13:00
Not good is 63.Bx8b+ +Bx3h +Bx8a +B4i N*4d G3a N5b+ R*3h S6h N*8d and white's
attack is stronger. However, in the press room everyone expected 63.R4h to defend
against +Bx4g. Habu has a much more positive plan.
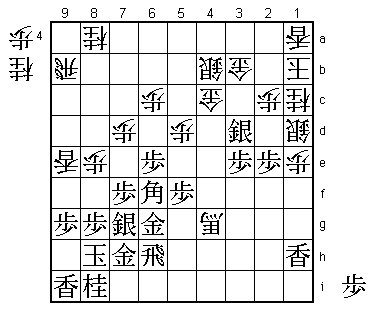
64.R8b-9b 04:21:00 04:16:00
Now there seems to be no defense against +Bx4g.
65.B4f-5g! 04:21:00 04:16:00
The point of Habu's opening strategy, starting with P9f and followed by P6e. It is
not the silver that will go to 6f, but the bishop!

66.+B2ix4g?  04:21:00  05:10:00

After the game, Fukaura said that he regretted this move. He had counted on 67.P*4d
G5c, after which the white position looks awkward, but black needs another pawn to break
it down. This is based on a miscalculation as we will see next. Better was 66.Px3e,
which removes the pressure on the third rank. Then after 67.B6f K1b P1e Px1e P9f P6d
the position is still very difficult.

67.B5g-6f    04:49:00  05:10:00
68.K2b-1b    04:49:00  05:12:00
69.P1f-1e    05:14:00  05:12:00

Simple but effective. Habu doesn't waste a pawn to put the gold out of position, but
uses it for the edge attack.

70.P1dx1e    05:14:00  05:12:00
71.P*1d      05:32:00  05:12:00
72.S1cx1d    05:32:00  05:17:00
73.P*1c      05:32:00  05:17:00
74.N2ax1c    05:32:00  05:17:00
75.S4ex3d    05:32:00  05:17:00
Interesting difference of opinion between the two players here. Fukaura thought he
was in big trouble here, but Habu thought it was strange to move the silver out here
and wasn't really confident his position was good.

76.P6c-6d    05:32:00  05:52:00

Fukaura could have defended here with 76.P*4d, which was probably better. Still,
this would have required a complete change of his mindset in this position. After all,
when he played 66.+Bx4g, he basically asked Habu to drop a pawn on 4d.

77.S3dx4c+   05:46:00  05:52:00
78.S4bx4c    05:46:00  05:52:00
79.P*4d      05:46:00  05:52:00
80.S4c-5b    05:46:00  05:57:00
81.P3e-3d    05:49:00  05:57:00
82.N*2a      05:49:00  06:05:00
83.P6ex6d    06:33:00  06:05:00
84.P*6e      06:33:00  06:14:00
85.B6f-8d    06:40:00  06:14:00
86.S*5i      06:40:00  06:15:00
87.R6h-2h    06:43:00  06:15:00
88.N1cx2e    06:43:00  06:16:00
89.G6g-5g!   07:11:00  06:16:00
This is where 66.+Bx4g is coming back to haunt Fukaura. He was planning on fighting
back by going after the rook if 89.B5a+ N3g+, but by attacking the promoted bishop,
Habu gives the rook an escape route: 90.+B6i B5a+ N3g+ R2i and black can take the
silver or the bishop whenever he needs an extra piece in attack.

90.+B4g-6i   07:11:00  06:21:00

No choice. A second problem of having to move the promoted bishop here is that
under some circumstances, black can drop a gold on 7i (or move the gold from 7h
to 7i), securing the defense. White has to rush his attack to avoid this, but this
desperate attempt is easily countered.

91.B8d-5a+   07:14:00  06:21:00
92.P8e-8f    07:14:00  06:28:00
93.L1hx1e    07:26:00  06:28:00
94.S1dx1e    07:26:00  06:49:00
95.+B5ax1e   07:26:00  06:49:00
96.P8fx8g+   07:26:00  06:49:00
97.K8hx8g    07:27:00  06:49:00
98.P*8e      07:27:00  07:04:00
99.K8g-8h    07:30:00  07:04:00
100.P8e-8f   07:30:00  07:19:00
101.S7gx8f   07:31:00  07:19:00
102.P*8g     07:31:00  07:20:00
103.K8hx8g   07:32:00  07:20:00
104.P*8e     07:32:00  07:20:00
105.S8fx8e   07:33:00  07:20:00
106.P*8d     07:33:00  07:23:00
107.S8ex7d   07:36:00  07:23:00
108.R9b-7b   07:36:00  07:25:00
109.P*1c     07:44:00  07:25:00
110.K1b-2b   07:44:00  07:26:00
111.S*3c     07:45:00  07:26:00
112.N2ax3c   07:45:00  07:27:00
113.P3dx3c+  07:45:00  07:27:00
114.G3bx3c   07:45:00  07:27:00
115.N*1d     07:45:00  07:27:00
116.K2b-3b   07:45:00  07:32:00
117.P*3d     07:45:00  07:32:00

Basically a hisshi. 118.Gx3d G*4b K2a +Bx5i wins easily for black. It would have
made for an interesting finish of this game, with the black bishop maneuver
4f-5g-8d-5a-1e-5i deciding the game, but it would also mean that Fukaura would
be forced to resign in a position that looked devastating.

118.L*8e     07:45:00  07:34:00
119.P*8f     07:46:00  07:34:00
120.L8ex8f   07:46:00  07:34:00
121.K8gx8f   07:46:00  07:34:00
122.S*8e     07:46:00  07:34:00
123.K8f-8g   07:47:00  07:34:00
Resigns      07:47:00  07:34:00

This position looks much better for white, but there is no mate against the black
king and black simply threatens Px3c+ and there is no defense. For example 124.Gx3d
G*4b K2a L*2b is simple mate. After a bad start in this Oi match, Habu pulls one
back. However, he is still 1-2 behind and Fukaura has the black pieces in the next
game. Therefore, no smile from Habu, even during the post-mortem analysis. He clearly
felt that this Oi match was going to be a long battle.