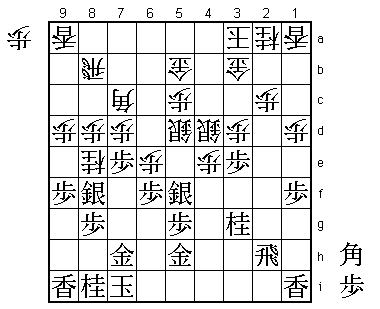
48th Oi Match Game 2
[Black "Fukaura Koichi, Challenger"]
[White "Habu Yoshiharu, Oi"]
[Event "48th Oi-sen, Game 2"]
[Date "July 24th and 25th 2007"]
1.P7g-7f     00:01:00  00:00:00
2.P3c-3d     00:01:00  00:01:00
3.P2g-2f     00:04:00  00:01:00
4.G4a-3b     00:04:00  00:03:00
5.G6i-7h     00:16:00  00:03:00
6.P8c-8d     00:16:00  00:10:00
7.P2f-2e     00:18:00  00:10:00
8.B2bx8h+    00:18:00  00:11:00
9.S7ix8h     00:18:00  00:11:00
10.S3a-2b    00:18:00  00:12:00
11.S3i-3h    00:34:00  00:12:00
12.S2b-3c    00:34:00  00:18:00
13.S8h-7g    00:35:00  00:18:00
14.S7a-6b    00:35:00  00:28:00
15.P4g-4f    00:36:00  00:28:00
16.P6c-6d    00:36:00  00:40:00
17.S3h-4g    00:36:00  00:40:00
18.S6b-6c    00:36:00  00:41:00
19.K5i-6h    00:36:00  00:41:00
20.K5a-4b    00:36:00  00:53:00
21.P9g-9f    01:00:00  00:53:00
22.P9c-9d    01:00:00  00:59:00
23.G4i-5h    01:00:00  00:59:00
24.G6a-5b    01:00:00  01:02:00
25.P3g-3f    01:11:00  01:02:00
26.P7c-7d    01:11:00  01:15:00
27.P6g-6f    01:17:00  01:15:00
28.P1c-1d    01:17:00  01:22:00
29.P1g-1f    01:17:00  01:22:00
30.S6c-5d    01:17:00  01:26:00
31.S4g-5f    01:17:00  01:26:00
32.K4b-3a    01:17:00  01:28:00
33.K6h-7i    01:19:00  01:28:00
34.N8a-7c    01:19:00  01:36:00
35.N2i-3g    01:21:00  01:36:00
36.P4c-4d    01:21:00  01:36:00
37.P4f-4e    02:54:00  01:36:00
38.P4dx4e    02:54:00  02:01:00
39.P3f-3e    02:54:00  02:01:00
40.S3c-4d    02:54:00  02:02:00
41.P2e-2d    03:01:00  02:02:00
42.P2cx2d    03:01:00  02:11:00
43.R2hx2d    03:01:00  02:11:00
44.P*2c      03:01:00  02:12:00
45.R2d-2h    03:01:00  02:12:00
46.N7c-8e    03:01:00  02:53:00
47.S7g-8f    03:47:00  02:53:00
48.B*7c      03:47:00  03:03:00
49.P7f-7e    03:48:00  03:03:00
50.P6d-6e    03:48:00  03:12:00
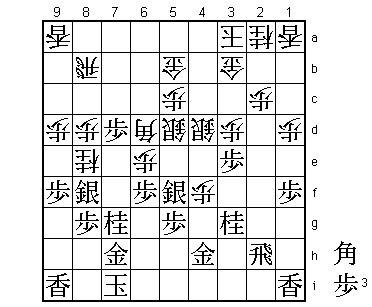
A Kakugawari with tempo loss opening, and this particular variation has
been studied for quite some time. This position was first played in August
2003 in the challenger tournament of the Ryu-O between Tanigawa and Yamasaki.
In that game it followed 51.G4h and after 52.Px6f Px7d B4f G4g P*7g Sx7g Nx7g+
Gx7g S*3f! Gx3f Bx5g+ white had the better position even though Tanigawa
managed to turn the tables and win.
51.G5h-4g!? 04:02:00 03:12:00
A new move by Fukaura, but it is unclear how good it is. The reasoning behind
this move is simple: defending the knight on 3g and at the same time defend
against B4f in the variation given above so that S*3f is not possible anymore.
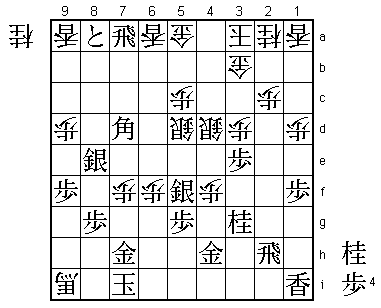
52.P4e-4f 04:02:00 03:29:00
This is the disadvantage of 51.G4g: white can push up this pawn while attacking
the gold. Still, this is not only good for white, because the pawn on 4f also
blocks the bishop on 7c.
53.P7ex7d 04:20:00 03:29:00
54.B7c-6d 04:20:00 03:44:00
55.G4g-4h 04:20:00 03:44:00
56.P*7g 04:20:00 03:45:00
57.N8ix7g 05:18:00 03:45:00
58.P6ex6f? 05:18:00 04:45:00
Probably a mistake. After the game Fukaura said he was worried about 58.Nx7g+
59.Sx7g 60.N*3f. This simple fork was of course also seen by Habu, but Habu
didn't like 61.Px6e next, so he decided against the knight fork. However, after
Px6e he may have given the move 62.B7e too little thought. For example, 63.P7c+
Nx4h+ +Px8b Bx5g+ N*6h P4g+ and even though black is ahead on material, the white
attack looks pretty dangerous. It was probably Habu's best chance in this game.
As it was, Habu said after the game that there was not a single position in this
game where he thought he was better.
59.B*7c 05:38:00 04:45:00
60.B6dx7c 05:38:00 04:46:00
61.P7dx7c+ 05:38:00 04:46:00
62.R8b-8a 05:38:00 04:46:00
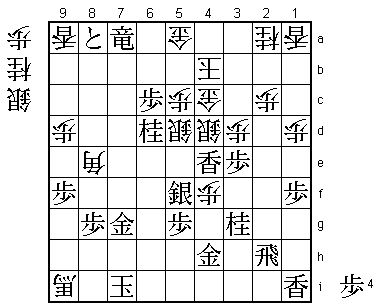
63.B*7d! 05:44:00 04:46:00
This is a strong bishop drop that gives black the advantage.
64.G5b-5a 05:44:00 05:08:00
Trying to make it as hard as possible. For example, 64.G5b-4c +P7b R5a P*6c and
white has no defense against the tokin attack.
65.+P7c-7b 06:08:00 05:08:00
66.P*7f 06:08:00 05:09:00
67.N7gx8e 06:24:00 05:09:00
68.P8dx8e 06:24:00 05:09:00
69.S8fx8e 06:24:00 05:09:00
70.B*7g 06:24:00 05:48:00
71.+P7bx8a 07:07:00 05:48:00
72.B7gx9i+ 07:07:00 05:48:00
73.R*7a 07:07:00 05:48:00
74.L*6a 07:07:00 05:48:00
75.B7d-5b+!  07:09:00  05:48:00

Strong move. Black has to be very careful here, because his position has many
weaknesses. Because of this, Fukaura thought that he had no choice but to attack,
because any hesitation could be fatal.

76.G5ax5b    07:09:00  06:05:00
77.R7ax6a+   07:09:00  06:05:00
78.K3a-4b    07:09:00  06:05:00
79.N*6d!     07:20:00  06:05:00

Strong again. The black attack cannot be stopped, although Fukaura needs to
find one more good move to win the game.

80.B*6c      07:20:00  06:18:00

If 80.B*9g K6h Bx6d +Rx6d N*3f would work, white would be OK, but then black has
R2i which attacks the promoted bishop on 9i.

81.L*4e      07:33:00  06:18:00
82.P6f-6g+   07:33:00  06:57:00
83.G7hx6g    07:37:00  06:57:00
84.G5b-5a    07:37:00  06:59:00
85.P*4c      07:49:00  06:59:00
86.G3bx4c    07:49:00  06:59:00
87.+R6a-7a   07:49:00  06:59:00
88.P7f-7g+   07:49:00  07:04:00
89.G6gx7g    07:49:00  07:04:00
90.B6cx8e    07:49:00  07:04:00
91.P*6c!     07:49:00  07:04:00
After game Fukaura said that only when he found this move, he thought that his
attack would work. White cannot ignore this, because Rx5a+ is a mating threat.

92.B8ex6c    07:49:00  07:31:00

White has no choice but to pull back the bishop from the attack, which gives black
enough breathing room to make his own attack work. White wants to play 92.Sx6c
instead, but this fails to 93.Lx4d Gx4d Rx2c+. Also 92.P*6a +R8b N*6b Px6b+
Px6b P*7h is winning for black.

93.L4ex4d    07:49:00  07:31:00
94.S*8h      07:49:00  07:32:00
95.K7i-6i    07:49:00  07:32:00
96.S8hx7g+   07:49:00  07:33:00
97.K6i-5i    07:49:00  07:33:00
98.N*4g      07:49:00  07:34:00
99.G4hx4g    07:51:00  07:34:00
100.P4fx4g+  07:51:00  07:36:00
101.S5fx4g   07:51:00  07:36:00
102.+S7g-6h  07:51:00  07:37:00
103.K5ix6h   07:52:00  07:37:00
104.+B9ix4d  07:52:00  07:37:00
105.R2hx2c+  07:53:00  07:37:00
106.G*2b     07:53:00  07:37:00
107.+R2c-2i  07:56:00  07:37:00
108.L*6e     07:56:00  07:43:00
109.K6h-5i   07:56:00  07:43:00
110.P*2d     07:56:00  07:44:00
111.S*5b     07:56:00  07:44:00
112.G5ax5b   07:56:00  07:44:00
113.S*3a     07:56:00  07:44:00
114.K4b-3b   07:56:00  07:44:00
115.N6dx5b+  07:56:00  07:44:00
116.B6cx5b   07:56:00  07:46:00
117.N*3f     07:56:00  07:46:00
118.+B4dx3e  07:56:00  07:47:00
119.+R2ix2d  07:57:00  07:47:00
120.+B3ex2d  07:57:00  07:49:00
121.N3fx2d   07:57:00  07:49:00
122.K3b-3c   07:57:00  07:50:00
123.S3ax2b=  07:57:00  07:50:00
124.K3c-4d   07:57:00  07:50:00
125.B*5e     07:57:00  07:50:00
126.K4dx5e   07:57:00  07:50:00
127.P5g-5f   07:57:00  07:50:00
Resigns      07:57:00  07:50:00
It is always a little bit special when a game is being resigned with the king on
the central square 5e. This is mate after 128.K4d P*4e Sx4e G*5e or 128.K6f G*7g
K5g G*5h so Habu had no choice. A great start for challenger Fukaura to take
the first two games of this match. Habu already faces a must-win situation in
the third game to avoid an almost unrecoverable 0-3 abyss.