48th Oi Match Game 1
[Black "Habu Yoshiharu, Oi"]
[White "Fukaura Koichi, Challenger"]
[Event "48th Oi-sen, Game 1"]
[Date "July 10th and 11th 2007"]
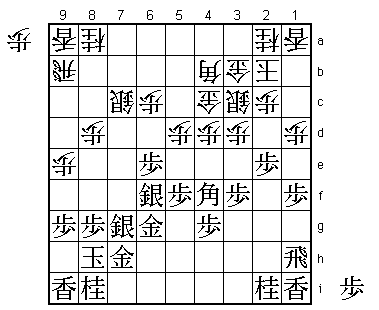
1.P7g-7f 00:00:00 00:00:00
2.P8c-8d 00:00:00 00:02:00
It has been 11 years since Fukaura challenged for a title. That was probably
a longer drought than he and the people following the professional shogi
scene expected. The last time (which was also the first time) he challenged
for a title was also in the Oi match and also against Habu. In that match
he opened the first game with 1.P9f, with a hand that was slightly shaking.
More than anything, his lack of experience resulted in a 4-1 defeat. This
time Habu faces a different Fukaura, not trying to put his opponent off
balance, but meets him head on, playing the Yagura opening with white.
For a while, the white opening strategies have been dominated by the Kakugawari
with tempo loss and the Gokigen Nakabisha, but lately white players have been
playing the Yagura more often. Therefore, Fukaura's opening selection is not
really a surprise.
3.S7i-6h 00:04:00 00:02:00
4.P3c-3d 00:04:00 00:02:00
5.S6h-7g 00:05:00 00:02:00
6.S7a-6b 00:05:00 00:02:00
7.P5g-5f 00:09:00 00:02:00
8.P5c-5d 00:09:00 00:02:00
9.S3i-4h 00:11:00 00:02:00
10.S3a-4b 00:11:00 00:02:00
11.G6i-7h 00:14:00 00:02:00
12.G4a-3b 00:14:00 00:09:00
13.K5i-6i 00:18:00 00:09:00
14.K5a-4a 00:18:00 00:09:00
15.G4i-5h 00:21:00 00:09:00
16.G6a-5b 00:21:00 00:10:00
17.B8h-7i 00:26:00 00:10:00
18.S4b-3c 00:26:00 00:12:00
19.P3g-3f 00:38:00 00:12:00
20.B2b-3a 00:38:00 00:12:00
21.P6g-6f 01:03:00 00:12:00
22.P4c-4d 01:03:00 00:14:00
23.G5h-6g 01:08:00 00:14:00
24.P7c-7d 01:08:00 00:15:00
25.B7i-6h 01:08:00 00:15:00
26.G5b-4c 01:08:00 01:34:00
27.K6i-7i 01:12:00 01:34:00
28.P9c-9d 01:12:00 01:34:00
29.K7i-8h 01:18:00 01:34:00
30.P9d-9e 01:18:00 01:34:00
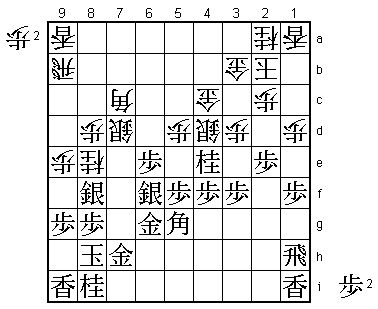
31.P2g-2f 02:11:00 01:34:00
32.S6b-7c 02:11:00 02:16:00
33.P2f-2e 02:47:00 02:16:00
34.P7d-7e 02:47:00 02:47:00
35.P7fx7e 02:51:00 02:47:00
36.B3ax7e 02:51:00 02:47:00
37.P6f-6e 02:53:00 02:47:00
38.K4a-3a 02:53:00 02:48:00
39.B6h-4f 02:54:00 02:48:00
40.R8b-9b 02:54:00 02:48:00
41.S4h-5g 02:55:00 02:48:00
42.K3a-2b 02:55:00 02:48:00
43.S5g-6f 02:56:00 02:48:00
44.B7e-4b 02:56:00 02:48:00
45.P1g-1f 03:02:00 02:48:00
46.P1c-1d 03:02:00 02:53:00
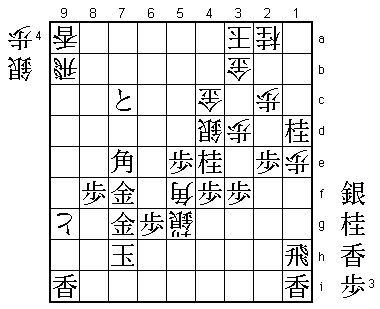
47.R2h-1h?! 03:41:00 02:53:00
This position looks strange with both rooks on the edge in front of the lance,
but this is actually a known position. The most famous example is the fifth
game of this year's Osho match between Sato and Habu. There it followed
48.S7d P*7e Sx7e Sx7e Bx7e S6f P4e B3g B5c S*8c and black managed to keep
both of white's major pieces out of play and won the game. Fukaura has a
better idea than S7d and because of this Habu commented after the game that
47.R1h might be a questionable move.
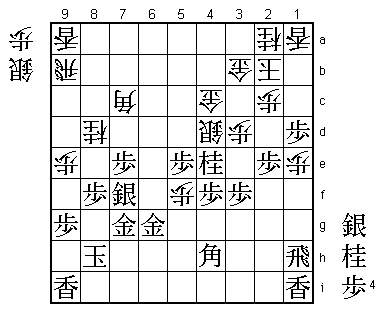
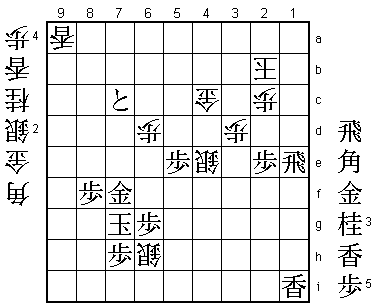
48.P4d-4e! 03:41:00 03:34:00
Black is now forced to move the bishop, but there is no good place to go.
49.B4f-5g 04:01:00 03:34:00
The alternative is 49.B3g, but after 50.P6d Px6d Sx6d P*6e S7c white has
managed to get a pawn in hand, which is a small but important advantage.
More important is that with the black bishop on 3g, the edge attack is much
less powerful and that is why Habu decided to pull the bishop back to 5g.
50.N8a-9c 04:01:00 03:35:00
51.N2i-3g 04:35:00 03:35:00
52.N9c-8e 04:35:00 03:48:00
This is the problem of 49.B5g. Because the knight is no longer tied to the
defense of the silver on 7c, it can now quickly help the attack. White has
managed to set up an attacking formation which is looking at least as
dangerous as the black one, which is a great achievement when playing the
Yagura opening with white.
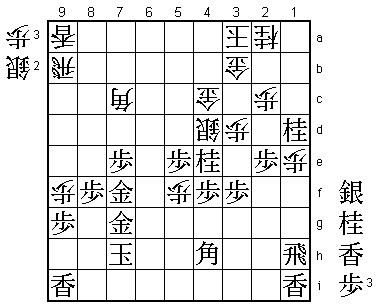
53.S7g-8f 04:35:00 03:48:00
54.P6c-6d 04:35:00 03:48:00
55.P6ex6d 05:17:00 03:48:00
56.B4bx6d 05:17:00 04:33:00
57.N3gx4e 05:19:00 04:33:00
Habu regretted this move, because the knight only looks active, but actually
isn't doing much harm.
58.S3c-4d 05:19:00 04:33:00
59.P4g-4f 05:19:00 04:33:00
This is the biggest problem of 57.Nx4e. Black is now forced to close the bishop
diagonal and therefore weaken the power of the edge attack. Keeping this edge
attack strong was the reason why black played 49.B5g, so it is clear that Habu
has not managed to solve the opening problems here.
60.S7c-7d 05:19:00 04:57:00
61.P*6e 05:41:00 04:57:00
62.B6d-7c 05:41:00 04:57:00
63.P1f-1e?   05:53:00  04:57:00

Habu is so focused on creating his own attack that he is overdoing it. Fukaura
said after the game that he was worried about 63.P*7g. This seems like not
doing anything, which is why Habu didn't like it, but it tries to maintain
the tiny material advantage that black has (a pawn). Fukuara had no idea how
he could continue after 63.P*7g.

64.P1dx1e    05:53:00  05:02:00
65.P*1d      05:53:00  05:02:00
66.P5d-5e    05:53:00  05:23:00
67.P5fx5e    05:54:00  05:23:00
68.P*7g      05:54:00  05:37:00
69.N8ix7g    06:04:00  05:37:00
70.P*5f      06:04:00  06:16:00
71.B5g-4h    06:20:00  06:16:00
72.N8ex7g+   06:20:00  06:16:00
73.G7hx7g    06:26:00  06:16:00
74.P8d-8e    06:26:00  06:21:00
75.P*7e      06:34:00  06:21:00
76.S7dx6e    06:34:00  06:22:00
77.S6fx6e    06:35:00  06:22:00
78.P8ex8f    06:35:00  06:22:00
79.P8gx8f    07:02:00  06:22:00
80.P*7f      07:02:00  06:37:00
81.S6ex7f    07:09:00  06:37:00
82.N*8d!     07:09:00  06:37:00
Here Fukaura felt that he his attack might be stronger. If the silver on 7f
moves, white can use the last pawn on 7f to continue his attack.

83.P1d-1c+   07:13:00  06:37:00
84.L1ax1c    07:13:00  06:44:00
85.P*1d      07:13:00  06:44:00
86.L1cx1d    07:13:00  06:44:00
87.N*2f      07:13:00  06:44:00
88.P9e-9f!   07:13:00  06:53:00

Strong attack. 89.Px9f Nx9f and then Lx9f Rx9f or K7h N8h+ followed by Rx9i+
lets the white rook in and loses quickly, so Habu has to leave this pawn.

89.N2fx1d    07:16:00  06:53:00
90.K2b-3a    07:16:00  06:53:00
91.K8h-7h    07:18:00  06:53:00
92.N8dx7f    07:18:00  07:00:00
93.G6gx7f    07:20:00  07:00:00
94.P5f-5g+!  07:20:00  07:22:00

22 minutes well spent, because this is the winning move. There are a number of
moves that look appealing here like S*5g, Px9g+ and P*4g, but P5g+ is the best.
It needed some deep calculation, though...

95.B4hx5g    07:20:00  07:22:00
96.S*5f      07:20:00  07:22:00
97.P7e-7d    07:22:00  07:22:00
98.S5fx5g+   07:22:00  07:24:00
99.P7dx7c+   07:22:00  07:24:00
100.B*5f     07:22:00  07:25:00
101.P*6g     07:28:00  07:25:00
102.P9fx9g+  07:28:00  07:25:00
103.B*7e     07:28:00  07:25:00
This is the position that needed to be analyzed before playing 94.P5g+. This is
a fork on king and promoted silver, so Fukaura had to assess well in advance that
his attack would be unstoppable even without it.

104.P*6d     07:28:00  07:26:00
105.L9ix9g   07:38:00  07:26:00

The obvious move here seems to be 105.P*9c, but then 106.S*8g is winning easily.
107.Gx8g fails to 108.Bx6g+ and after 107.K6i, the move 108.Sx7f+ is a mating
threat, so black has no time to take the rook on 9b.

106.R9bx9g+  07:38:00  07:31:00
107.B7ex5g   07:38:00  07:31:00
108.+R9g-9h  07:38:00  07:37:00

Habu struggles for a while, but this promoted rook is too strong.

109.K7h-6i   07:41:00  07:37:00
110.B5f-4g+  07:41:00  07:42:00
111.S*5h     07:41:00  07:42:00
112.+R9h-8i  07:41:00  07:44:00
113.P*7i     07:42:00  07:44:00
114.P*5f     07:42:00  07:44:00
115.B5g-6h   07:51:00  07:44:00
116.+B4gx3f  07:51:00  07:44:00
117.P*3c     07:54:00  07:44:00
118.N2ax3c   07:54:00  07:45:00
119.S*2b     07:54:00  07:45:00
120.G3bx2b   07:54:00  07:51:00
121.N1dx2b+  07:54:00  07:51:00
122.K3ax2b   07:54:00  07:51:00
123.R1hx1e   07:54:00  07:51:00
124.N*5g     07:54:00  07:51:00
125.B6hx5g   07:54:00  07:51:00
126.+B3fx5h  07:54:00  07:51:00
127.K6ix5h   07:54:00  07:51:00
128.+R8i-8h  07:54:00  07:51:00
129.P7i-7h   07:54:00  07:51:00
130.P5fx5g+  07:54:00  07:51:00
131.K5hx5g   07:54:00  07:51:00
132.N3cx4e   07:54:00  07:51:00
133.P4fx4e   07:55:00  07:51:00
134.P*5f     07:55:00  07:51:00
135.K5gx5f   07:56:00  07:51:00
136.S4dx4e   07:56:00  07:52:00
137.K5f-6f   07:57:00  07:52:00
138.+R8hx7g  07:57:00  07:52:00
139.K6fx7g   07:57:00  07:52:00
140.S*6h     07:57:00  07:52:00
Resigns      07:57:00  07:52:00
Mate after 140.K6f B*5g or 140.Kx6h N*5f etc. The lance on 9a works very well in
attack, making it impossible for the black king to escape. A win with the white
pieces is a great start for Fukaura and this match suddenly has become a lot
more interesting than could be expected when taking into account the difference
in experience on the big stage between Habu and Fukuara. A win with the black
pieces in the second game and Fukaura would be really in business.