47th Oza Match Game 3
Black: Habu, Oza
White: Maruyama, Challenger
47th Oza-sen, Game 3, September 29th 1999
1.P2g-2f           0/0          0/0
2.P3c-3d           0/0          0/0
3.P7g-7f           1/1          0/0
4.P8c-8d           0/1          0/0
5.P2f-2e           2/3          0/0
6.P8d-8e           0/3          0/0
7.G6i-7h           1/4          0/0
8.G4a-3b           0/4          0/0
9.P2e-2d           2/6          0/0
10.P2cx2d          0/6          1/1
11.R2hx2d          0/6          0/1
12.P8e-8f          0/6          1/2
13.P8gx8f          2/8          0/2
14.R8bx8f          0/8          0/2
15.R2dx3d          2/10         0/2
16.B2b-3c          0/10         1/3
17.R3d-3f          4/14         0/3
18.S3a-2b          0/14         1/4
19.P*8g            1/15         0/4
20.R8f-8e          0/15         1/5
21.R3f-2f          1/16         0/5
22.K5a-4a          0/16         2/7
23.K5i-5h          3/19         0/7
24.S7a-6b          0/19         2/9
25.G4i-3h          2/21         0/9
26.P7c-7d          0/21         13/22
27.P3g-3f          18/39        0/22
28.G6a-5a          0/39         48/70
29.N2i-3g          4/43         0/70
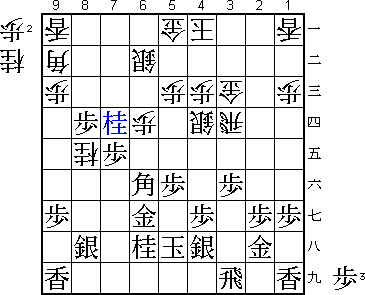
30.P*2e!           0/43         50/120

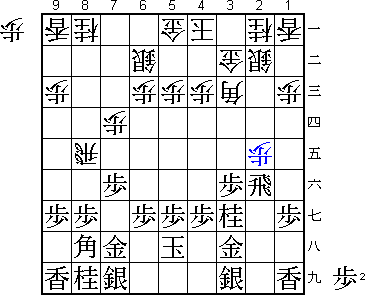
A new and strong move by Maruyama. Driving back the black rook followed
by switching the white rook from the right to the left side of the position
is a strong but risky plan. If white can make it work, black is in serious
trouble.

31.R2f-2i          17/60        0/120
32.P*8f            0/60         0/120
33.P8gx8f          93/153       0/120
34.R8ex8f          0/153        0/120
35.S3i-4h          3/156        0/120
36.N8a-7c          0/156        50/170
37.P3f-3e          29/185       0/170
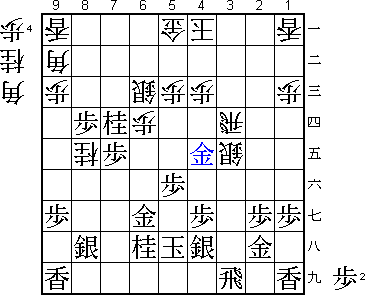
38.R8fx7f!         0/185        64/234

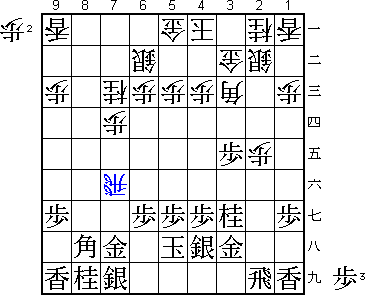
An important follow-up to the previous plan. Having the bishop taken instead
of taking the bishop is risky, but it seems like black is unable to exploit
the "sente" situation. If white plays the "safe" 38.Bx8h+ Sx8h Rx7f S7g
R2f P*2g move order, the improvement of the black silver position from 7i
to 7g gives black a satisfactory position as well.

39.B8hx3c+         42/227       0/234
40.S2bx3c          0/227        0/234
41.R2ix2e          9/236        0/234

No choice. Black wants to avoid the switch R2f, because this would force
him to drop a pawn in front of the rook (P*2g), since his position is much
more vulnerable to rook drops.

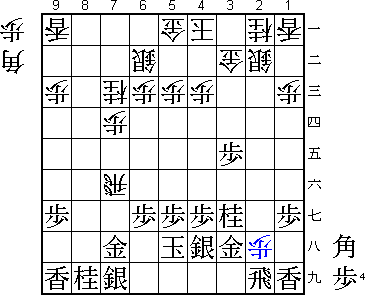
42.S3c-2b!         0/236        21/255

Great play. An amateur would be scolded for playing the silver to 3c and
back, losing a pawn in the process. The strange thing about shogi is that
this move is very good here. The white threat P*8h forces black to play
the following defence:

43.R2e-2i          26/262       0/255
44.P*2h            0/262        9/264

45.G3hx2h          4/266        0/264

Black wants to play 45.Rx2h, but this fails to 46.P*3f N2e B*5e and after
P*7g Bx2h+ Gx2h R8f white has the clear advantage. The rook in hand is
a big plus, while black has no attack with the two bishops.

It is clear that Habu has lost the opening, but it is hard to find
the move that caused the problem. There is still much to explore in
this opening...

46.R7f-2f          0/266        0/264
47.P*2g            8/274        0/264
48.R2f-8f          0/274        1/265
49.S7i-8h          1/275        0/265
50.P*3f            0/275        10/275
51.N3g-2e          1/276        0/275
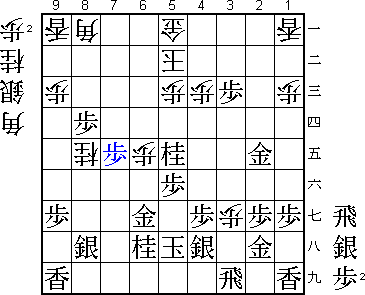
52.R8f-8e?!        0/276        2/277

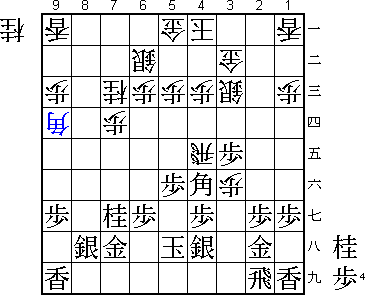
Both players have spent a lot of time in the early middle game and time
pressure is starting to be a factor. Thus far, Murayama played a flawless
game. However, here 52.B*5e looks better. After 53.P*8g R8e, it is
impossible to defend against the threat Bx2h+ Rx2h G*3g and black's position
falls apart. Habu also thought that this would lose quickly for him.
Still, 52.R8e can hardly be called a bad move. Forcing black to use the
bishop in hand to defend a pawn is a move typical of Maruyama's style.

53.B*4f            1/277        0/277
54.N2a-3c          0/277        4/281
55.N2ex3c+         0/277        0/281
56.S2bx3c          0/277        0/281
57.N8i-7g          1/278        0/281
58.R8e-4e          0/278        5/286
59.P5g-5f          0/278        0/286
60.B*9d?           0/278        7/293

Maruyama starts to lose his way. Here 60.S4d P3d P5d would have kept the
advantage.

61.K5h-6i          6/284        0/293
62.N*7e            0/284        0/293
63.K6i-5h          5/289        0/293
64.S3c-4d          0/289        5/298
65.P*7f            3/292        0/298
66.S4dx3e          0/292        0/298
67.B4f-5g          1/293        0/298
68.P*8g            0/293        1/299
69.S8h-7i          0/293        0/299
70.B9dx7f          0/293        0/299
71.P*3c            1/294        0/299
72.G3bx3c          0/294        0/299
73.N*6h            0/294        0/299
74.B7f-9d          0/294        0/299
75.P*7f            0/294        0/299
76.N7ex6g+         0/294        0/299
77.G7hx6g          0/294        0/299
78.P7d-7e          0/294        0/299
79.B5g-6f          0/294        0/299
80.S3e-4d          0/294        0/299
81.N*8f            1/295        0/299
82.B9d-8c          0/295        0/299
83.R2i-3i          1/296        0/299
84.R4e-3e          0/296        0/299
85.P*3g            0/296        0/299
86.P8g-8h+         0/296        0/299
87.S7ix8h          0/296        0/299
88.P*8e            0/296        0/299
89.P3gx3f          0/296        0/299
90.R3e-3d          0/296        0/299
91.P*8d            2/298        0/299
92.B8c-9b          0/298        0/299
93.N7gx8e          0/298        0/299
94.N7cx8e          0/298        0/299
95.P7fx7e          1/299        0/299
96.P6c-6d          0/299        0/299
97.N8f-7d          0/299        0/299

98.S6b-6c?         0/299        0/299

The losing move. If white plays 98.P6e, then there will always be the counter
N*6f and black has to be very careful.

99.P3f-3e          0/299        0/299
100.S4dx3e         0/299        0/299
101.B6fx3c+        0/299        0/299
102.R3dx3c         0/299        0/299
103.P*3d           0/299        0/299
104.R3cx3d         0/299        0/299
105.G*4e           0/299        0/299

106.P*3h           0/299        0/299

In byoyomi Maruyama chooses a useless pawn drop sequence that pretty much
costs all his material.

107.R3ix3h         0/299        0/299
108.P*3g           0/299        0/299
109.R3hx3g         0/299        0/299
110.N*2e           0/299        0/299
111.R3g-3i         0/299        0/299
112.P*3h           0/299        0/299
113.R3ix3h         0/299        0/299
114.P*3g           0/299        0/299
115.R3h-3i         0/299        0/299
116.R3d-3a         0/299        0/299
117.P*3b           0/299        0/299
118.R3ax3b         0/299        0/299
119.P*3c           0/299        0/299
120.R3b-7b         0/299        0/299
121.G4ex3e         0/299        0/299
122.S6cx7d         0/299        0/299
123.P7ex7d         0/299        0/299
124.R7bx7d         0/299        0/299
125.P*7f           0/299        0/299
126.P6d-6e         0/299        0/299
127.G3ex2e         0/299        0/299
128.B9b-8a         0/299        0/299
129.N*5e           0/299        0/299
130.K4a-5b         0/299        0/299
131.S*7e           0/299        0/299
132.R7dx7e         0/299        0/299
133.P7fx7e         0/299        0/299
Resigns            0/299        0/299
Time:              04:59:00     04:59:00

With a gold and a silver behind and no attack, Maruyama throws the towel.
Having found no good place to resign, the final position looks much worse
than he deserved. Maruyama was dictating this game until time pressure
forced a couple of vital mistakes. Even though things look bleak, he has
black in the next game and is playing well. This match might not be over
yet.
