47th Oza Match Game 2
Black: Maruyama, Challenger
White: Habu, Oza
47th Oza-sen, Game 2, September 20th 1999
1.P2g-2f           0/0          0/0
2.P3c-3d           0/0          1/1
3.P7g-7f           0/0          0/1
4.P4c-4d           0/0          1/2
5.P2f-2e           0/0          0/2
6.B2b-3c           0/0          0/2
7.S3i-4h           0/0          0/2
8.R8b-4b           0/0          1/3
9.K5i-6h           0/0          0/3
10.S7a-7b          0/0          1/4
11.K6h-7h          0/0          0/4
12.P9c-9d          0/0          1/5
13.G4i-5h          13/13        0/5
14.S3a-3b          0/13         7/12
15.P9g-9f          13/26        0/12
16.G4a-5b          0/26         11/23
17.P5g-5f          1/27         0/23
18.K5a-6b          0/27         8/31
19.B8h-7g          6/33         0/31
20.K6b-7a          0/33         32/63
21.K7h-8h          9/42         0/63
22.P6c-6d          0/42         2/65
23.P6g-6f          18/60        0/65
24.S3b-4c          0/60         47/112
25.S4h-5g          9/69         0/112
26.K7a-8b          0/69         7/119

Recently, the Fujii system is most often played against the black Anaguma.
In this game Habu chooses the "old-fashioned" Mino instead.

27.G5h-6g          44/113       0/119
28.P7c-7d          0/113        5/124
29.L9i-9h          6/119        0/124
30.P8c-8d          0/119        2/126
31.K8h-9i          40/159       0/126
32.G5b-6c          0/159        11/137
33.S7i-8h          0/159        0/137
34.S7b-8c          0/159        0/137
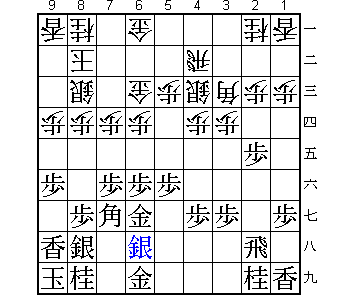
35.S5g-6h!?        21/180       0/137

Interesting idea. This silver blocks the retreat of the bishop, so it looks
a bit strange. The normal development from this position is G7i followed by
either B6h or B5i and G7g. Maruyama's plan is to invite the pawn push to
4e, because there is a weakness at 4f now. If white does not play this,
black can quietly strengthen his Anaguma with G7h followed by S6h-7i.

36.G6a-7b?!        0/180        30/167

A difficult decision. Habu did not like 36.P4e P6e S4d P3f followed by
N3g. It is hard to see if his decision is correct. In the game white ends
up without any good moves, so either P4e seems to be the right move to
play here, or Habu's opening strategy is a failure.

37.P3g-3f          4/184        0/167
38.R4b-3b          0/184        10/177
39.P4g-4f          13/197       0/177
40.S4c-5d          0/197        4/181
41.G6i-7h          4/201        0/181
42.N8a-7c          0/201        3/184
43.S6h-7i          2/203        0/184
44.R3b-4b          0/203        5/189
45.N2i-3g          7/210        0/189
46.R4b-3b          0/210        16/205
47.P1g-1f          27/237       0/205
48.P3d-3e          0/237        3/208
49.R2h-2f          1/238        0/208
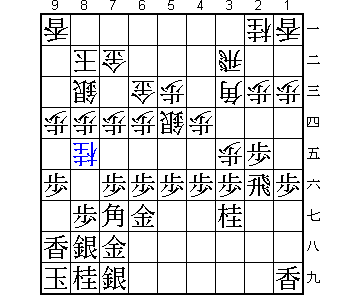
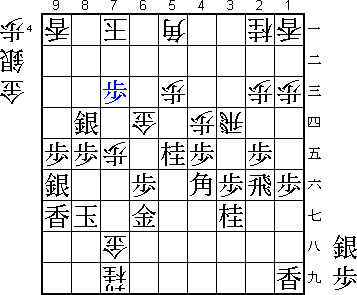
50.N7c-8e?!        0/238        26/234

Habu is stuck for moves. This knight is going to be attacked by P8f in the
near future, which stretches white position too much. However, with the black
bishop on 7g, white can not play B5a because of P6e with a big advantage for
black.

51.B7g-6h          1/239        0/234
52.B3c-5a          0/239        0/234
53.P3fx3e          0/239        0/234
54.R3bx3e          0/239        0/234
55.P*3f            0/239        0/234
56.R3e-3d          0/239        0/234
57.P8g-8f          0/239        0/234
58.P9d-9e          0/239        0/234
59.P9fx9e!         4/243        0/234

Saves white's knight, but this is the right decision. After 61.Px8e Px9f,
white has a strong attacking base on 9g. As Maruyama plays it, he wins two
pawns and leaves white without pawns in hand. From now on the fighting will
concentrate on the left side of the board. Both rooks will not play any
part in the game from now on.

60.P*9g            0/243        0/234
61.N8ix9g          0/243        0/234
62.N8ex9g+         0/243        0/234
63.L9hx9g          0/243        0/234
64.P6d-6e          0/243        8/242
65.P6fx6e          23/266       0/242
66.S5dx6e          0/266        0/242
67.P*6f            0/266        0/242
68.S6e-5d          0/266        0/242
69.S8h-8g          4/270        0/242
70.P8d-8e          0/270        13/255
71.P8fx8e          4/274        0/255
72.P*8d            0/274        0/255
73.P8ex8d          2/276        0/255
74.S8cx8d          0/276        0/255
75.P*8f            0/276        0/255
76.P7d-7e          0/276        1/256
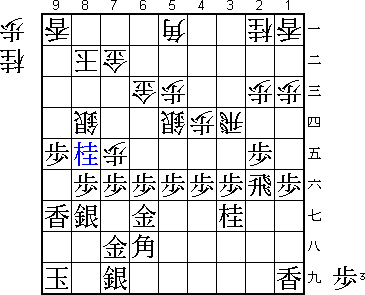
77.N*8e!           2/278        0/256

Habu has started a desperate fight, but Maruyama quietly takes away all of
white's moves. 77.N*8e is a very strong move, tieing the white silver to
the defence of 9c and 7c. For example: 78.Sx9e P*9b followed by P*9c and
black uses the lance to win the white rook after L*3e.

78.P7ex7f          0/278        8/264

Habu has to attack. If he allows black to play S8h followed by K9h he has
no chance of winning.

79.P*7c            0/278        0/264
80.G7bx7c          0/278        0/264
81.N8ex7c+         0/278        0/264
82.G6cx7c          0/278        0/264
83.P*7e            4/282        0/264
84.P*9f            0/282        7/271

Here 84.N*8c was also analysed, but after 85.Gx7f Nx7e Gx7e Sx7e N*8e G6c
P5e followed by G*6e is very good for black.

85.S8gx9f          1/283        0/271
86.N*8c            0/283        4/275
87.G*8e            2/285        0/275
88.S8dx8e          0/285        1/276
89.P8fx8e          0/285        0/276
90.N8cx7e          0/285        1/277
91.G6gx7f          0/285        0/277
92.P*7d            0/285        0/277
93.S*8d            8/293        0/277
94.G7c-6c          0/293        8/285

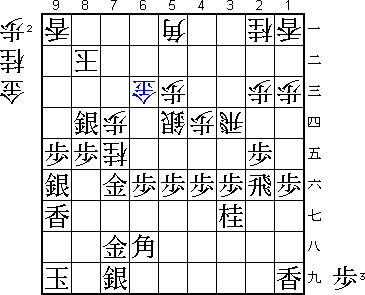
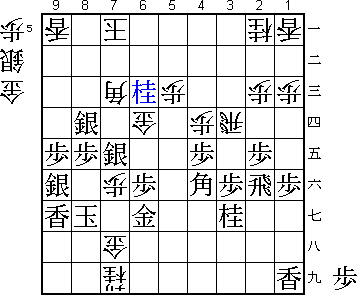
95.P5f-5e!         2/295        0/285

A surprise. It seems easy to improve the position at no cost with 95.P9d.
If then 96.P*8c P9c+ Lx9c Sx9c+ Kx9c L*3e wins for black. If 96.P*9b,
then black has improved his position on the edge a lot. After only two
minutes thought, Maruyama decided to go for the quick kill. This is
certainly not his usual style, but in this game he shows that he has
mastered that part of the game as well. In Tanigawa style he goes for
the shortest route to win.

96.S5dx5e          0/295        0/285
97.P*5f            0/295        0/285
98.S5ex5f          0/295        4/289
99.P4f-4e          0/295        0/289
100.S5f-6g=        0/295        0/289
101.G7hx6g         1/296        0/289
102.N*8g           0/296        0/289

Black looks in some trouble here. Even Habu felt a glimmer of hope: "I thought
I would not even give check".

103.K9i-8h         0/296        0/289
104.N8gx7i+        0/296        0/289
105.G7fx7e         1/297        0/289
106.G*7h           0/297        0/289
107.K8h-8g         0/297        0/289
108.P7dx7e         0/297        0/289
109.B6h-4f         0/297        0/289
110.K8b-7a         0/297        2/291
111.N*5e           2/299        0/291
112.G6c-6d         0/299        0/291
113.P*7c!          0/299        0/291

Ends all hope. S*6c next leaves white without defence, while giving up a
gold means mate in one. Running away with 114.K6a also fails to 115.P6e
followed by S*6c.

114.P7e-7f         0/299        3/294

A final prayer. If 115.S*6c?? then 116.Bx7c! (Sx7c+ S*9h and mate) and
white would suddenly be winning.

115.S*7e!          0/299        0/294

Perfect until the end. This silver defends against a possible mate and
leaves white without defence.

116.B5ax7c         0/299        5/299
117.N5e-6c=        0/299        0/299
Resigns            0/299        0/299
Time:              04:59:00     04:59:00

After 118.Gx6c Sx7c+ or 118.K6a Sx6d the game is over.

A big win for Maruyama. Going 2-0 down in a five game title match is almost
impossible to recover from, especially against Habu. Not only did he
avoid that, he did so in an impressive style, playing perfect shogi.
His first title match win will give him a boost of confidence, just what
he needs to defeat an opponent he has such bad results against.
