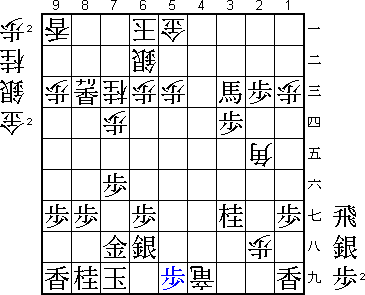
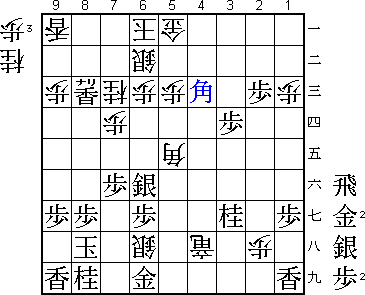
47th Oza Match Game 1
Black: Habu, Oza
White: Maruyama, Challenger
47th Oza-sen, Game 1, September 3rd 1999
1.P7g-7f           0/0          0/0
2.P3c-3d           0/0          0/0
3.P2g-2f           1/1          0/0
4.P8c-8d           0/1          0/0
5.P2f-2e           1/2          0/0
6.P8d-8e           0/2          0/0
7.G6i-7h           1/3          0/0
8.G4a-3b           0/3          0/0
9.P2e-2d           2/5          0/0
10.P2cx2d          0/5          1/1
11.R2hx2d          0/5          0/1
12.P8e-8f          0/5          0/1
13.P8gx8f          0/5          0/1
14.R8bx8f          0/5          0/1
15.R2dx3d          1/6          0/1
16.B2b-3c          0/6          0/1
17.R3d-3f          2/8          0/1
18.S3a-2b          0/8          0/1
19.P*8g            1/9          0/1
20.R8f-8e          0/9          0/1

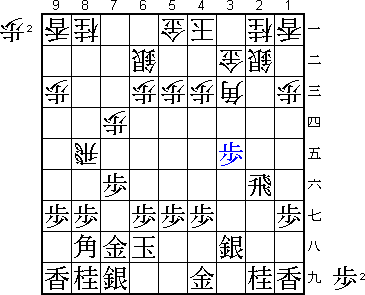
There it is again. The R8e Yokofudori variation.

21.R3f-2f          0/9          0/1
22.K5a-4a          0/9          1/2
23.K5i-6h          1/10         0/2
24.S7a-6b          0/10         0/2
25.P3g-3f          2/12         0/2
26.G6a-5a          0/12         1/3
27.S3i-3h          1/13         0/3
28.P7c-7d          0/13         1/4
29.P3f-3e          2/15         0/4

30.N8a-7c          0/15         1/5
31.B8hx3c+         7/22         0/5
32.N2ax3c          0/22         0/5
33.P3e-3d          1/23         0/5
34.N3c-4e          0/23         0/5
35.P3d-3c+         2/25         0/5
36.N4ex5g+         0/25         2/7
37.K6hx5g          0/25         0/7
38.B*3e            0/25         3/10
39.K5g-5h          1/26         0/10
40.B3ex2f          0/26         1/11
41.+P3cx3b         1/27         0/11
42.K4ax3b          0/27         0/11
43.B*6f            0/27         0/11
44.B2f-4d          0/27         3/14

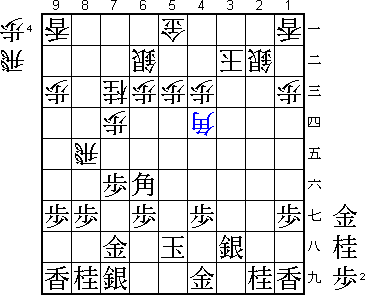
45.B6fx4d          23/50        0/14

The variation played in this game is a good example of how violent this
opening can get. Both players show that their opening preparation is good.
Three days before this game, exactly the same variation was played in the
game between Abe and Nakahara in the pre-rounds of the Osho tournaments.
There, Abe played the aggressive 45.N*2d K3c Bx4d Px4d G*3b K2d Gx2b K3c
Gx1a. This was not good enough, since Nakahara strongly countered with
N6e and won in 89 moves. Habu's way of playing is a definite improvement.

46.P4cx4d          0/50         0/14
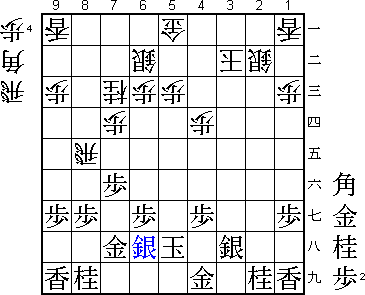
47.S7i-6h!         0/50         0/14

This is the real Habu idea. Since the black attack is not decisive, he
takes the time to strengthen his own position. With the white king in
an awkward position and the black position without many holes, it is
good psychology to leave the initiative to Maruyama.

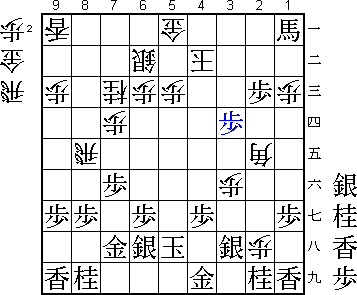
48.P*3f?           0/50         127/141

After long thought, Maruyama plays a bad move that probably already decides
the game. Maruyama will have spent most of the time on the natural 48.P*2h.
Habu said after the game that he had looked both at this move and 48.R2e.
48.R2h does not seem to be very good for white after 49.B*3d R2h+ G*4c
K2a P*5b G6a G4b B*5d N*4f B6e P6f and if the white bishop leaves the
9h-2a diagonal, B4c+ is decisive. Therefore, 48.P*2h seems to be the right
move. Then 49.N3g P*3f B*2e B*5d N7g R3e N*2g (Habu thought he could play
G*4f here, but realised after the game that white would win with Px3g+)
R5e P*5f Rx5f S5g Rx5g+ Kx5g P3g+ P*5e N*6e is better for white. In a
position like this a single variation is not enough for a definite
conclusion and it is hard to judge who actually has the better chances
here. Still, Maruyama should have chosen this over the bad 48.P*3f. It
is a pity that Maruyama has the habit of keeping very silent during the
post-mortem analysis, so there was no information about his reasons for
playing P*3f instead of P*2h.

49.G*3d!           39/89        0/141

Aims at the simple N*2d K4b B*2a. This is hard to defend against.

50.B*6a            0/89         37/178

A defence only move that shows white failed strategy.

51.G3dx4d          70/159       0/178
52.P*2h            0/159        10/188
53.P*2c            42/201       0/188
54.S2b-3c          0/201        39/227

Painful, but no choice. After 54.Sx2c B*3c or 54.Kx2c N7g R3e (R2e B*1f) S5g
followed by S4f black has an overwhelming position.

55.G4dx3c          14/215       0/227
56.K3bx3c          0/215        0/227
57.B*2b            0/215        0/227
58.K3c-4b          0/215        1/228
59.B2bx1a+         4/219        0/228
60.B6a-2e          0/219        0/228
61.P*3d!           13/232       0/228

The winning move. 62.Bx3d S*4d is an easy win for black, so Maruyama tries
a desperate attack which Habu effortlessly holds off.

62.P*4f            0/232        65/293
63.L*8f            26/258       0/293
64.R8e-4e          0/258        0/293
65.+B1a-3c         15/273       0/293
66.K4b-5b          0/273        0/293
67.N*4d            0/273        0/293
68.K5b-6a          0/273        0/293
69.L8f-8c+         1/274        0/293
70.R*5d            0/274        0/293
71.K5h-6i          0/274        0/293
72.R5dx4d          0/274        0/293
73.P4gx4f          7/281        0/293
74.P3f-3g+         0/281        0/293
75.K6i-7i          0/281        0/293
76.R4ex4f          0/281        0/293
77.N2ix3g          1/282        0/293
78.R4fx4i+         0/282        1/294
79.S3hx4i          0/282        0/294
80.R4dx4i+         0/282        0/294
81.P*5i            0/282        0/294

82.G*6i            0/282        3/297

At first glance, white's position looks like there is still something to
play for. However, the horse on 3c is too powerful in defence for white
to be really threatening. 82.G*6i is actually showing that Maruyama has
given up all hope and just wants to make the position look a little closer
than it actually was.

83.K7i-8h          0/282        0/297
84.G6ix6h          0/282        0/297
85.G7hx6h          3/285        0/297
86.S*7i            0/285        0/297
87.K8hx7i          2/287        0/297
88.+R4ix5i         0/287        0/297
89.S*6i            0/287        0/297
90.B2ex6i+         0/287        0/297
91.G6hx6i          0/287        0/297
92.S*6h            0/287        0/297
93.K7i-8h          0/287        0/297
94.S*7i            0/287        0/297
95.K8h-9h          0/287        0/297
96.G*8h            0/287        0/297
97.+B3cx8h         0/287        0/297
98.S7ix8h+         0/287        0/297
99.K9hx8h          0/287        0/297
100.B*5e           0/287        0/297
101.S*6f           4/291        0/297
102.+R5i-4h        0/291        0/297
103.B*4c           0/291        0/297
Resigns            0/291        0/297
Time:              04:51:00     04:57:00

There is no immediate mate, but after +Rx4c Gx6h +R4h G*5h there is nothing
left to play for.

So, Maruyama does not get his first win in his first title match appearance.
Furthermore, his score against Habu drops to an abysmal 3-11. Will he be
able to shake off his Habu complex in game 2?
