47th Osho Match Game 5
Black: Habu, Osho
White: Sato, Challenger
47th Osho-sen, Game 5, February 18th and 19th 1998
1.P2g-2f           1/1          0/0
2.P8c-8d           0/1          11/11
3.P2f-2e           2/3          0/11
4.P8d-8e           0/3          0/11
5.G6i-7h           2/5          0/11
6.G4a-3b           0/5          0/11
7.P2e-2d           3/8          0/11
8.P2cx2d           0/8          0/11
9.R2hx2d           0/8          0/11
10.P*2c            0/8          0/11
11.R2d-2f          0/8          0/11

Yagura in game one, Yodofuribisha in game two, Kakugawari in game three,
Shikenbisha in game five and now Aigakari. This match shows new ideas in
almost every opening possible.

12.S7a-6b          0/8          13/24
13.S3i-3h          10/18        0/24
14.P1c-1d          0/18         6/30
15.P1g-1f          17/35        0/30
16.P5c-5d          0/35         12/42
17.P7g-7f          22/57        0/42
18.S6b-5c          0/57         19/61
19.P4g-4f          91/148       0/61
20.P3c-3d          0/148        16/77
21.S3h-4g          0/148        0/77
22.P8e-8f          0/148        35/112
23.P8gx8f          0/148        0/112
24.R8bx8f          0/148        0/112
25.P*8g            1/149        0/112
26.R8f-8b          0/149        0/112
27.G4i-5h          11/160       0/112
28.P4c-4d          0/160        2/114
29.K5i-6i          1/161        0/114
30.G6a-5b          0/161        10/124
31.P3g-3f          17/178       0/124
32.S3a-4b          0/178        8/132
33.N2i-3g          5/183        0/132
34.S4b-4c          0/183        6/138
35.S7i-6h          15/198       0/138
36.K5a-6b          0/198        43/181
37.P5g-5f          14/212       0/181
38.P6c-6d          0/212        5/186
39.K6i-7i          63/275       0/186
40.P7c-7d          0/275        72/258
41.P3f-3e          36/311       0/258
42.N2a-3c          0/311        14/272
43.P5f-5e          32/343       0/272
44.P5dx5e          0/343        13/285
45.B8hx5e          0/343        0/285
46.P3dx3e          0/343        16/301
47.B5e-7g          2/345        0/301
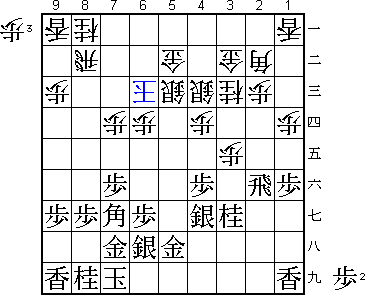
48.K6b-6c          0/345        41/342

It is unclear what Sato had prepared for this game, but this move shows that
his strategy has failed. Having to play the king to 6c is very painful. Normal
would have been 48.G6c, but Sato felt this would weaken the fourth file too
much. The king on 6c gives this game the flavour of a handicap game.

49.S4g-5f          14/359       0/342
50.P*5d            0/359        1/343
51.P6g-6f          37/396       0/343
52.N8a-7c          0/396        11/354
53.G5h-6g          0/396        0/354
54.R8b-8a          0/396        10/364
55.P6f-6e          16/412       0/364
56.N7cx6e          0/412        12/376
57.B7g-8h          7/419        0/376
58.P2c-2d          0/419        6/382
59.P9g-9f          8/427        0/382
60.N3c-2e          0/427        30/412
61.N3gx2e          0/427        0/412
62.S4c-3d          0/427        1/413
63.N2e-1c+         7/434        0/413
64.B2bx1c          0/434        1/414
65.P*6f            0/434        0/414
66.P5d-5e          0/434        1/415
67.S5fx5e          2/436        0/415
68.P*5d            0/436        1/416
69.S5ex4d          0/436        0/416
70.S5cx4d          0/436        1/417
71.P6fx6e          0/436        0/417
72.N*5e            0/436        8/425
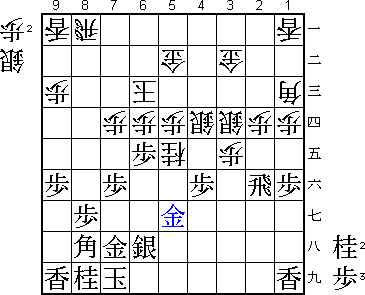
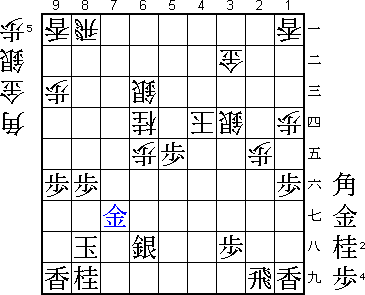
73.G6g-5g?         6/442        0/425

Unnecessary move which lets Sato back in. Habu was a little overconfident here:
"I wanted to make it completely safe". Black can just ignore the threat on
the gold on 6g, even though white can take this with check. Opening the bishop
diagonal would be too dangerous. Therefore, Habu should have played the much
stronger 73.N*5f! and after 74.S3c N*4d G3b-4b Px6d K5c Nx5b+ Kx5b P6c+ Kx6c
G*6d K5b Gx5d black's position is much better.

74.P2d-2e!         0/442        11/436

Takes the chance to wake the sleeping pieces on the right side of the board.

75.R2f-2i          1/443        0/436
76.P*8f            0/443        3/439
77.P8gx8f          0/443        0/439
78.P*8g            0/443        1/440
79.G7hx8g          2/445        0/440
80.P3e-3f          0/445        0/440
81.P*5f            9/454        0/440
82.P3f-3g+         0/454        1/441
83.P6ex6d          8/462        0/441
84.K6c-5c          0/462        1/442
85.P5fx5e          0/462        0/442
86.P5dx5e          0/462        1/443
87.B8h-7g!         0/462        0/443

Incredible coolness. Habu takes two moves to make his king safer in a position
where white seems to threaten everything. It is his best chance to win the
game.

88.+P3g-3f         0/462        2/445
89.K7i-8h          7/469        0/445
90.+P3fx4f         0/469        1/446
91.G5g-6f          0/469        0/446
92.S*5d            0/469        15/461
93.P*2d            0/469        0/461
94.P*6e            0/469        0/461
95.G6f-6g          0/469        0/461
96.B1cx2d          0/469        0/461
97.P*4g            0/469        0/461
98.+P4f-4e         0/469        1/462
99.N*4f            0/469        0/462
100.+P4ex4f        0/469        0/462
101.P4gx4f         0/469        0/462
102.B2dx4f         0/469        0/462
103.N*3f           0/469        0/462
104.B4f-3g+        0/469        1/463
105.N3fx4d         0/469        0/463
106.K5cx4d         0/469        0/463
107.P*5f           1/470        0/463

108.P7d-7e?        0/470        12/475

It is in Sato's character to try and win in attack as soon as possible.
However, there is a hole in his calculations. With only five minutes left,
it would have been wiser to go for the entering king after P*4g which makes
the head of the king safe to enter. After P7e, white gives black too many
pieces and the position becomes very dangerous again.

109.P6d-6c+        3/473        0/475
110.G5bx6c         0/473        0/475
111.S*7b           0/473        0/475
112.P7ex7f         0/473        0/475
113.G6gx7f         0/473        0/475
114.N*8d           0/473        0/475
115.S7bx6c=        1/474        0/475
116.N8dx7f         0/474        0/475
117.G8gx7f         0/474        0/475
118.S5dx6c         0/474        0/475
119.P*3h           0/474        0/475
120.+B3g-4f        0/474        1/476
121.B7gx5e         0/474        0/476
122.+B4fx5e        0/474        0/476
123.P5fx5e         0/474        0/476
124.N*6d           0/474        1/477
125.G7f-7g         0/474        0/477

126.P*8g           0/474        0/477
127.K8h-9h         2/476        0/477
128.P8g-8h+        0/476        2/479
129.K9hx8h         0/476        0/479
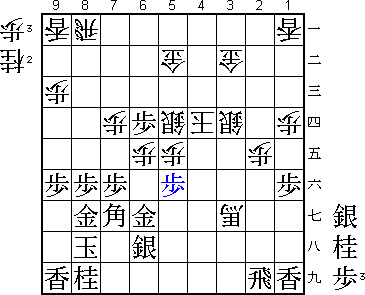
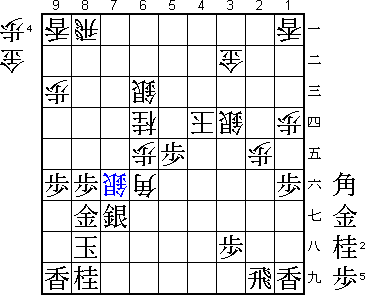
130.P*8g?          0/476        0/479

In byoyomi, Sato sacrifices a pawn to win time he can use to find the winning
position. In a way, he has given himself two chances to find the winning
variation, but there was not enough time. Here he could have won by playing
130.P*7f G7h P*8g Gx8g B*6f P*7g Px7g+ Sx7g S*7f! (diagram).

Then black can not take the bishop: Sx6f Sx8g+ Kx8g Rx8f K7h (Kx8f G*7f leads
to mate) G*8g and white takes the silver next and wins.

131.K8h-9h         0/476        0/479
132.N6d-7f         0/476        0/479
133.B*6b           0/476        0/479
134.P*5c           0/476        0/479
135.N*3f           0/476        0/479
136.K4d-3c         0/476        0/479
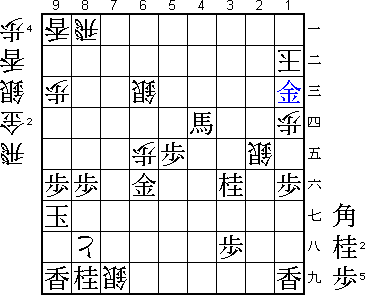
137.G7gx7f         1/477        0/479
138.S*7h           0/477        0/479
139.G7f-7g         0/477        0/479
140.B*6f           0/477        0/479
141.G*7i           2/479        0/479

It is a surprise that there is still a defense in this position, but this game
has quite a few incredible things.

142.G*8h           0/479        0/479
143.K9h-9g         0/479        0/479
144.G8hx7i         0/479        0/479
145.S6hx7i         0/479        0/479
146.S7hx7i=        0/479        0/479
147.G7gx6f         0/479        0/479
148.P8g-8h+        0/479        0/479

And Sato wins. At least that was the opinion of everyone in the press room.

149.B*4d           0/479        0/479

"Habu just starts a rush of checks before resigning".

150.K3c-2c         0/479        0/479
151.R2ix2e         0/479        0/479
152.S3dx2e         0/479        0/479
153.P*2d           0/479        0/479
154.K2c-1c         0/479        0/479
155.G*2c           0/479        0/479
156.G3bx2c         0/479        0/479
157.P2dx2c+        0/479        0/479
158.K1cx2c         0/479        0/479
159.P*2d           0/479        0/479
160.K2c-3d         0/479        0/479
161.G*3e           0/479        0/479
162.K3d-4c         0/479        0/479
163.B6bx5c+        0/479        0/479
164.K4c-3b         0/479        0/479
165.P2d-2c+        0/479        0/479
166.K3bx2c         0/479        0/479
167.G3e-2d         0/479        0/479
168.K2c-1b         0/479        0/479

Habu has played the moves up to now without any confidence, often thinking
until the last possible second of his one minute byoyomi to play his move.
Now there surely can not be mate with only two knights in hand. Habu is groping
in the dark...

169.B4dx1a+!       0/479        0/479

...and finally finds the light switch. I do not know what is more amazing:
that there was a 35-move mate in the position at all or that Habu played the
only possible mating variation without being able to calcualte it to the end.

170.K1bx1a         0/479        0/479
171.L*1c           0/479        0/479
172.B*1b           0/479        0/479

This is not a tsume problem, because if white would have had a knight in hand
there would have been no mate here. But if you don't have it, you don't have
it... 172.K2a is mate after P*2c.

173.+B5c-4d        0/479        0/479
174.K1a-2a         0/479        0/479

It all just works. After 174.S*2b N*2c K2a Lx1b+ also leads to mate.

175.L1cx1b+        0/479        0/479
176.K2ax1b         0/479        0/479
177.G2d-1c         0/479        0/479
Resigns            0/479        0/479
Time:              07:59:00     07:59:00

After 178.Kx1c B*2b K1b N*2d K2a N*1c white is mated with the last piece.
An amazing endgame where Habu needed more than magic to win: he needed a
miracle.
