47th Osho Match Game 4
Black: Sato, Challenger
White: Habu, Osho
47th Osho-sen, Game 4, February 9th and 10th 1998
1.P7g-7f 2/2 0/0
2.P3c-3d 0/2 2/2
3.P2g-2f 2/4 0/2
4.P4c-4d 0/4 2/4
5.P2f-2e 2/6 0/4
6.B2b-3c 0/6 2/6
7.S3i-4h 1/7 0/6
8.R8b-4b 0/7 4/10
9.P5g-5f 2/9 0/10
10.S7a-7b 0/9 5/15
11.K5i-6h 2/11 0/15
12.P9c-9d 0/11 3/18
13.K6h-7h 9/20 0/18
14.P9d-9e 0/20 3/21
15.G4i-5h 25/45 0/21
16.G4a-5b 0/45 12/33
17.P3g-3f 34/79 0/33
18.K5a-6b 0/79 18/51
19.B8h-6f 20/99 0/51
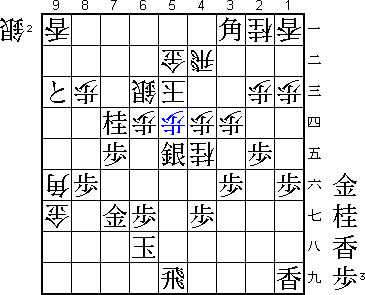
This opening was undoubtedly prepared by Sato. It is a new idea in the Fujii
system, which in itself was a new idea to build a strong attacking position
against the Ibisha Anaguma. Sato's idea is very interesting, but from this
game a conclusion about its strength is difficult.
20.S3a-3b 0/99 64/115
21.N2i-3g 28/127 0/115
22.S3b-4c 0/127 40/155
23.S7i-8h          27/154       0/155

An interesting knight sacrifice seems to be 23.N4e Px4e Bx3c+ Nx3c P2d Px2d
Rx2d and black can promote the rook to compensate for the knight loss. This
sacrifice seems to have been played before in a slightly different type of
position and is considered to be an overplay by black. Sato probably looked
only briefly at that possibility, because he has a different and much stronger
idea.

24.K6b-7a          0/154        64/219
25.G6i-6h          15/169       0/219
26.S4c-5d          0/169        12/231
27.N8i-7g          59/228       0/231
28.P6c-6d          0/228        3/234
29.P8g-8f?!        5/233        0/234
30.G5b-6c          0/233        38/272
31.B6f-5g?!        46/279       0/272

The last two moves by Sato are probably a bit too slow. Pulling back the bishop
makes this a target for a counterattack by the bishop. It would have been
better to play the game idea immediately.

32.R4b-2b          0/279        43/315
33.R2h-2i          6/285        0/315
34.P7c-7d          0/285        2/317
35.L9i-9h          8/293        0/317

Sato's new idea finally becomes clear. He want to play the rook to the 9th
file and attack where white has made preparations to attack.

36.N8a-7c!         0/293        3/320

A difficult move to play, because it further weakens the edge. Habu has judged
correctly that he can not defend the edge anyway and that he has to find a
counterattack to win this game. The bishop on 5g will be his target.

37.P9g-9f          6/299        0/320
38.N7c-6e          0/299        21/341

39.N7gx6e          7/306        0/341
40.S5dx6e          0/306        0/341
41.P9fx9e          5/311        0/341
42.S6ex5f          0/311        7/348
43.N*5e            6/317        0/348
44.S5fx5g+         0/317        14/362
45.N5ex6c=         7/324        0/362
46.S7bx6c          0/324        0/362
47.S4hx5g          0/324        0/362

An almost forced sequence of moves which leads to a very unclear position. This
game has turned into a great fight.

48.P7d-7e          0/324        2/364
49.S5g-6f          65/389       0/364
50.N*8d            0/389        15/379
51.S8h-8g          52/441       0/379
52.N8dx7f          0/441        0/379
53.P9e-9d          2/443        0/379
54.K7a-6b          0/443        27/406
55.P9d-9c+         1/444        0/406
56.N7fx6h+         0/444        24/430
57.G5hx6h          0/444        0/430
58.P*9g            0/444        0/430
59.L9hx9g          0/444        0/430
60.N*7f            0/444        0/430
61.S8gx7f          5/449        0/430
62.P7ex7f          0/449        0/430
63.R2i-5i          0/449        0/430
Shukan Shogi considers this a good move, aiming at G*7c Kx7c Rx5c+ and
bringing the rook into play. Igo Shogi weekly was much less sure about its
strength and suggested 63.N*5e immediately. Shukan Shogi thinks black is
better, even though his advantage is minimal.

64.G6a-5b          0/449        20/450
65.N*5e            8/457        0/450
66.P*9f            0/457        17/467
67.L9gx9f          5/462        0/467
68.G*9g            0/462        0/467
69.K7h-6i          5/467        0/467
70.B*7d            0/467        7/474
71.K6i-5h          12/479       0/474
72.B3c-1e          0/479        0/474
73.S*4h            0/479        0/474
74.P5c-5d          0/479        0/474

This sets white's counterattack in motion. White likes to play N*5f and nail
the king with two bishops. To avoid that, black has to play a defense-only
move. It now seems that Habu can win.

75.P1g-1f          0/479        0/474
76.B1ex3g+         0/479        1/475
77.S4hx3g          0/479        0/475
78.P5dx5e          0/479        0/475
79.P*7e            0/479        0/475
80.B7dx9f          0/479        0/475
81.N*7d            0/479        0/475
82.K6b-5c          0/479        1/476
83.B*3a            0/479        0/476
84.R2b-4b          0/479        0/476
85.S6fx5e          0/479        0/476
86.L*5f            0/479        0/476
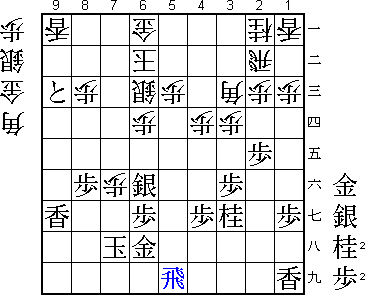
87.G6h-5g! 0/479 0/476
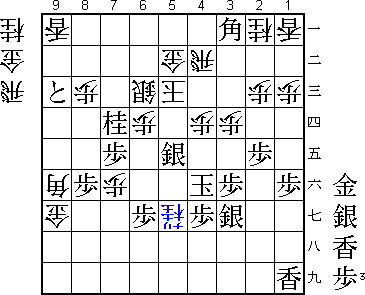
Sato Magic! In byoyomi he finds the only chance to win. The natural 87.P*5g
would lose after 88.P7g+ Gx7g N*4e S3g-4f Nx5g+ Sx5g Lx5g+ Kx5g N*4e K6h
P*5d (diagram).
In this position white is still not threatening mate, but surprisingly
black has no continuation. If black tries to break through he has
to give up the silver on 5e and/or the knight on 7d and that is enough
for white to have a mate. Therefore, black is forced to retreat the
silver on 5e and then white is completely safe and win by for example
S*4h or G8g.
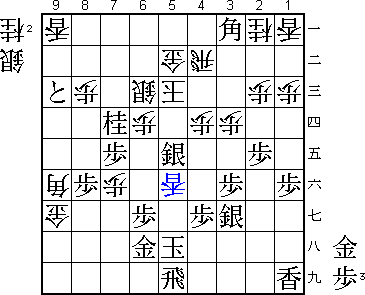
88.N*4e? 0/479 3/479
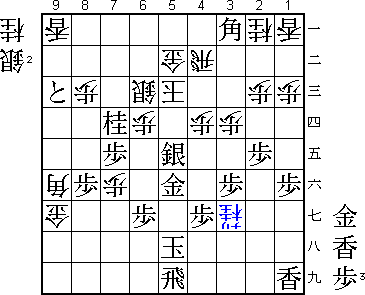
Habu uses his final minutes to find the win, but does not find it. He should
have played 88.Lx5g+ Kx5g N*4e K4f S*5g Rx5g Nx5g+ (diagram) and black can
not take this knight because of R*5i followed by N*4e.
Habu was afraid he could be mated in this position, but because of the bishop
on 9f, which is also working in defense, there is no mate.

89.G5gx5f          0/479        0/479
90.N4ex3g+         0/479        0/479
91.S5ex4d??        0/479        0/479

A blunder that throws away the game. Sato has seen that he can make a hisshi,
but he had no time to calculate that this extra silver gives white a mate.
The winning move is 91.G4e! Of course 92.Px4e is mate in one after G*4d.
White can play 92.Sx7d to make an escape for the king, but even with the
extra knight white has no mate. This means black can just take back with
93.Px7d. Then there is well-hidden win after 94.Bx7d Sx6d Kx6d Bx4b+ Gx4b
R*5d K7e S*6f (diagram).
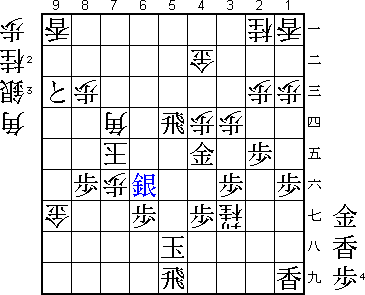
There is no mate here, but black wins the bishop which kills
white's mating threat and leaves the white king without defense.

92.K5cx4d          0/479        0/479
93.L*4e            0/479        0/479
94.K4d-3c          0/479        0/479
95.L4ex4b+         0/479        0/479
96.S*6i            0/479        0/479
97.K5h-5g          0/479        0/479

Unfortunately for black, 97.Rx6i Bx6i+ Kx6i R*4i B*5i S*5h Kx5h Rx4g+ also
leads to mate.

98.S*4h            0/479        0/479
Resigns            0/479        0/479
Time:              07:59:00     07:59:00

A very close game that could have gone either way. Usually it is impossible
to read from Sato's face whether he has lost or won the game he just finished,
but this time his disappointment was clear. Habu now takes a comfortable
3-1 lead in the match, which is almost decisive.