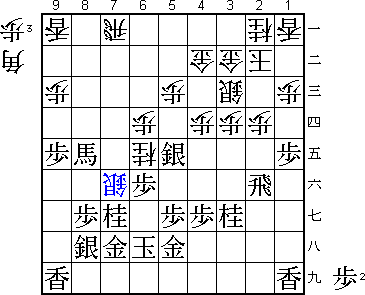
47th Osho Match Game 3
Black: Habu Yoshiharu, Osho
White: Sato Yasumitsu, Challenger
47th Osho-sen, Game 3, January 29th and 30th 1998
1.P2g-2f           1/1          0/0
2.P8c-8d           0/1          1/1
3.P7g-7f           1/2          0/1
4.G4a-3b           0/2          6/7
5.G6i-7h           2/4          0/7
6.P8d-8e           0/4          0/7
7.B8h-7g           1/5          0/7
8.P3c-3d           0/5          0/7
9.S7i-8h           1/6          0/7
10.B2bx7g+         0/6          2/9
11.S8hx7g          0/6          0/9

The trend in recent title matches is to play a different opening every game.
This has become popular after Tanigawa expressed his wish to do so in every
title game match he plays. After a Yagura and a Yodofuribisha, this time the
players select the Kakugawari (Bishop Exchange).

12.S3a-4b          0/6          0/9
13.S3i-3h          2/8          0/9
14.S7a-7b          0/8          2/11
15.P1g-1f          1/9          0/11
16.S4b-3c          0/9          16/27
17.P9g-9f          30/39        0/27
18.S7b-8c          0/39         72/99
19.P3g-3f          74/113       0/99
20.S8c-8d          0/113        0/99
21.S3h-3g          0/113        0/99
22.P7c-7d          0/113        11/110

I think this was prepared by Sato. Even though it is not an unusual move in
this type of position, it seems a little quick. If this was indeed preparation,
one wonders why he spent 72 minutes to play 18.S8c.

23.P2f-2e          4/117        0/110
24.P4c-4d          0/117        6/116

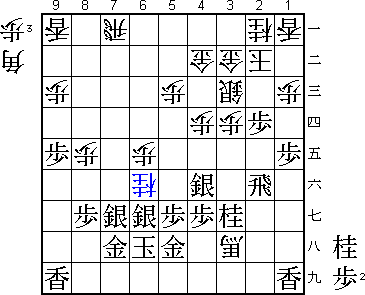
A necessary preparation. White can not attack immediately with 24.P7e, since
after Px7e Sx7e P2d he is in big trouble after both Sx2d B*5e and Px2d P*2e
Px2e Rx2e.

25.S3g-4f          73/190       0/116
26.P7d-7e          0/190        15/131
27.P6g-6f          2/192        0/131
28.K5a-4a          0/192        47/178

Played after long thought. Sato: "A frightening move".

29.G4i-5h?!        20/212       0/178

Habu regretted this natural defense move after the game: "I should have opened
the position much quicker". He refers to the attack after 29.P3e. Shukan Shogi
gives the wild variation 30.Px7f Px3d Px7g+ Px3c+ Px7h+ +Px3b Rx3b Rx7h S*6g
P*3c Rx3c P*3d R3b R2h R7b and because of the threat R7i+ it seems like white
has a good position. Still, Habu was quite upset with himself about missing
this chance.

30.K4a-3a          0/212        11/189
31.K5i-6h          1/213        0/189
32.G6a-5b          0/213        8/197
33.P9f-9e          31/244       0/197
34.G5b-4c          0/244        23/220
35.P1f-1e          15/259       0/220
36.K3a-2b          0/259        2/222
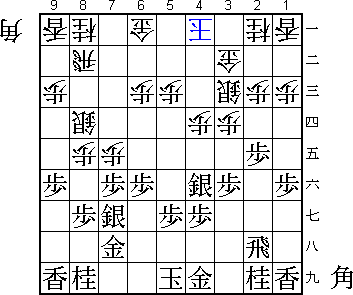
37.B*6a?!          10/269       0/222

This is an probably overplay, but it was very hard to see that in advance.

38.B*5d!           0/269        43/265

Good move. If white does not play this drop, black has a very strong attack
after P3e Px3e Sx3e P*3d P2d. For example Px3e Px2c+ Gx2c Bx4c+ and black wins.
The bishop on 5d covers the gold and thus makes this last variation impossible.

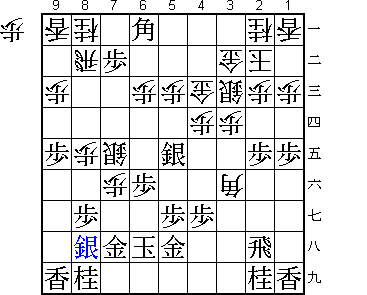
39.P7fx7e?         45/314       0/265

Yashiki commented the game in the program Igo-Shogi Weekly and he was very
clear: "This was bad". Of course hindsight is cruel and it was very hard to
see the great defense Sato pulls out of the hat. Also, the alternative was
very complicated with a lot of side variations. Still, Habu should have played
39.P6e. Then 40.Bx6e S6f R6b (kills the bishop and looks very strong) Sx6e
Rx6a B*7b R7a Bx6c+ Px7f +B6b R7e P*6f S7c +B6c is good for black.

40.S8dx7e          0/314        2/267
41.S4f-5e          0/314        0/267
42.B5dx3f          0/314        10/277
43.P*7b            2/316        0/277
44.P*7f            0/316        36/313
45.S7g-8h          0/316        0/313

So, what to do about the pawn that is going to promote on 7a?

46.G4c-4b!         0/316        1/314

Great move to contain the black bishop and promoted pawn. This takes away
5b from the bishop.

47.P7b-7a+         5/321        0/314
48.P6c-6d!         0/321        1/315

A great one-two combination by Sato. Black can not take the knight on 8a,
because of 50.Rx8a N*7c R8b and the knight and bishop can not be developed and
are in serious danger of getting lost. P6d is not only good for this reason,
it also gives white an attack on the weak head of the king after P6e.

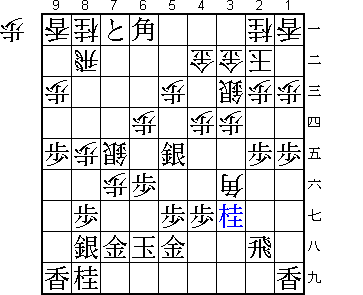
49.N2i-3g?         30/351       0/315

The losing move. Habu last chance was 49.P9d. Then after 50.Px9d Lx9d Lx9d
+Px8a R8d P3e Px3e N*3d Sx3d Bx3d+ L*3c +B5f L9h+ Sx4d black still has
fighting chances. Habu: "I had no confidence in that variation". Instead, he
decides to pull his pieces back and wait for another chance.

50.N8a-7c          0/351        11/326
51.P2e-2d          24/375       0/326
52.P2cx2d          0/375        1/327
53.R2h-2f          4/379        0/327
54.B3f-6c          0/379        4/331
55.+P7a-7b         6/385        0/331
56.B6cx7b          0/385        3/334
57.B6ax7b+         0/385        0/334
58.R8bx7b          0/385        0/334
59.B*6c            0/385        0/334
60.R7b-7a          0/385        6/340
61.B6c-7d+         0/385        0/340
62.N7c-6e          0/385        52/392
63.+B7dx8e         0/385        0/392
64.P7f-7g+         0/385        1/393
65.N8ix7g          0/385        0/393
66.S7e-7f!         0/385        0/393

It seems like white is not doing that badly, but this is the deciding move.
White gives up two pieces for one, but black has to drop the silver back in
defense and the bishop can be dropped at the good square 4i.

67.P6fx6e          1/386        0/393
68.S7fx8e          0/386        0/393
69.N7gx8e          0/386        0/393
70.B*4i            0/386        23/416
71.S*6g            13/399       0/416
72.B4i-3h+         0/399        2/418
73.S5e-4f          0/399        0/418
74.P6dx6e          0/399        4/422
75.S8h-7g          0/399        0/422
76.P*8d            0/399        8/430
77.P*2e            0/399        0/430
78.P8dx8e          0/399        1/431
79.P2ex2d          0/399        0/431
80.N*6f            0/399        3/434
Resigns            4/403        0/434
Time:              06:43:00     07:14:00

A little early to resign, especially since Habu's position seems to be hard
to break down. However, he took four minutes to calculate that he could not
escape from his castle collapsing. For example 81.N*2c Nx5h+ Sx5h +B4h Nx1a+
B*5i K7i Bx7g+ and hisshi.

A good win for Sato, which should give him confidence for the next game. He is
black in game four and has to win to avoid going down two with three to play.
