47th Osho Match Game 2
Black: Sato Yasumitsu, Challenger
White: Habu Yoshiharu, Osho
47th Osho-sen, Game 2, January 19th and 20th 1998
1.P7g-7f           3/3          0/0
2.P8c-8d           0/3          4/4
3.S7i-6h           0/3          0/4
4.P3c-3d           0/3          3/7
5.P6g-6f           15/18        0/7
6.S7a-6b           0/18         3/10
7.P5g-5f           0/18         0/10
8.P6c-6d           0/18         2/12
9.G6i-7h           29/47        0/12
10.S6b-6c          0/47         7/19
11.S3i-4h          0/47         0/19
12.S3a-4b          0/47         5/24
13.G4i-5h          2/49         0/24
14.P4c-4d          0/49         19/43
15.K5i-6i          5/54         0/43
16.S4b-4c          0/54         0/43
17.P2g-2f          13/67        0/43
18.P7c-7d          0/67         12/55
19.G5h-6g          27/94        0/55
20.B2b-3c          0/94         50/105
21.P3g-3f          18/112       0/105
22.N8a-7c          0/112        5/110
23.P2f-2e          23/135       0/110
24.R8b-4b          0/135        76/186

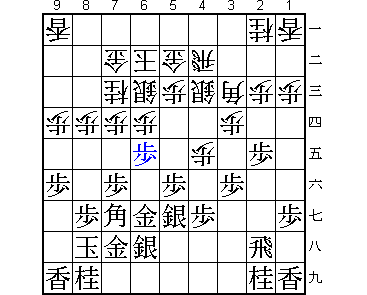
The Yodofuribisha opening. These same players also played this strategy in
the second game of the 8th Ryu-O tournament, but then Sato was the white
player who chose to avoid the Yagura opening. Playing the rook to the fourth
file is not very common. Most Yodofuribisha games have the rook on 2b or 3b.

25.K6i-7i          20/155       0/186
26.P9c-9d          0/155        7/193
27.P9g-9f          4/159        0/193
28.K5a-6b          0/159        0/193
29.S4h-5g          18/177       0/193
30.G4a-5b          0/177        22/215
31.B8h-7g          11/188       0/215
32.G6a-7b          0/188        6/221

To complete the normal ranging rook position, white can play the silver back
to 7b and play the king into the Mino after that by K7a-K8b, followed by
G5b-6c. However, because this takes a lot of moves, this gives black the
option of playing the strong Anaguma castle with L9h-K9i-S7i-S8h. Habu's
formation is a preparation for a quick attack if black chooses the anaguma.

33.K7i-8h          11/199       0/221
34.P4d-4e          0/199        25/246
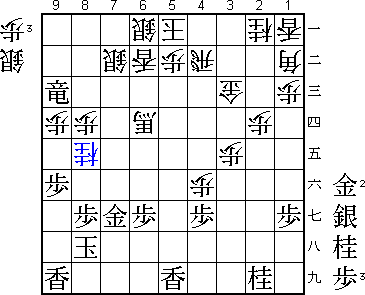
35.P6f-6e?!        70/269       0/246

The sealed move and a critical point in the game. Because white has especially
prepared for a counter attack against the anaguma, Sato chooses attack instead
of defense. Habu himself had not much confidence in his own quick attack after
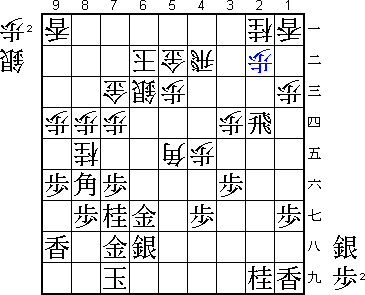
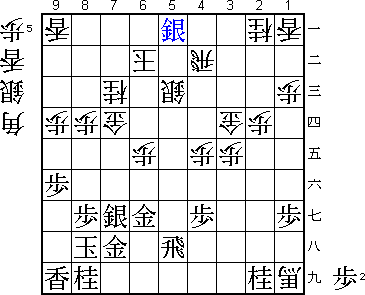
35.L9h N8e B8f P6e K7i Px6f Sx6f G7c N7g S4c-5d P2d Px2d P5e Sx5e Sx5e Bx5e
Rx2d P*2b (diagram below).

White's position seems to have a lot of holes and there
is no clear attack. Also better would have been 35.N3g S4d P1f K7a L9h K8b K9i
P5d S7i P5e, but Sato did not like the easy edge attack that white has either.
Sato took more than an hour to make up his mind, but unfortunately he
underestimated a Habu defense move.

36.S4c-4d          0/269        10/256
37.P6ex6d          29/298       0/256
38.S6cx6d          0/298        0/256
39.P2e-2d          1/299        0/256
40.P2cx2d          0/299        19/275
41.P3f-3e          9/308        0/275
42.G5b-4c!         0/308        16/291

The only move. After 42.Sx3e Bx3c+ Nx3c B*7g G4c P*3f Sx3f Rx2d P*2b P*3e
black has a small advantage. Playing the gold to a bad shape position and
leaving the king vulnerable is not a move one plays easily.

43.P3ex3d          19/327       0/291
44.G4cx3d          0/327        0/291
45.B7g-8f          3/330        0/291
46.S6d-6e          0/330        14/305
47.S5g-6f          25/355       0/305
48.S6e-5d          0/355        0/305
49.R2h-3h          3/358        0/305
50.P*3e            0/358        0/305
51.P7f-7e          19/377       0/305

51.P5e also looks good.

52.P*6e            0/377        35/340
53.S6f-5e          2/379        0/340
54.S4dx5e          0/379        2/342
55.P5fx5e          0/379        0/342
56.B3cx5e          0/379        2/344
57.S6h-7g          5/384        0/344
58.P7dx7e          0/384        22/366
59.R3h-5h          21/405       0/366
60.B5ex1i+         0/405        6/372
61.B8fx7e          10/415       0/372
62.S*6d            0/415        9/381
63.P*5e            3/418        0/381
64.S5dx5e          0/418        4/385
65.B7ex6d          7/425        0/385
66.S5ex6d          0/425        0/385
67.P*5d            1/426        0/385
68.G7b-6c!         0/426        40/425

Up until this point, most of the commentators in the press room thought that
Sato's attack was a good one and would win the game. After another good defense
move by Habu the mood changes in Habu's favour. Sato's attack seems not
good enough.

69.S*7d!           5/431        0/425

Only chance to win the game.

70.G6cx7d          0/431        15/440
71.P5dx5c+         2/433        0/440
72.S6dx5c          0/433        0/440
73.S*5a?           4/437        0/440

After this, Habu manages to kill blacks attack and cash in his material
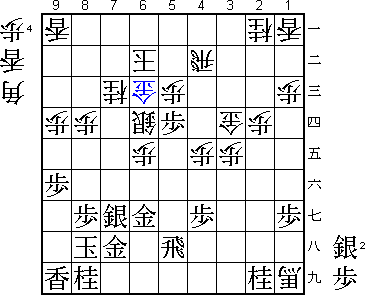
advantage. Best move would have been 73.P*5d and then:
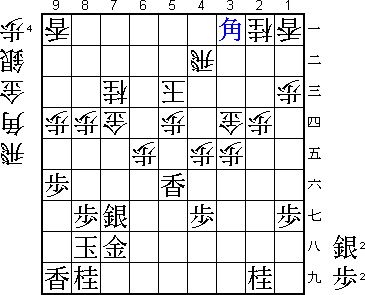
1) 74.L*5e Rx5e +Bx5e Px5c+ Kx5c L*5i P*5f Gx5f +Bx5f Lx5f P*5d B*3a
(diagram) which is also frightening for white.

2) 74.P*5e S*5a Kx5a Px5c+ which is much better than the game.
In the first variation white also has moves like S*6i which seems to be
threatening mate, but it is not completely clear who has the strongest attack.

74.K6bx5a          0/437        2/442
75.R5hx5c+         0/437        0/442
76.P*5b            0/437        0/442
77.+R5c-2c         12/449       0/442
78.B*1b!           0/449        3/445

The start of a sequence of defensive moves that leaves Sato without moves.

79.+R2c-6c         0/449        0/445
80.+B1i-6d         0/449        0/445
81.+R6c-7b         6/455        0/445
82.S*6a            0/455        5/450
83.+R7b-8a         0/455        0/450
84.S*7b            0/455        2/452
85.+R8a-7a         0/455        0/452
86.L*6b!           0/455        2/454

Memorable words by the great Oyama: "Defensive pieces are beautiful". Habu
has played this game in Oyama-style and can now counter from a completely
safe position.

87.+R7ax9a         1/456        0/454
88.P*7f            0/456        4/458
89.S7g-6h          4/460        0/458
90.P6e-6f          0/460        7/465
91.G6gx6f          1/461        0/465
92.G7d-6e          0/461        0/465
93.G6fx6e          5/466        0/465
94.N7cx6e          0/466        0/465
95.+R9a-9c         0/466        0/465
96.G3d-3c!         0/466        2/467

Now the bishop on 1b also comes back into play, which ends the game.

97.L*5i            7/473        0/467
98.P4e-4f          0/473        0/467
99.P*6g            0/473        0/467
100.G*7g           0/473        3/470
101.N8ix7g         0/473        0/470
102.P7fx7g+        0/473        0/470
103.S6hx7g         0/473        0/470
104.N6ex7g+        0/473        0/470
105.G7hx7g         0/473        0/470
106.N*8e           0/473        0/470
Resigns            0/473        0/470
Time:              07:53:00     07:50:00

The game is over after the forced sequence 107.G7h S*7g Gx7g Nx7g+ Kx7g P*7f
K8h Bx6g+. Habu is famous for his endgame attacks, but in this game he showed
that his defensive skills are also among the best.
