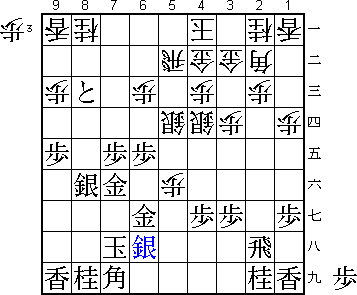
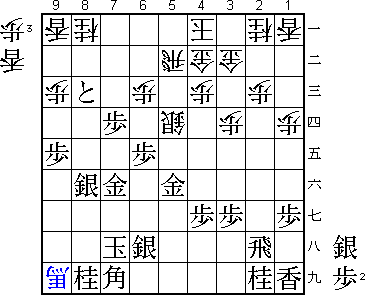
47th Osho Match Game 1
Black: Habu Yoshiharu, Osho
White: Sato Yasumitsu, Challenger
47th Osho-sen, Game 1, January 8th and 9th 1998
1.P7g-7f           0/0          0/0
2.P8c-8d           0/0          7/7
3.S7i-6h           1/1          0/7
4.P3c-3d           0/1          1/8
5.P6g-6f           1/2          0/8
6.S7a-6b           0/2          1/9
7.P5g-5f           2/4          0/9
8.P5c-5d           0/4          4/13
9.S3i-4h           2/6          0/13
10.S3a-4b          0/6          5/18

Both players are experts in the Yagura, especially Sato who has written a
number of very good books on this extremely complicated strategy. This double
Yagura was therefore expected. However, white's results have not been good
recently and it was interesting to see what Sato would play.

11.G4i-5h          7/13         0/18
12.G4a-3b          0/13         3/21
13.G6i-7h          4/17         0/21
14.K5a-4a          0/17         2/23
15.K5i-6i          2/19         0/23
16.P7c-7d          0/19         2/25
17.G5h-6g          8/27         0/25
18.S6b-5c          0/27         61/86
19.P2g-2f          31/58        0/86
20.P8d-8e          0/58         3/89
21.S6h-7g          7/65         0/89
22.S5c-6d          0/65         5/94

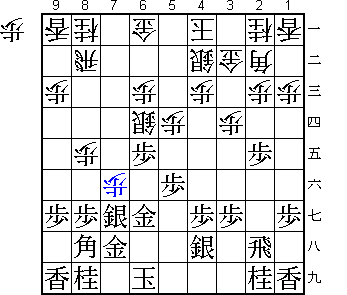
This quick attacking strategy must have surprised Habu. It is not really Sato's
style to attack this early. At professional level, it is a major gamble to
attack without the king being safe. Sato: "With white I thought I had
to go for it". We are still before lunch on the first day of a two day game.
Having already such a complicated position is very rare.

23.P2f-2e          77/142       0/94
24.P7d-7e          0/142        53/147
25.P6f-6e          25/167       0/147
26.P7ex7f          0/167        7/154

27.G6gx7f          1/168        0/154

Habu took only one minute for this move, but it took Sato completely by
surprise. "I had only thought about 27.Sx7f and 27.Px6d". Usually it is not
a good place for the gold to be on 7f, but Habu is aiming at putting pressure
on the left side of the position.

28.S6d-5c          0/168        11/165
29.B8h-7i          20/188       0/165
30.R8b-7b          0/188        70/235
31.P*7e            40/228       0/235
32.S5c-4d          0/228        4/239
33.S4h-5g          38/266       0/239
34.P5d-5e          0/266        10/249
35.P5fx5e          0/266        0/249
36.S4dx5e          0/266        0/249
37.P*5f            1/267        0/249
38.S5e-4d          0/267        0/249
39.P2e-2d          23/290       0/249
40.P2cx2d          0/290        2/251
41.R2hx2d          0/290        0/251
42.P*2c            0/290        0/251
43.R2d-2h          0/290        0/251
44.S4b-5c          0/290        10/261
45.G7h-6g          1/291        0/261
46.S5c-5d          0/291        17/278
47.K6i-7h          3/294        0/278
48.P1c-1d          0/294        15/293
49.P9g-9f          1/295        0/293

50.G6a-5a?         0/295        15/308

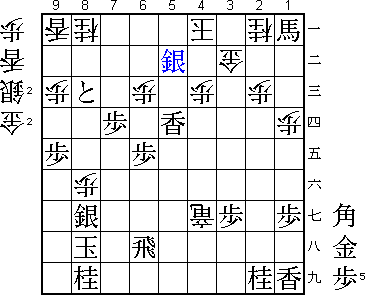
Not good. Sato was worried about P4f followed by P3f and decided to improve
the position of his king instead of answering the edge pawn. Habu never pushes
the pawns on 3g and 3f though... 50.P9d was necessary to keep in the game.

51.P9f-9e         16/311       0/308
52.G5a-4b          0/311        2/310
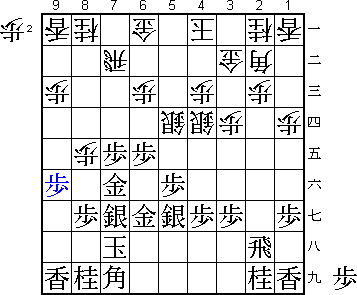
53.P8g-8f!         7/318        0/310

Great move that was overlooked by Sato and probably by everybody else except
Habu. Pushing the pawn in front of the king is usually the last thing one
wants to do, but Habu judges that white's pieces have all gone to the right
side of the board, while his pieces are all on the left side. There he wants
to attack. Habu's strategic brilliance is clear from this game.

54.P8ex8f          0/318        9/319
55.S7gx8f          0/318        0/319
56.R7b-5b          0/318        41/360
57.P*8d            37/355       0/360
58.P*5e            0/355        13/373
59.P8d-8c+         5/360        0/373
60.P5ex5f          0/360        0/373
61.S5g-6h          0/360        0/373

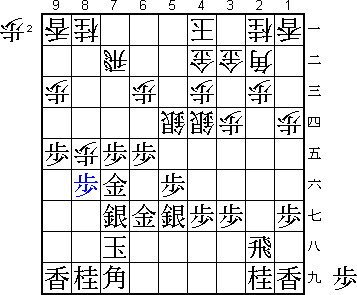
62.S4d-5e?!        0/360        8/381

Better 62.S4d-4e to open the bishop diagonal. Then if 63.S6h-7g S5e K8g then
P5g+ Gx5g B1c is bad for black. However, after 63.S8f-7g S5e P7d P*7e Gx7e
P5g+ Gx5g S4e-5f P7c+ Habu still seems to be winning.

63.P7e-7d          10/370       0/381
64.P5f-5g+         0/370        47/428

No choice. If white defends with 64.P*7b to aim for the same position as in
the comments above, black plays 65.S7e S5e G6g-7g which is much better for
black. It is interesting that in this game control of the board is more
important than the position of the king. Habu's king is obviously not in the
perfect castle shape, but because he controls the left side of the board,
Sato has no chance to attack. Habu's comments: "This Shogi looks like Go,
doesn't it".

65.G6gx5g          22/392       0/428
66.S5e-5f          0/392        0/428
67.G5gx5f          1/393        0/428
68.B2bx9i+         0/393        0/428

69.S*8h!           2/395        0/428

Subtle move that decides the game. If black plays 69.+B8h immediately, white
has still chances after 70.+Bx8h Kx8h, which leaves all the black generals
undefended or 70.+Bx8i Kx8i L*8g which is also nasty.

70.+B9i-9h         0/395        2/430
71.S8h-8g          2/397        0/430
72.+B9h-9i         0/397        0/430
73.B7i-8h          0/397        0/430
74.+B9ix8h         0/397        18/448
75.K7hx8h          0/397        0/448

The difference with the bishop exchange in the variation before is clear. All
generals are now defended and white has no attack. Comment in the press room:
"Perhaps 30% of the professionals would have resigned here". Sato decides
to try it a little longer, but I do not think Habu has lost a winning endgame
position since he was three years old.

76.L*2f            0/397        0/448
77.P*2g            6/403        0/448
78.S5d-4e          0/403        4/452
79.G5fx4e          10/413       0/452
80.L2fx2g+         0/413        0/452
81.R2hx2g          1/414        0/452
82.R5b-5h+         0/414        0/452
83.B*7g            1/415        0/452
84.P*8e            0/415        5/457
85.S8f-7e          2/417        0/457
86.P*5f            0/417        6/463
87.L*5i            10/427       0/463
88.+R5hx4g         0/427        1/464
89.G4ex3d          9/436        0/464
90.B*4e            0/436        3/467
91.R2g-2h          1/437        0/467
92.B4ex3d          0/437        0/467
93.B7gx1a+         6/443        0/467
94.P5f-5g+         0/443        0/467
95.L5ix5g          9/452        0/467
96.P*5f            0/452        0/467
97.L*3f            0/452        0/467
98.P5fx5g+         0/452        0/467
99.L3fx3d          0/452        0/467
100.+P5gx6h        0/452        0/467
101.L3dx3b+        0/452        0/467
102.G4bx3b         0/452        0/467
103.R2hx6h         0/452        0/467
104.L*8f           0/452        0/467
105.S7ex8f         0/452        0/467
106.P8ex8f         0/452        0/467
107.G7fx8f         0/452        0/467
108.P*8e           0/452        0/467
109.L*5d           0/452        0/467
110.P8ex8f         0/452        0/467
111.S*5b           0/452        0/467
Resigns            0/452        0/467
Time:              07:32:00     07:47:00

A surprisingly one-sided game between these two. Still, nothing's lost, since
Sato will have black in game two. That game he has to win.
